Cisco ISE TACACS Configurations (Fortigate, F5, Juniper, etc)
Here’s the configuration setup for using Cisco ISE as the TACACS+ server across multiple devices:
Cisco IOS
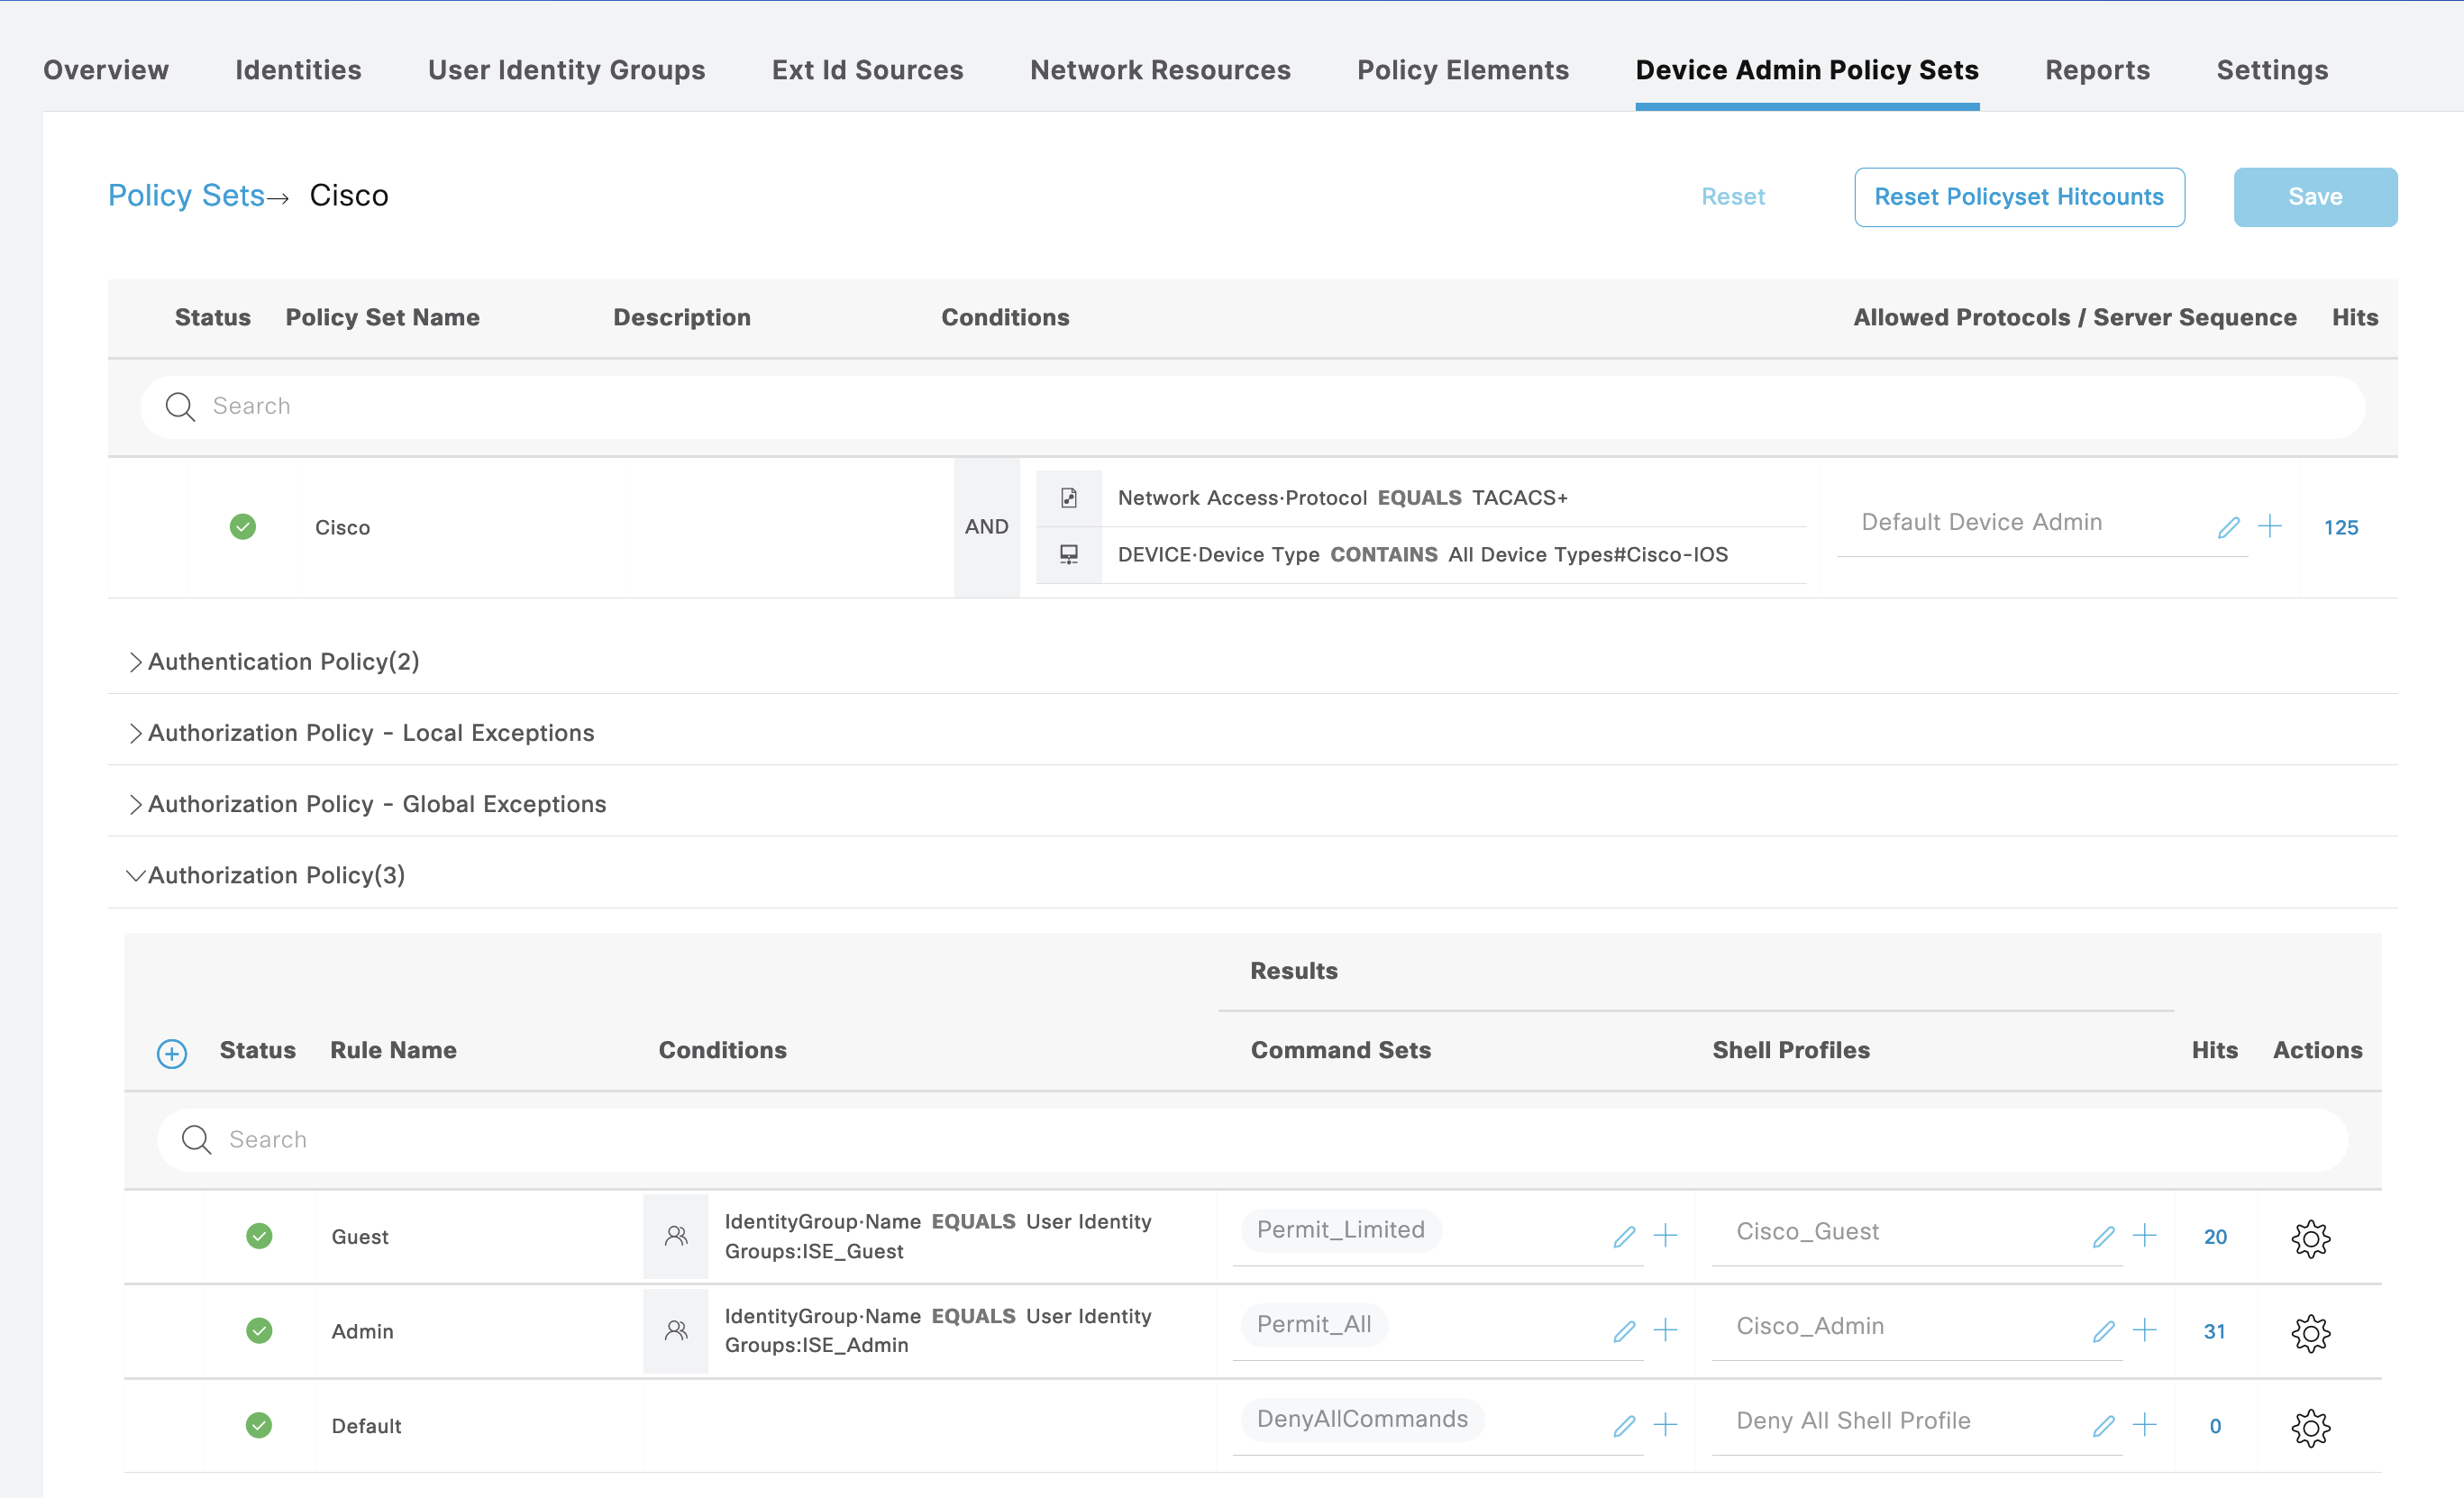
First on Work Centers » Device Administration » Device Admin Policy Set, create a policy set for Cisco IOS Devices, with 2 types of Authorization, Admin and Guest
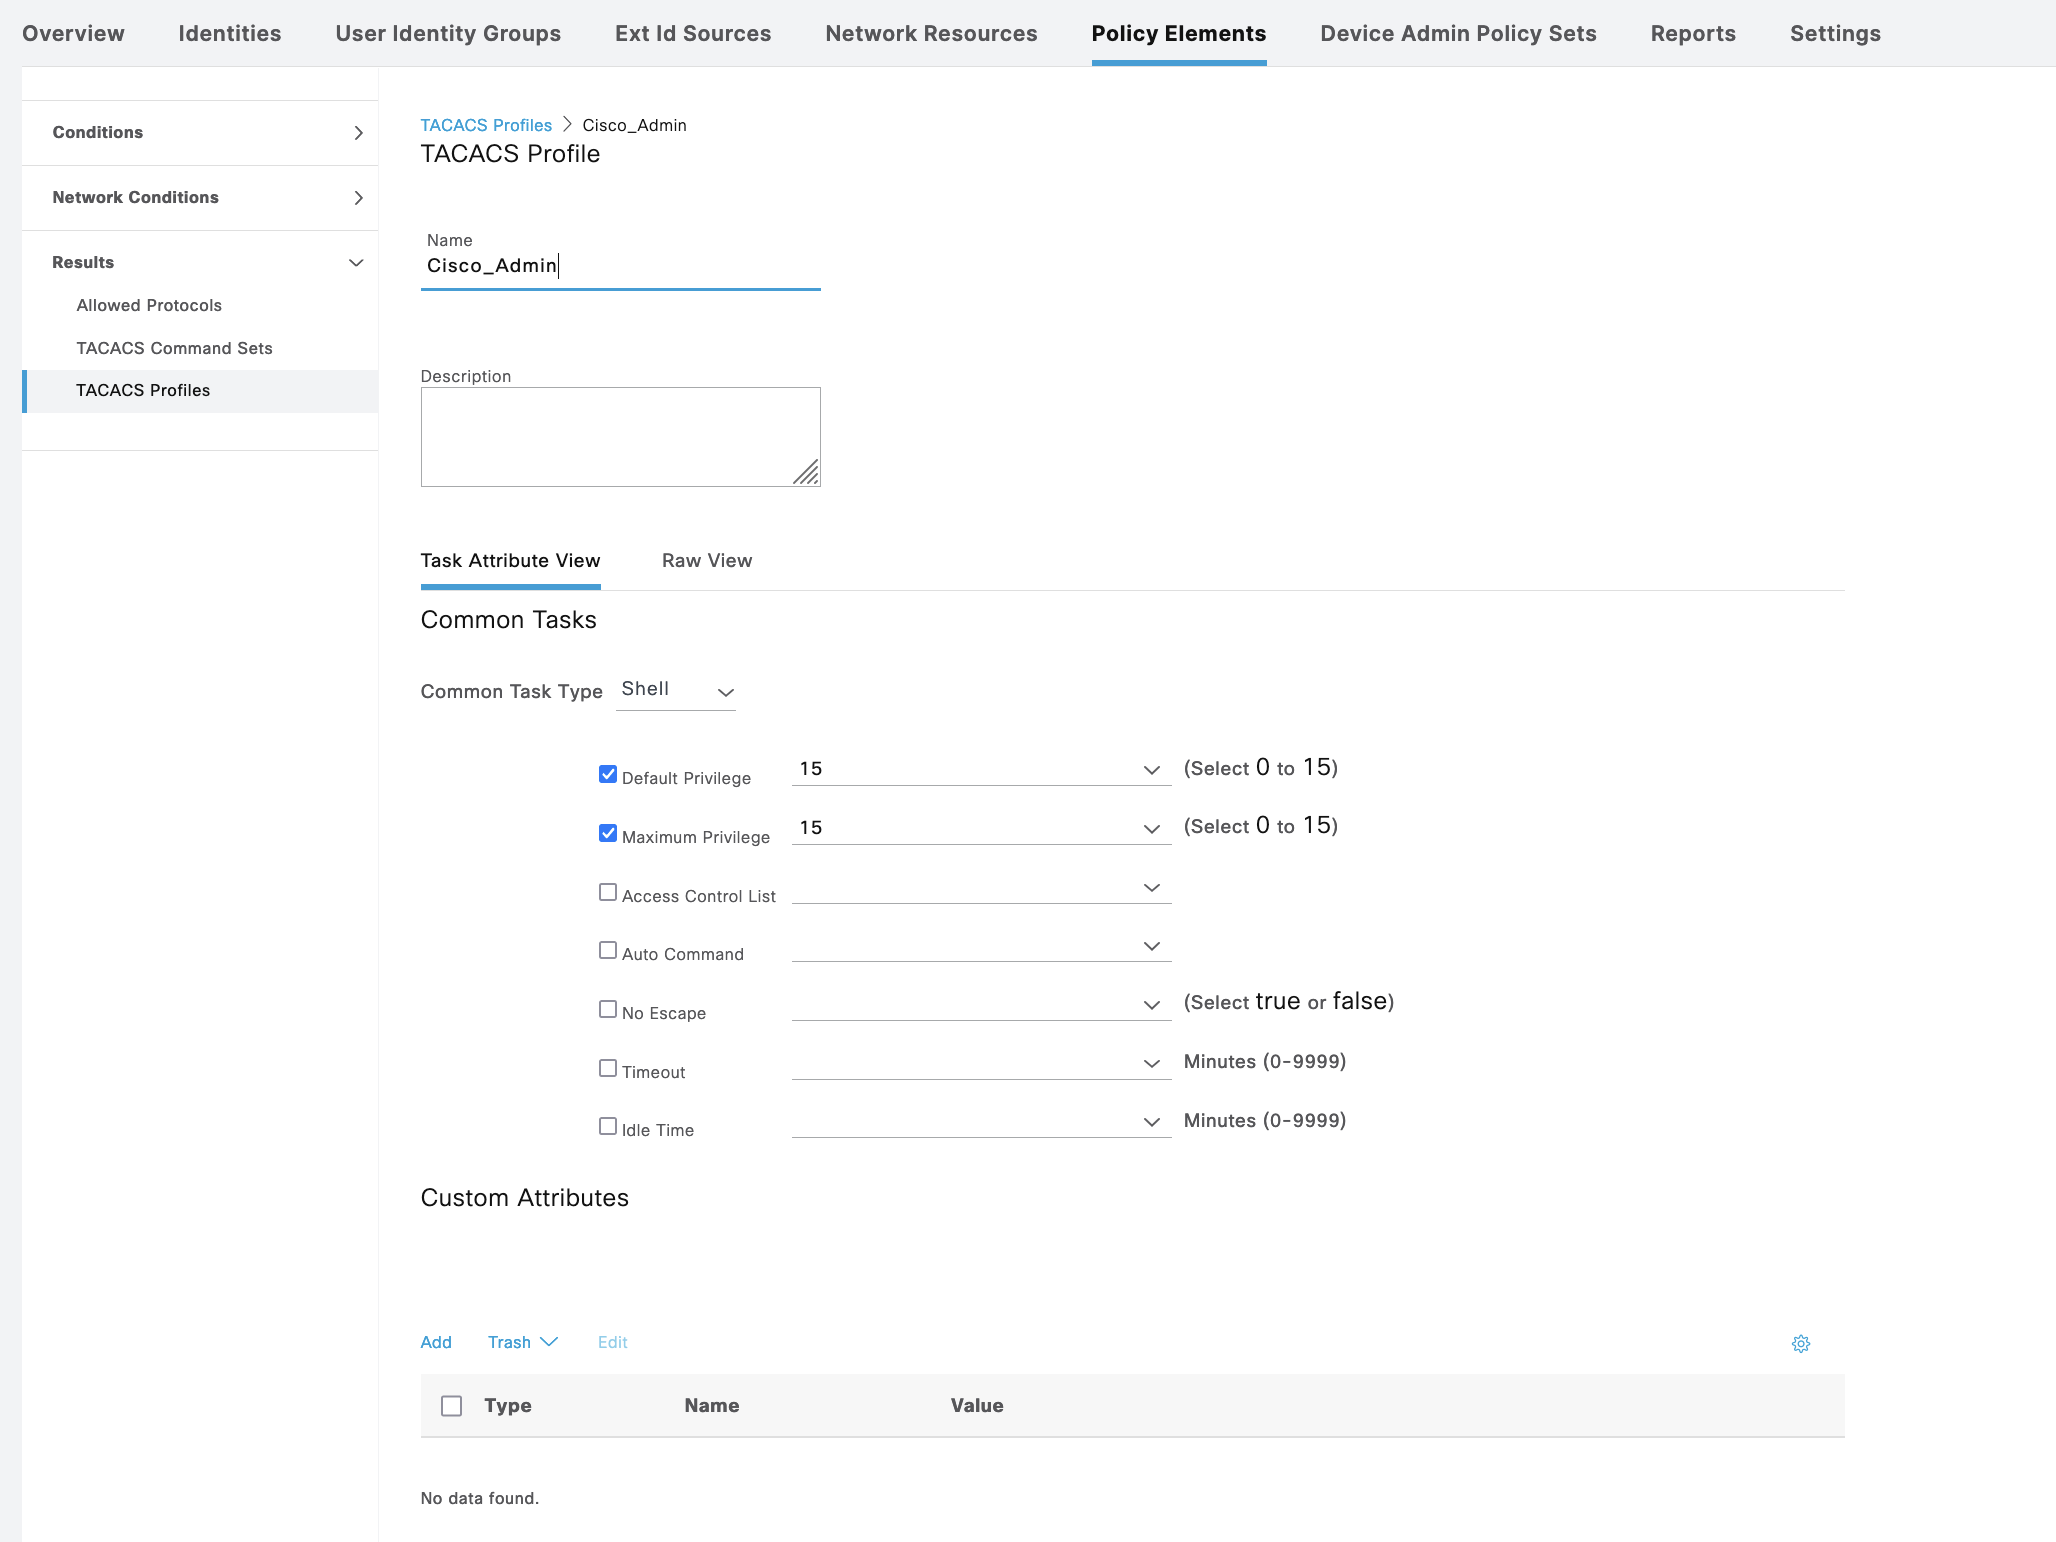
On Policy Elements » TACACS Profile, create 2 profiles for Admin and Guest

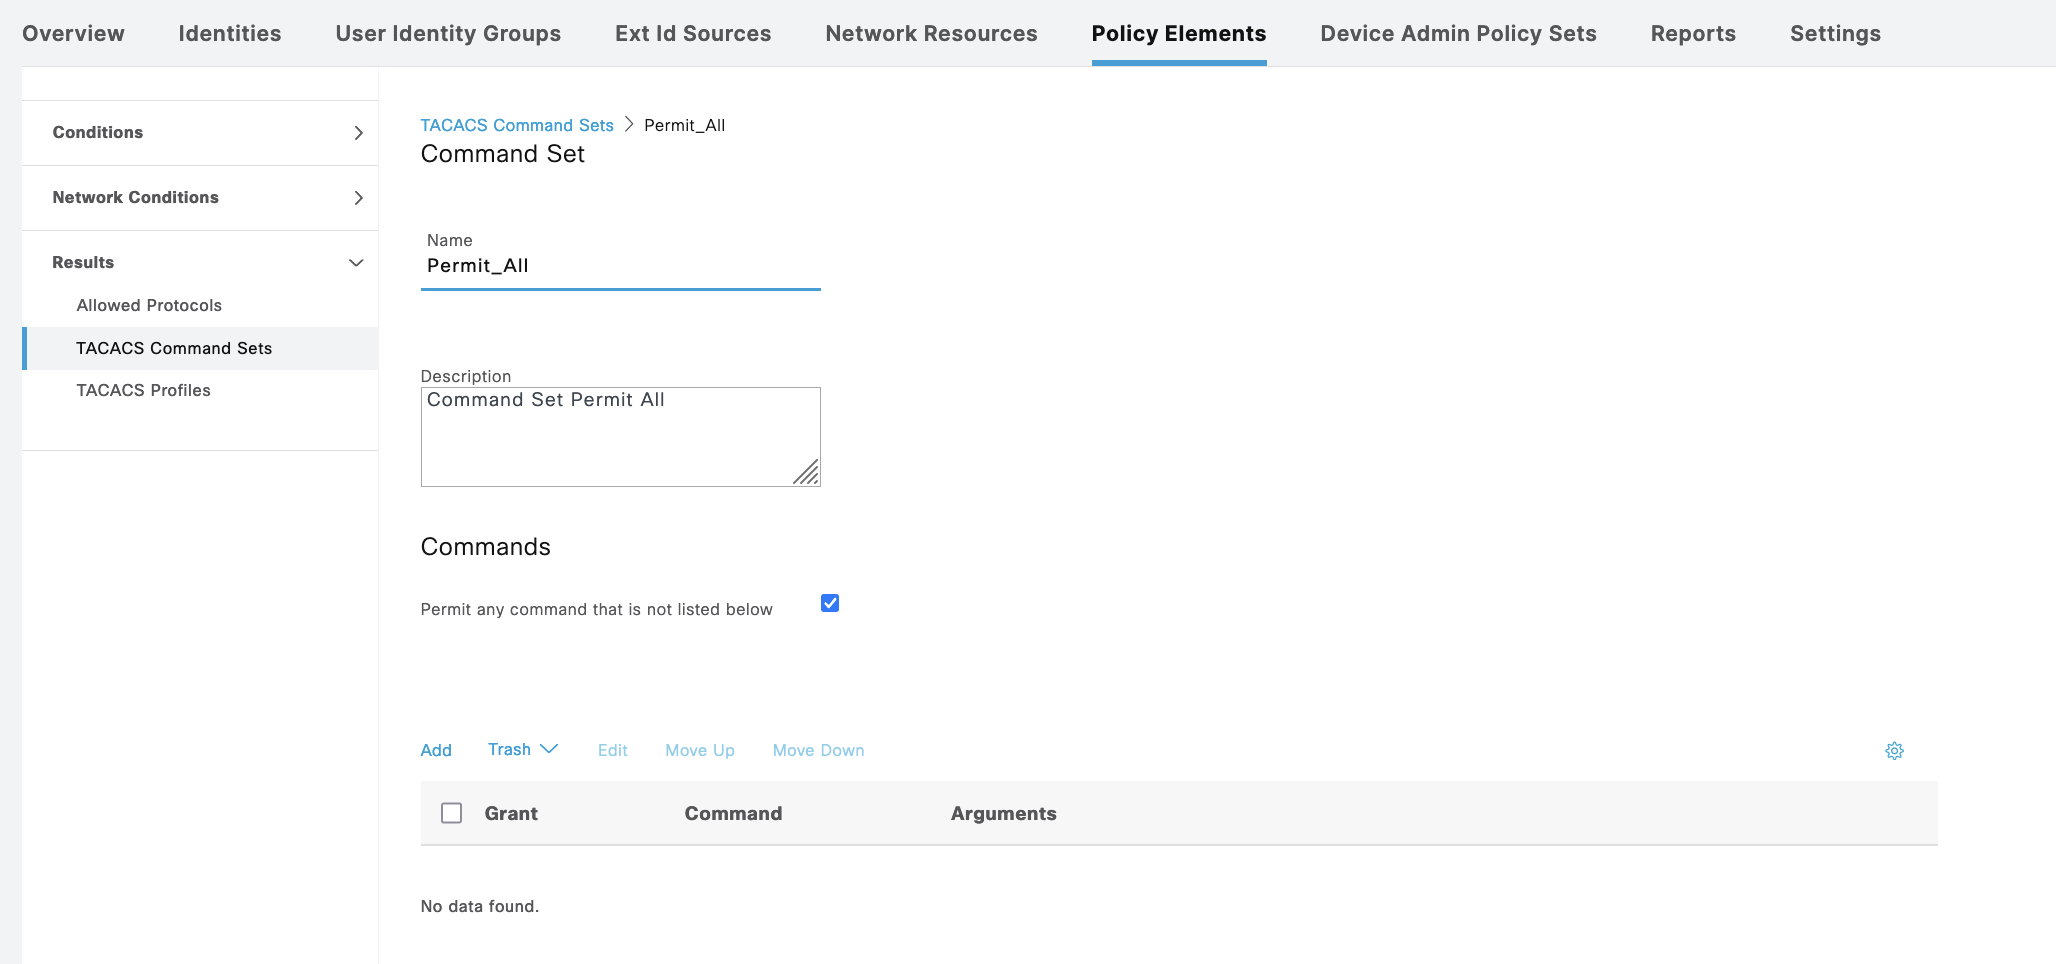
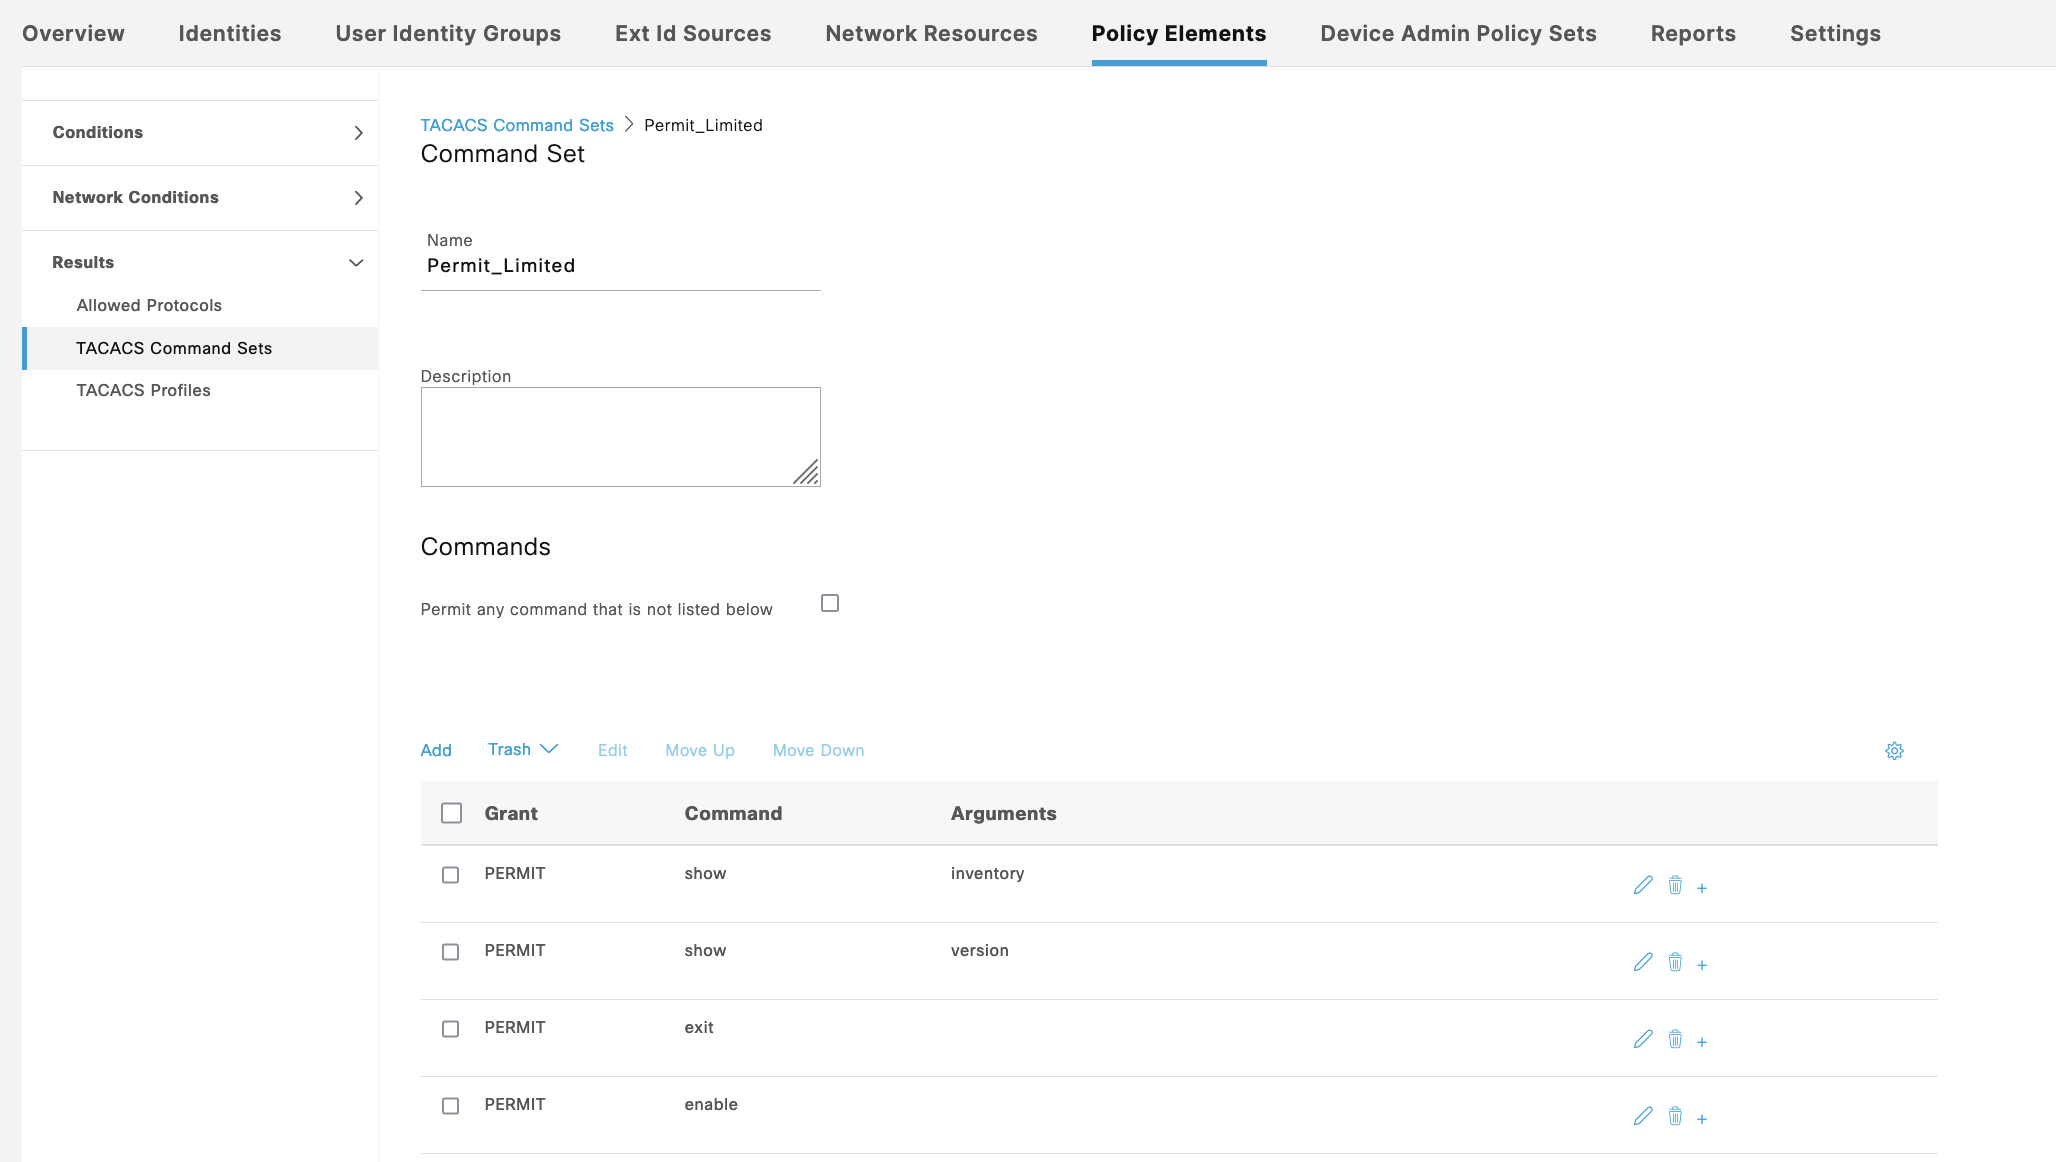
Then create Command Sets for Admin to permit all commands and Guest with limited set of allowed command
Next configure TACACS on the Cisco IOS device
1
2
3
4
5
6
7
8
9
10
11
12
13
14
15
16
17
18
19
20
21
22
23
24
25
26
27
28
aaa new-model

tacacs server ISE_VM
 address ipv4 198.18.134.103
 key helena
 exit

tacacs server ISE_VM2
 address ipv4 198.18.134.104
 key helena
 exit

aaa group server tacacs+ TACACS_SVR
 server name ISE_VM
 server name ISE_VM2

aaa authentication login default group TACACS_SVR local
aaa authentication enable default group TACACS_SVR enable
aaa accounting update newinfo
aaa accounting exec default start-stop group TACACS_SVR
aaa accounting commands 0 default start-stop group TACACS_SVR
aaa accounting commands 1 default start-stop group TACACS_SVR
aaa accounting commands 15 default start-stop group TACACS_SVR
aaa authorization config-commands
aaa authorization exec default group TACACS_SVR local if-authenticated
aaa authorization commands 0 default group TACACS_SVR local if-authenticated
aaa authorization commands 1 default group TACACS_SVR local if-authenticated
aaa authorization commands 15 default group TACACS_SVR local if-authenticated
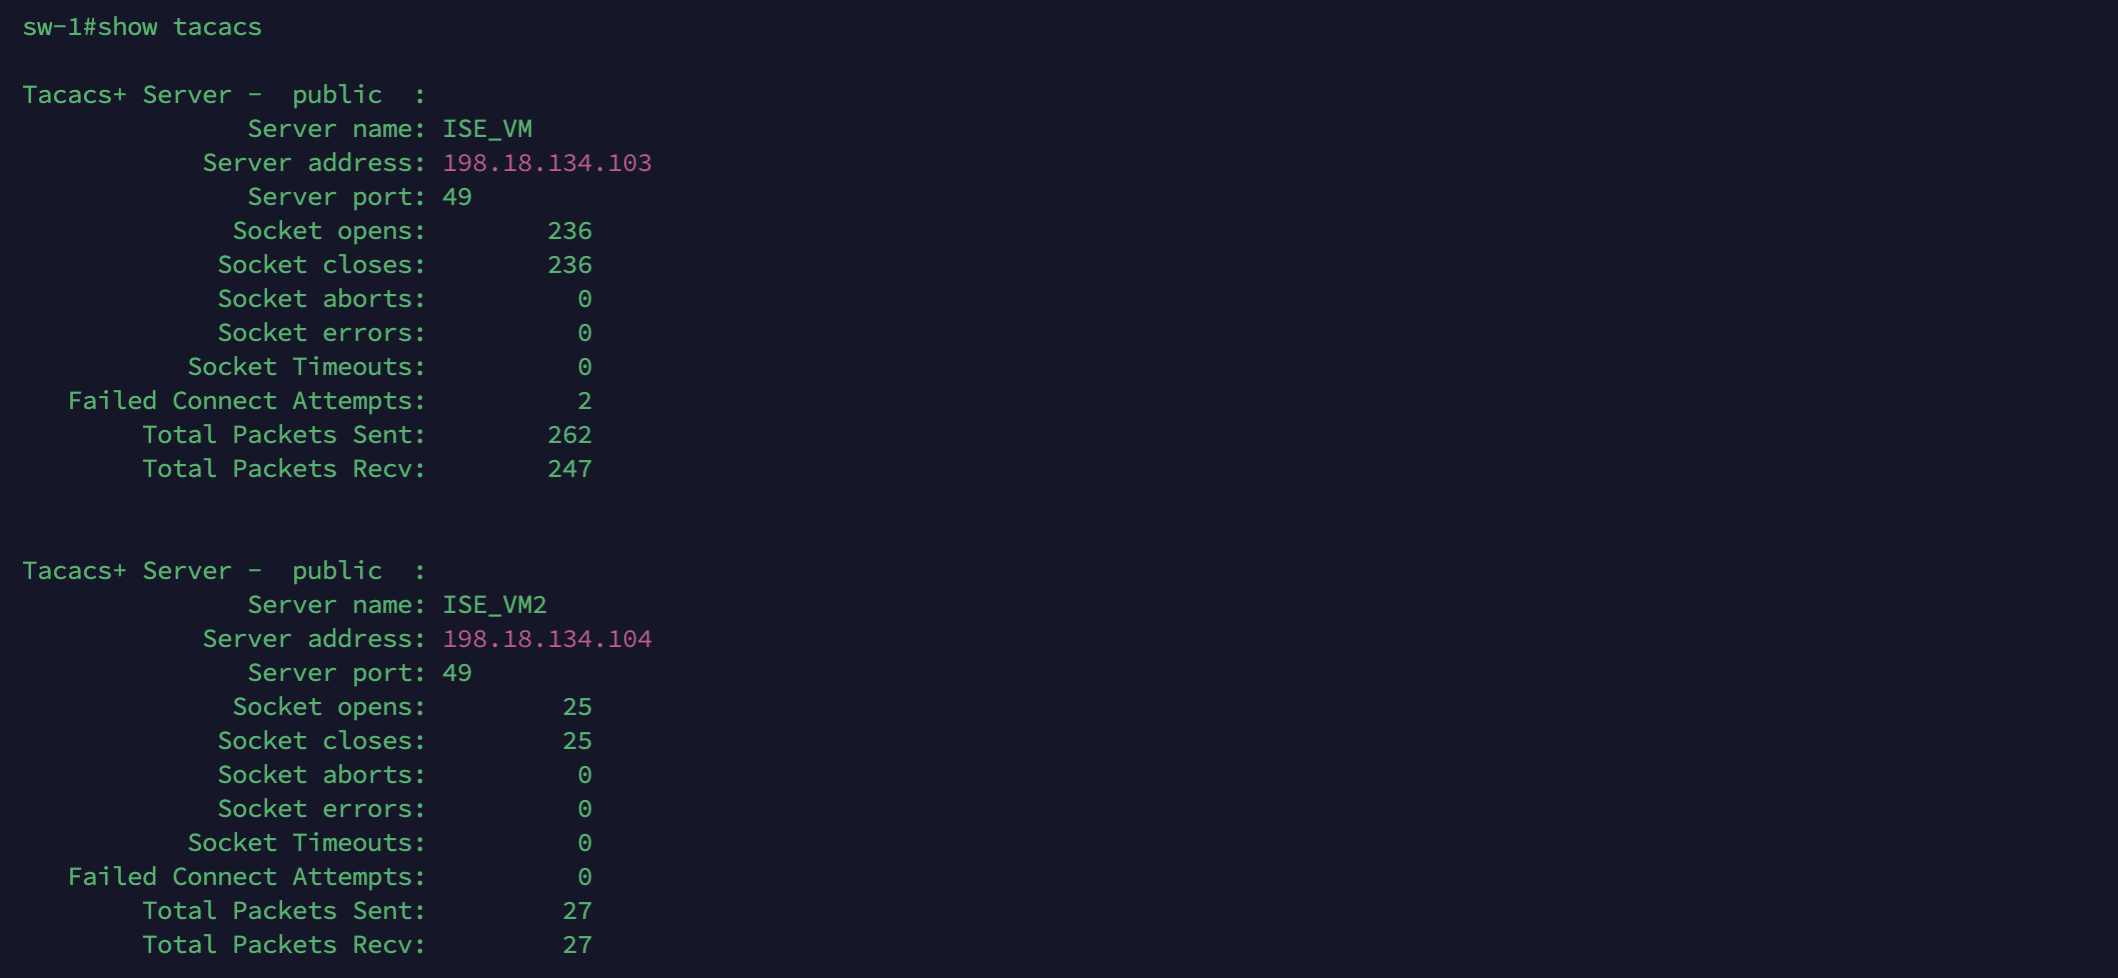
Run “show tacacs” to verify the configuration
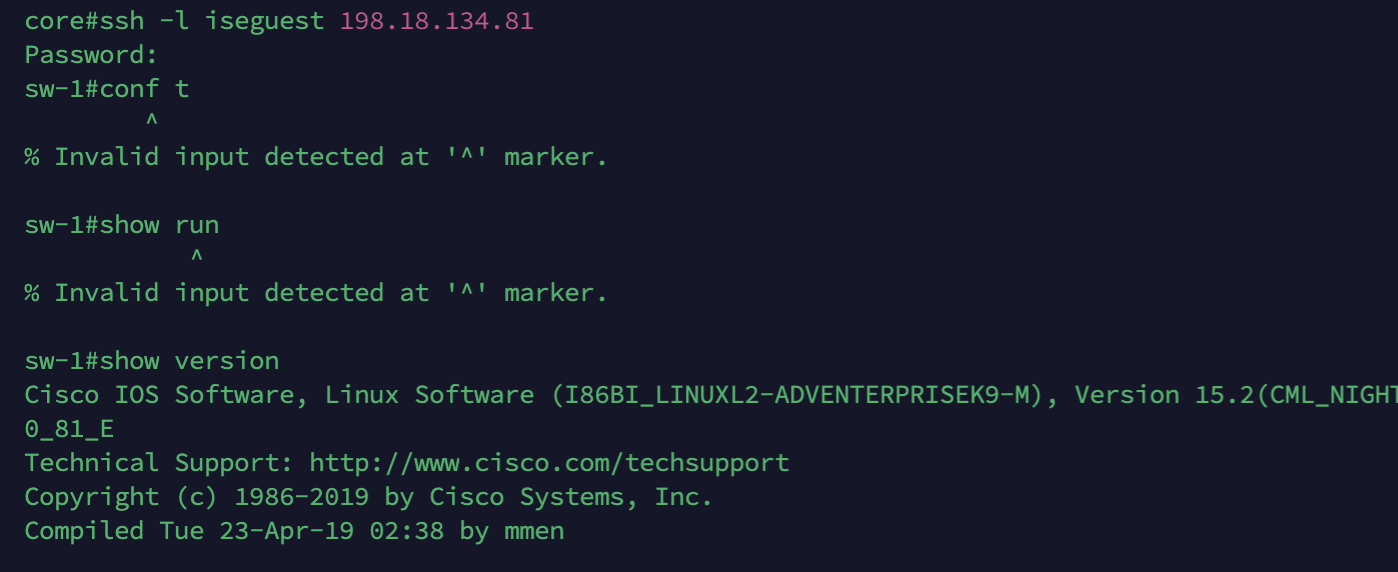
Now logging in with user iseadmin grants us full access

And with user iseguest we’re limited to only limited commands
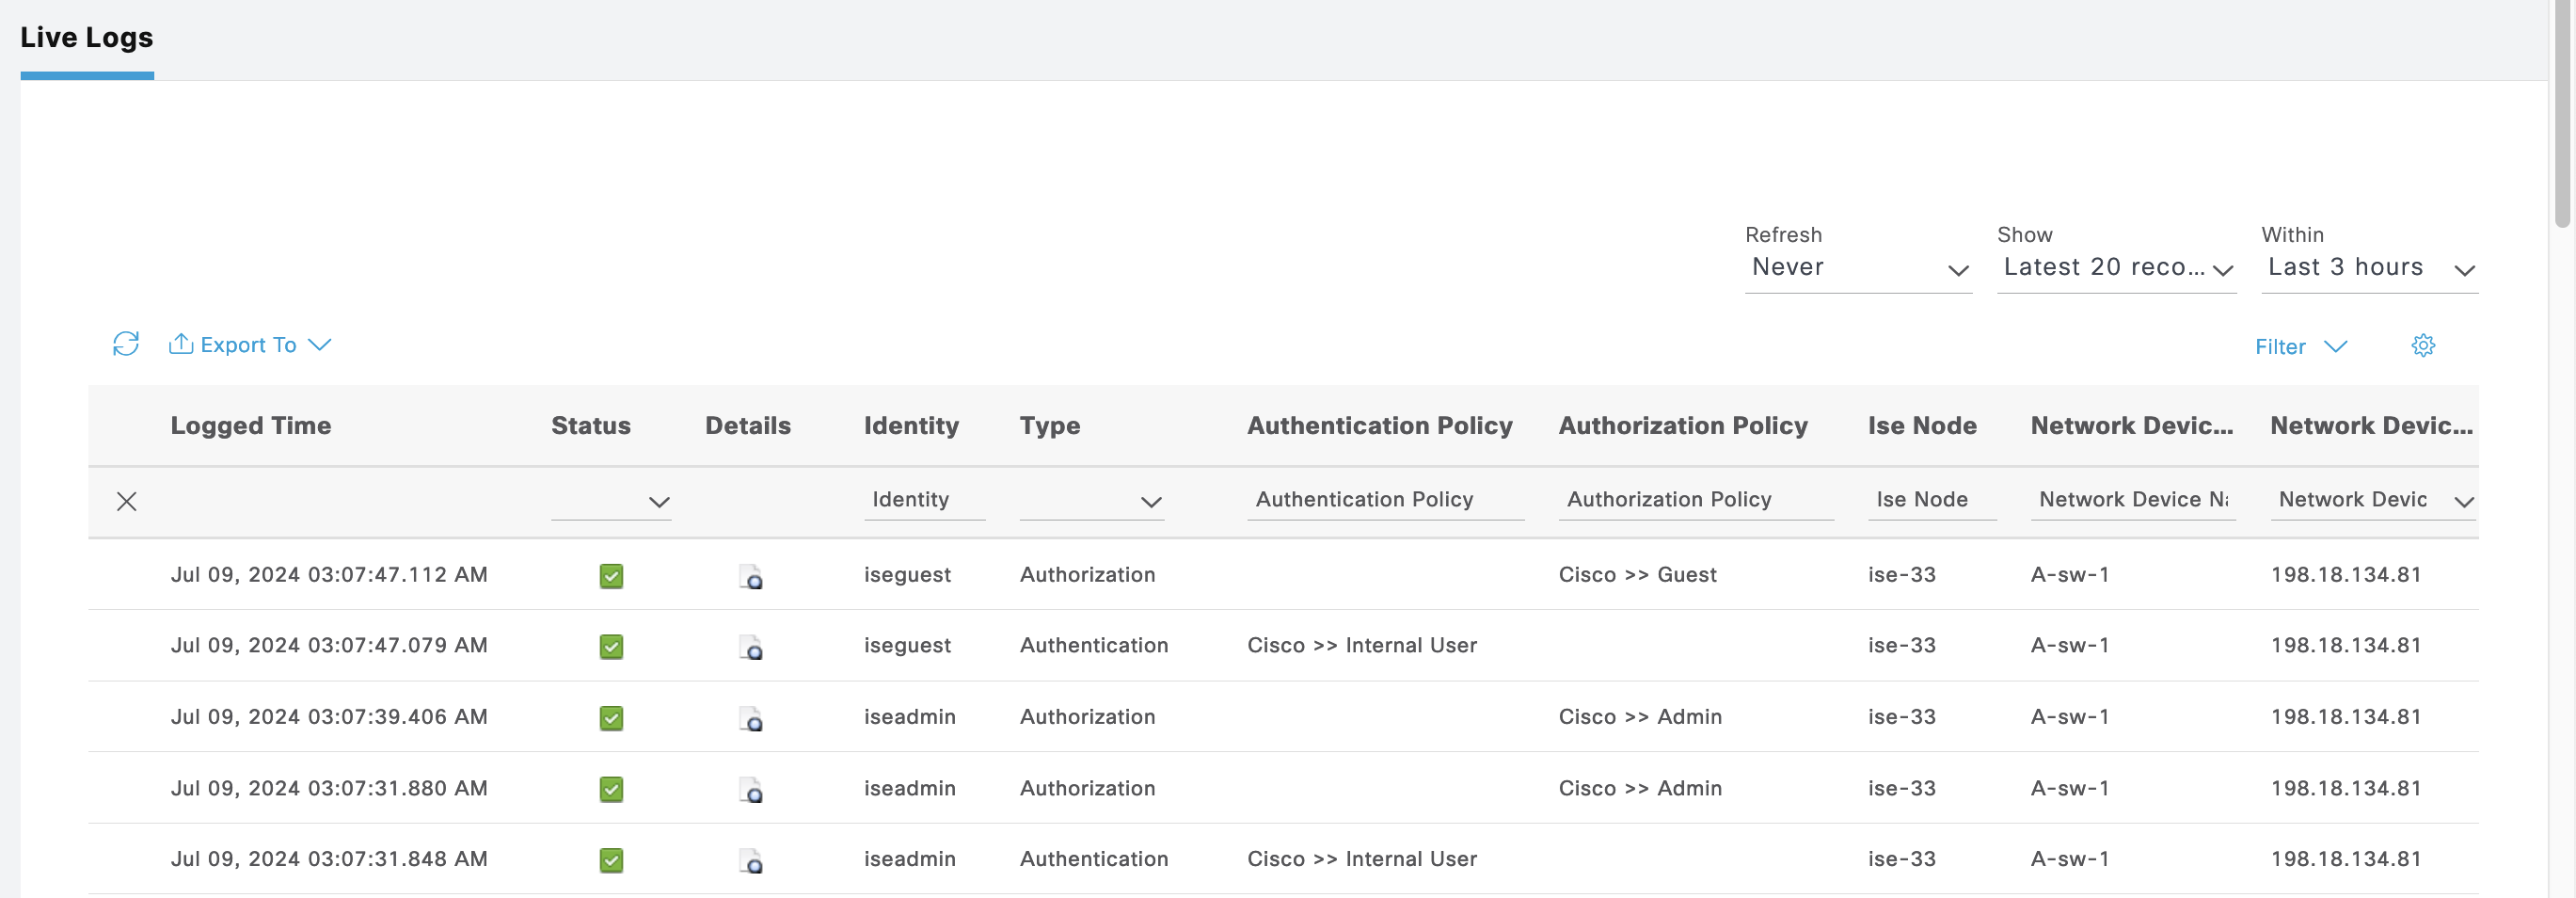
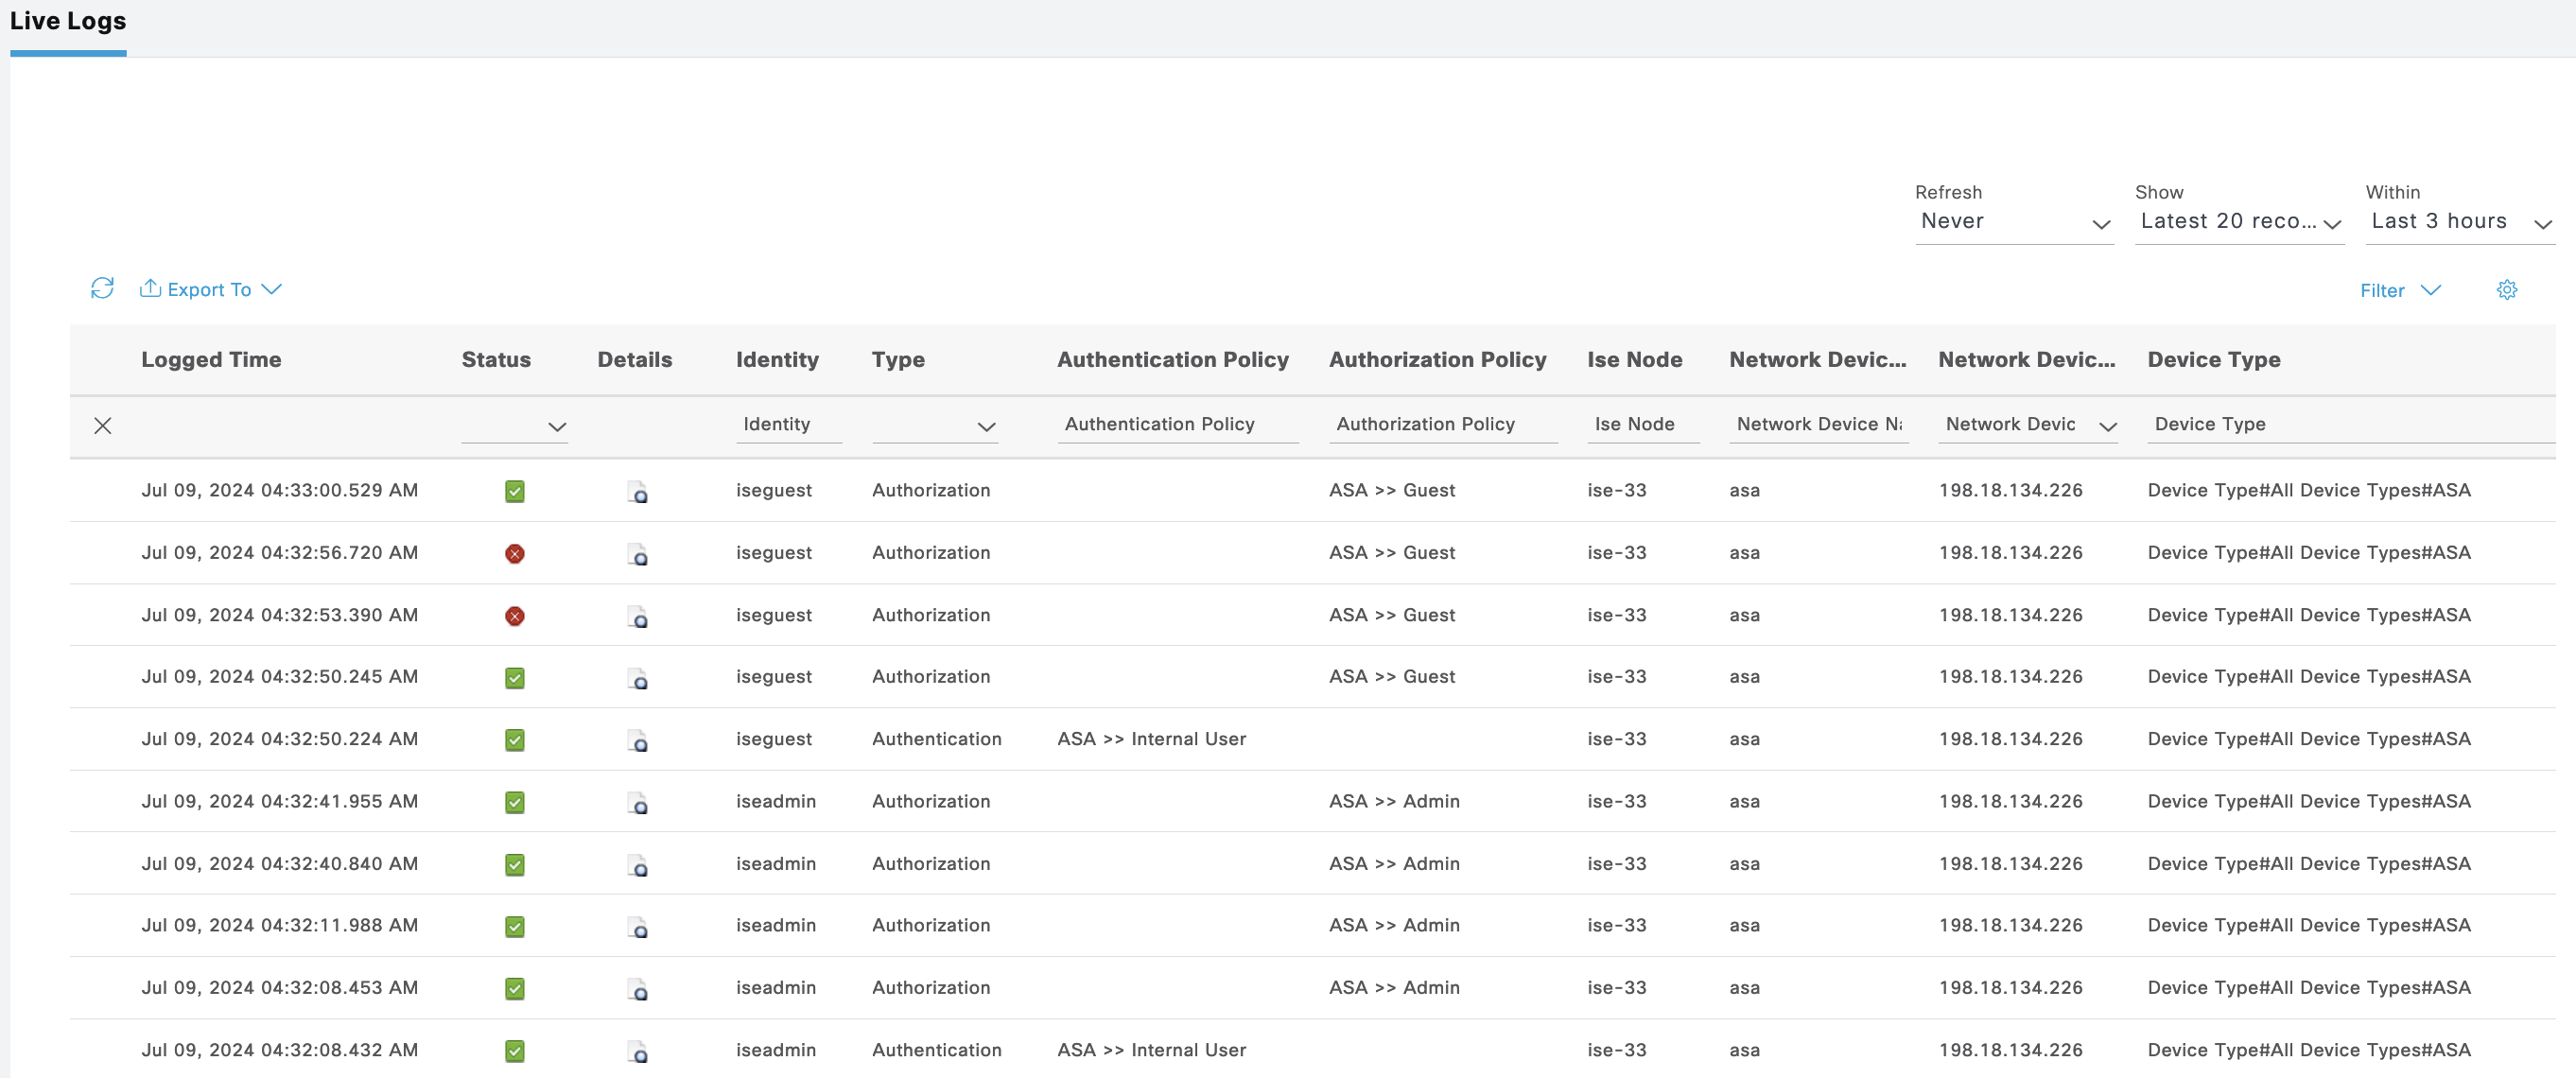
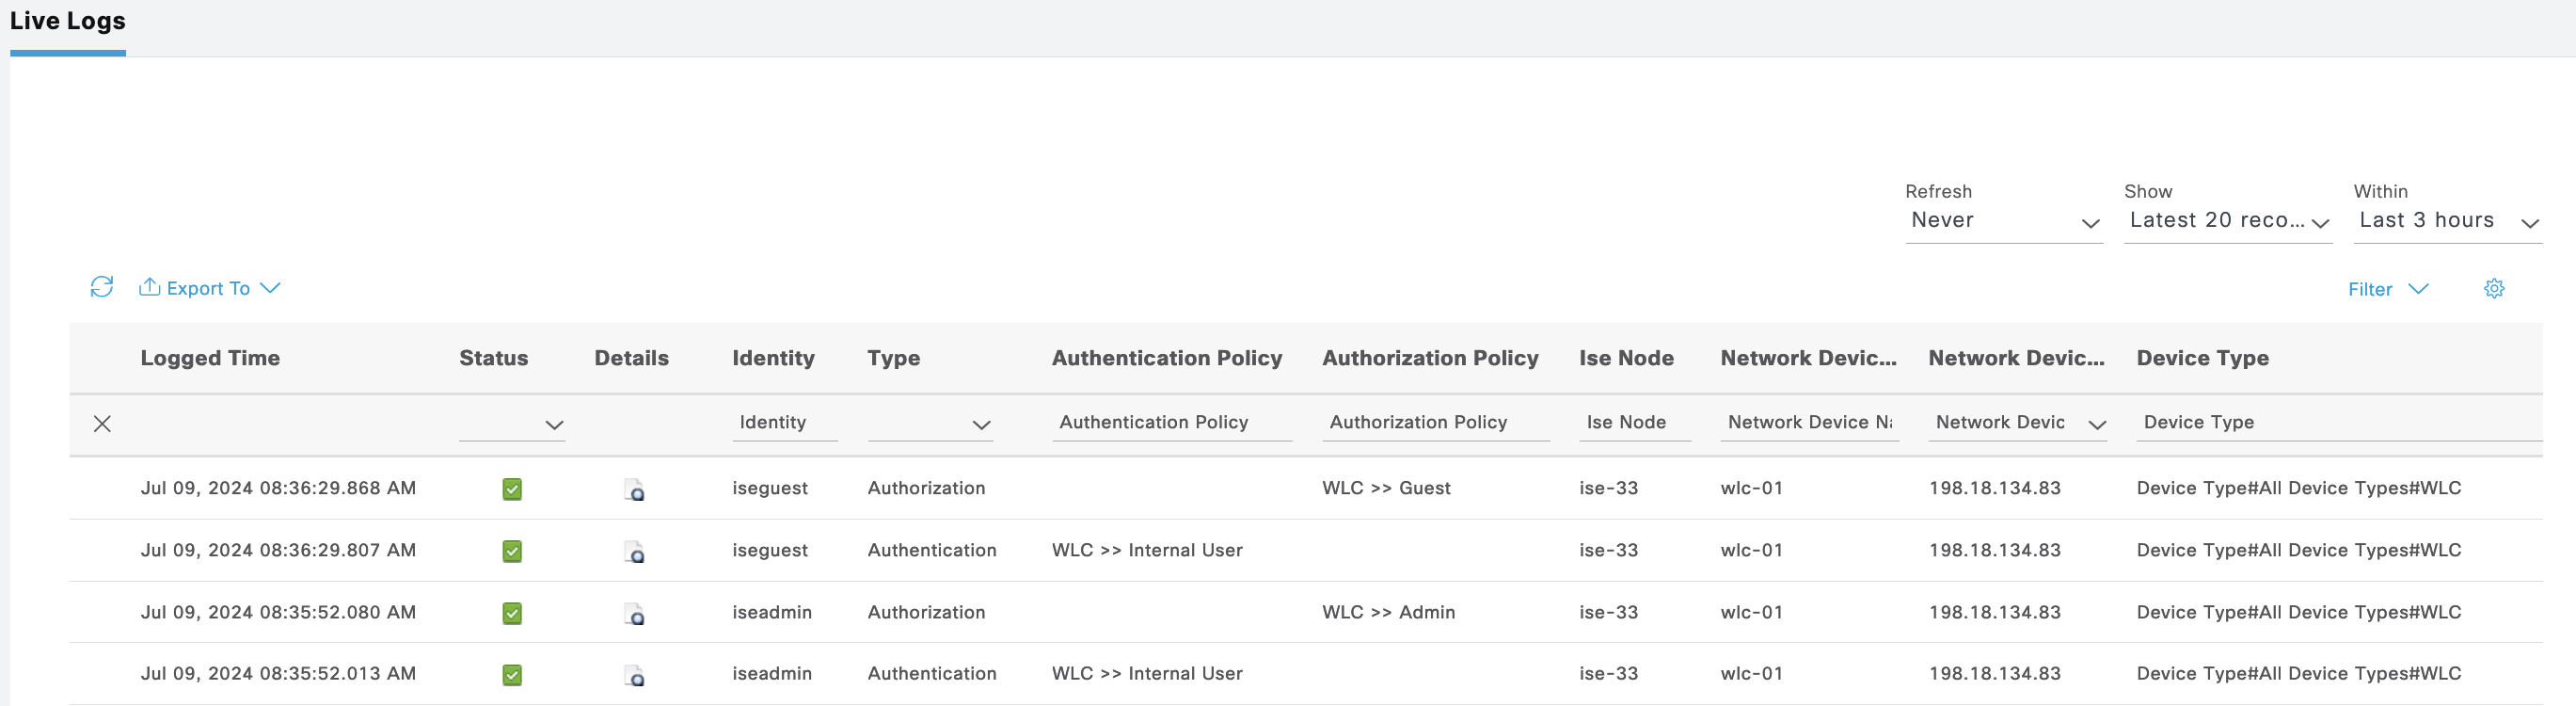
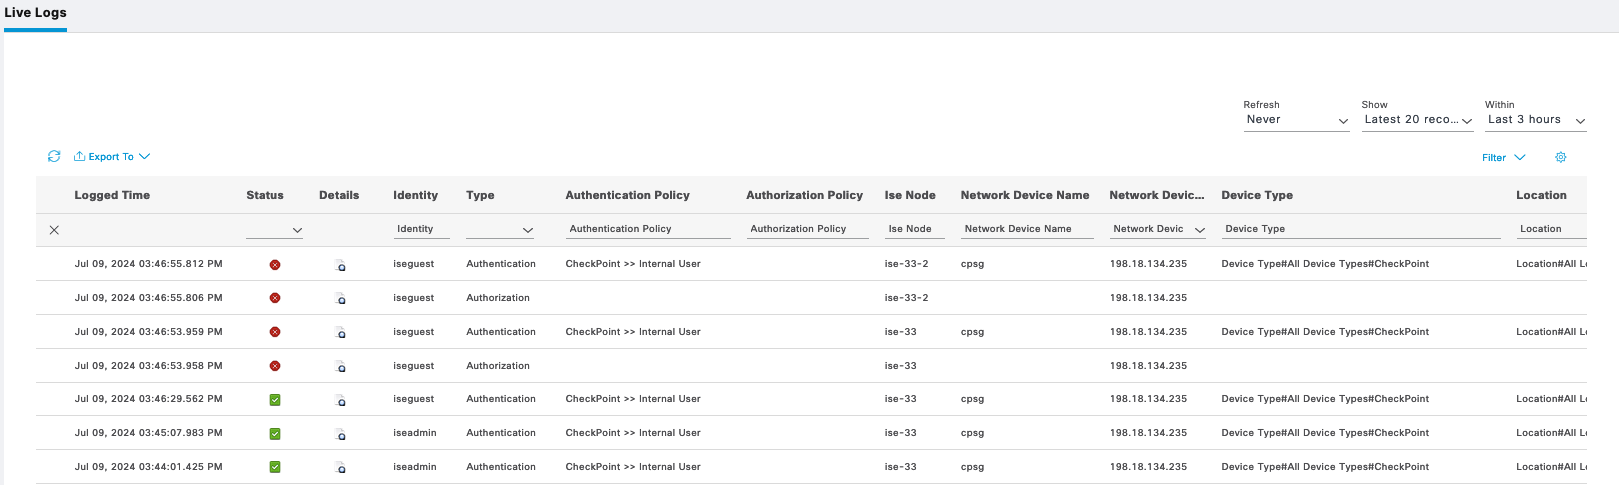
On Operation » TACACS Live Logs, we can see logs for both users authenticating
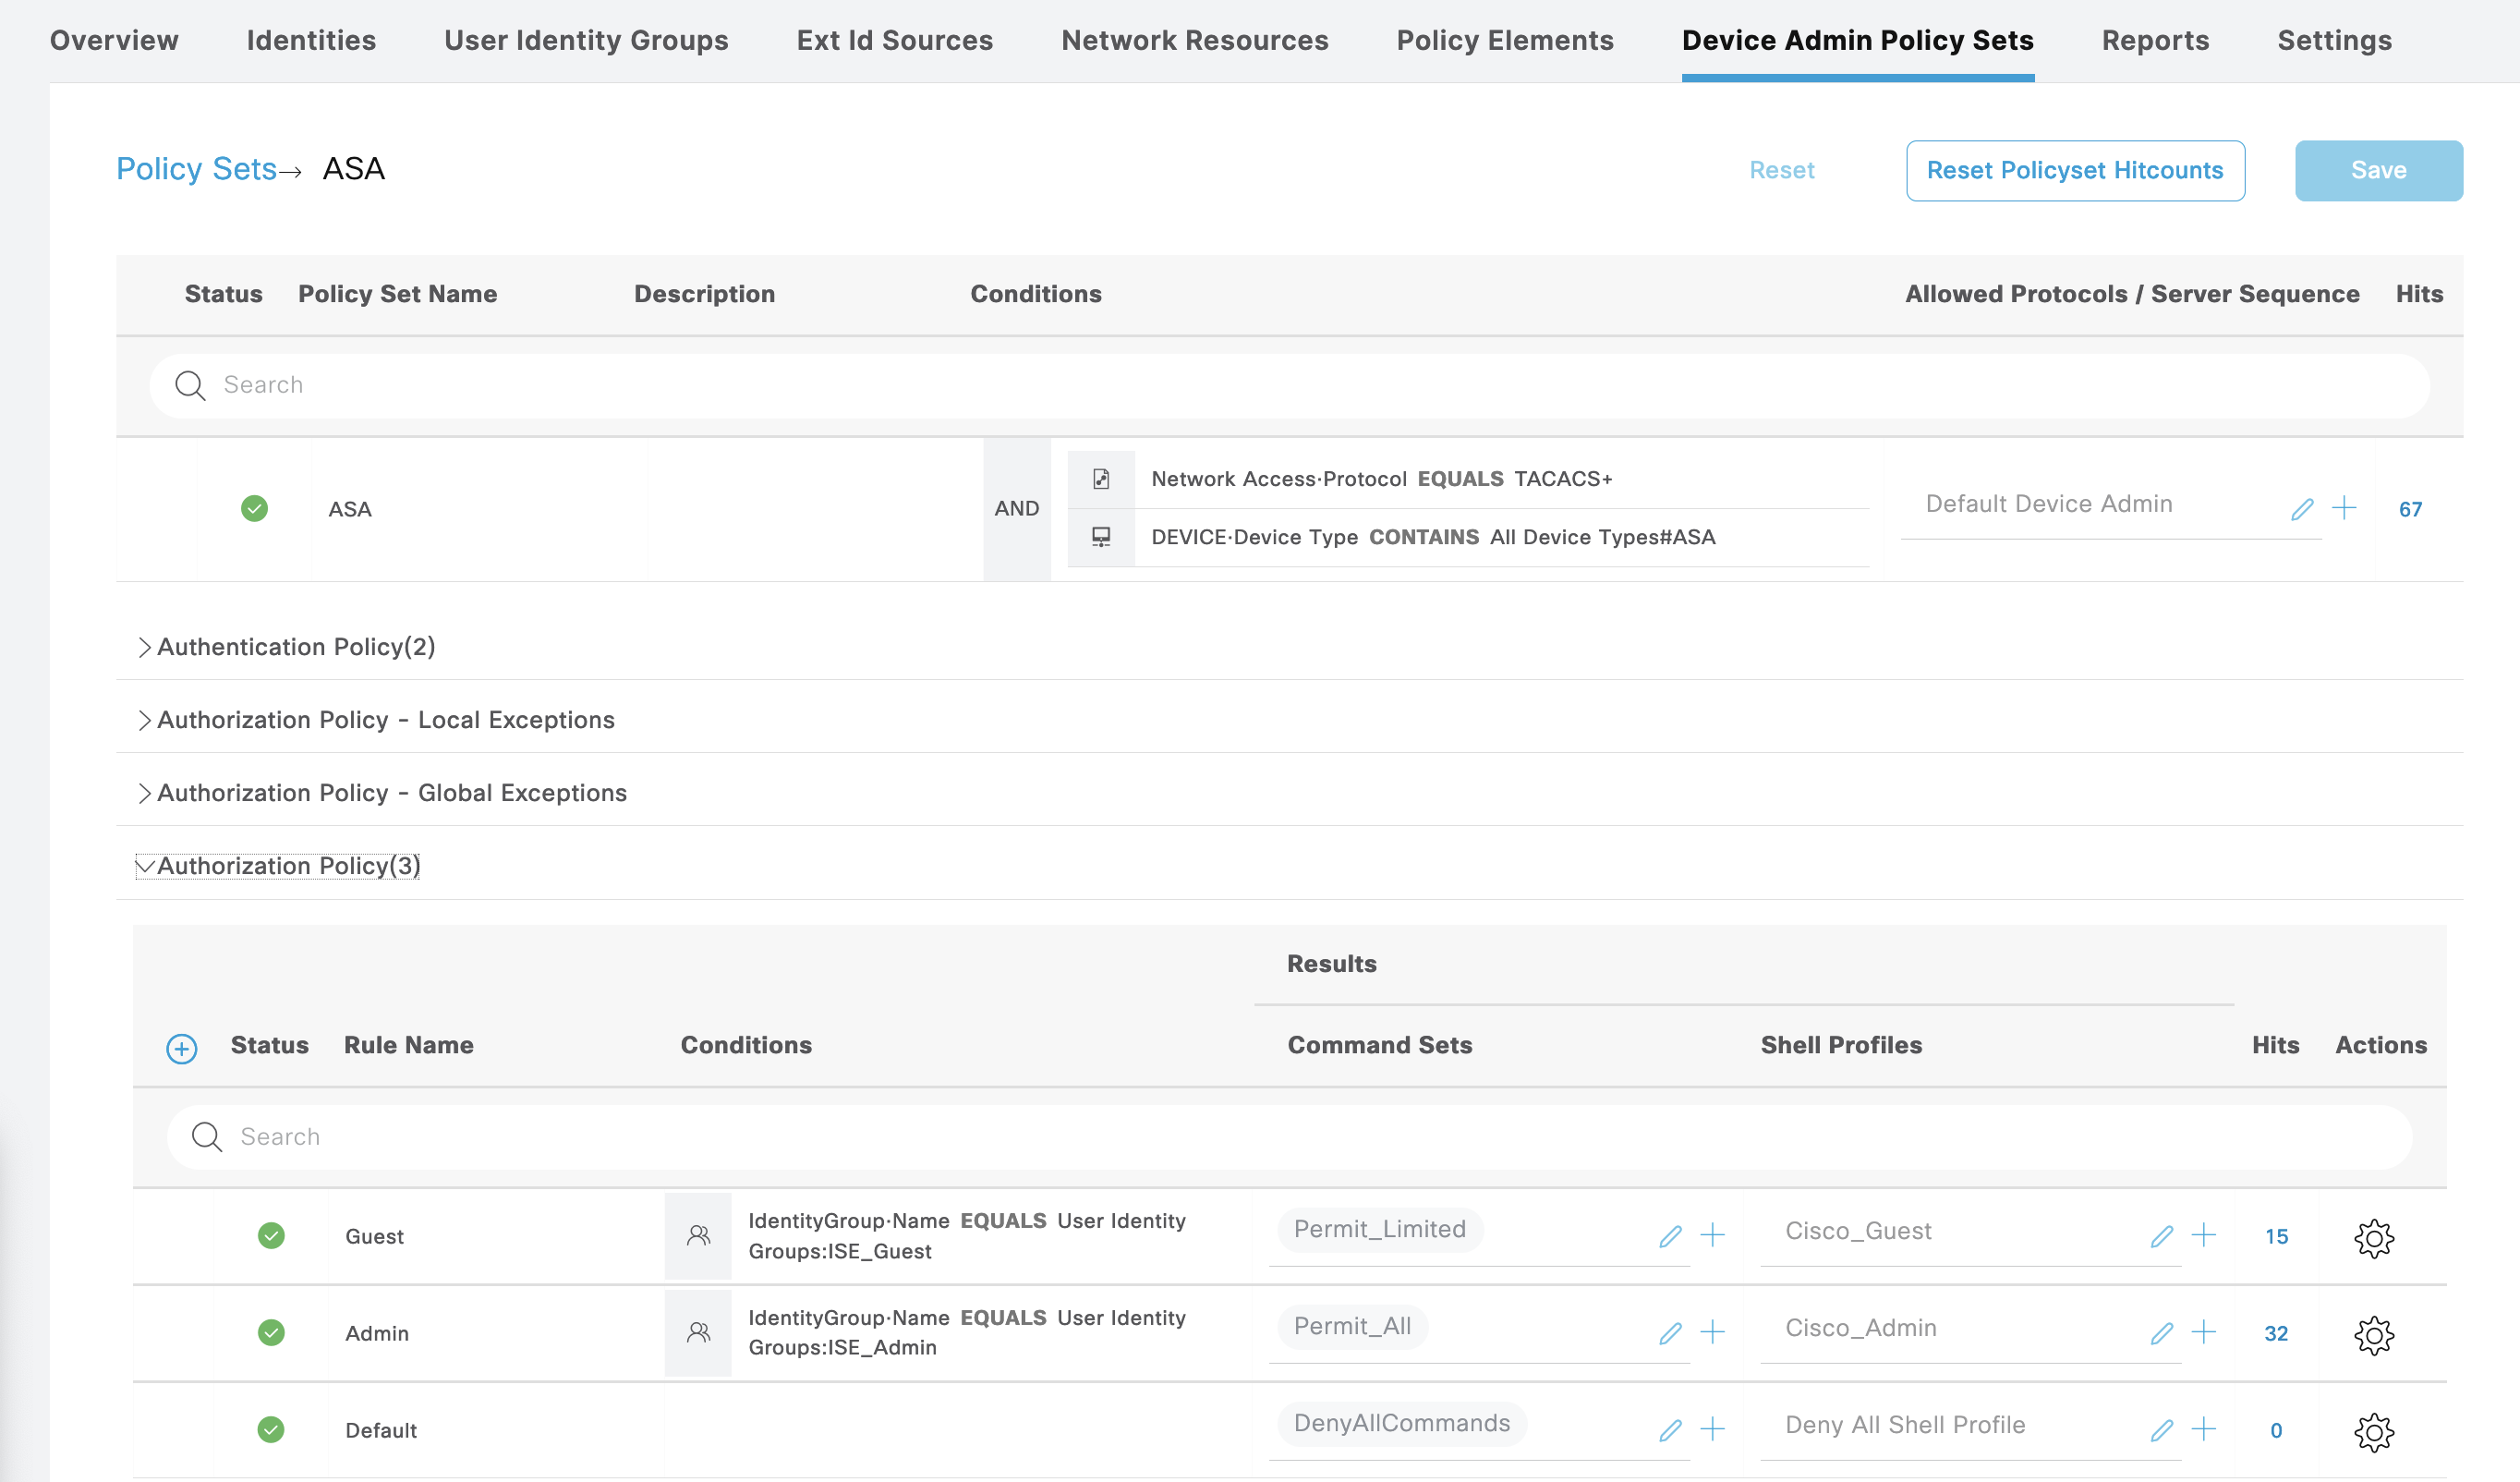
Cisco ASA
For Cisco ASA, we create a new Policy Sets containing the same Command Sets and Shell Profiles used on Cisco IOS
Next configure TACACS on the Cisco ASA
1
2
3
4
5
6
7
8
9
10
11
12
13
14
aaa-server ISE protocol tacacs+
 reactivation-mode timed
 max-failed-attempts 2

aaa-server ISE (Management) host 198.18.134.103
 key helena
aaa-server ISE (Management) host 198.18.134.104
 key helena


aaa accounting command ISE
aaa authentication ssh console ISE LOCAL
aaa authorization command ISE LOCAL
aaa authorization exec authentication-server auto-enable
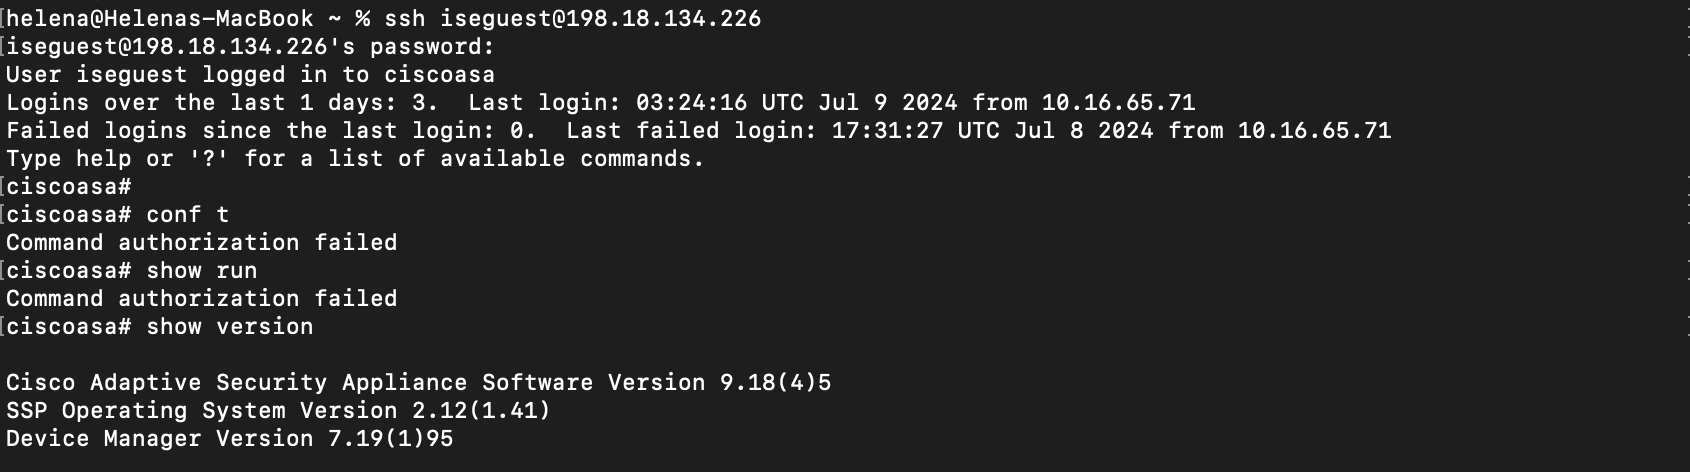
Run this command to test the TACACS authentication
1
test aaa authentication ISE host 198.18.134.103 username iseguest password cisco123
Run “show aaa-server” to verify the tacacs configuration
1
2
3
4
5
6
7
8
9
10
11
12
13
14
15
16
17
18
19
20
21
22
23
24
25
26
27
28
29
30
31
32
33
34
35
36
37
38
39
40
41
42
43
44
45
46
47
48
49
50
51
52
53
54
ciscoasa# show aaa-server
Server Group:    LOCAL
Server Protocol: Local database
Server Address:  None
Server port:     None
Server status:   ACTIVE, Last transaction at 02:02:33 UTC Tue Jul 9 2024
Number of pending requests      0
Average round trip time         0ms
Number of authentication requests   11
Number of authorization requests    4
Number of accounting requests       0
Number of retransmissions       0
Number of accepts           10
Number of rejects           5
Number of challenges            0
Number of bad authenticators        0
Number of timeouts          0
Number of unrecognized responses    0

Server Group:    ISE
Server Protocol: tacacs+
Server Address:  198.18.134.103
Server port:     49
Server status:   ACTIVE, Last transaction at 03:25:51 UTC Tue Jul 9 2024
Number of pending requests      1
Average round trip time         61ms
Number of authentication requests   20
Number of authorization requests    41
Number of accounting requests       10
Number of retransmissions       0
Number of accepts           45
Number of rejects           9
Number of challenges            0
Number of bad authenticators        0
Number of timeouts          17
Number of unrecognized responses    0

Server Group:    ISE
Server Protocol: tacacs+
Server Address:  198.18.134.104
Server port:     49
Server status:   ACTIVE, Last transaction at 02:07:11 UTC Tue Jul 9 2024
Number of pending requests      0
Average round trip time         33ms
Number of authentication requests   1
Number of authorization requests    8
Number of accounting requests       7
Number of retransmissions       0
Number of accepts           10
Number of rejects           2
Number of challenges            0
Number of bad authenticators        0
Number of timeouts          4
Number of unrecognized responses    0
Now if we log in with iseadmin, we should be granted full access

But if with iseguest, we can only access limited commands
Live Logs also shows the auth for both users
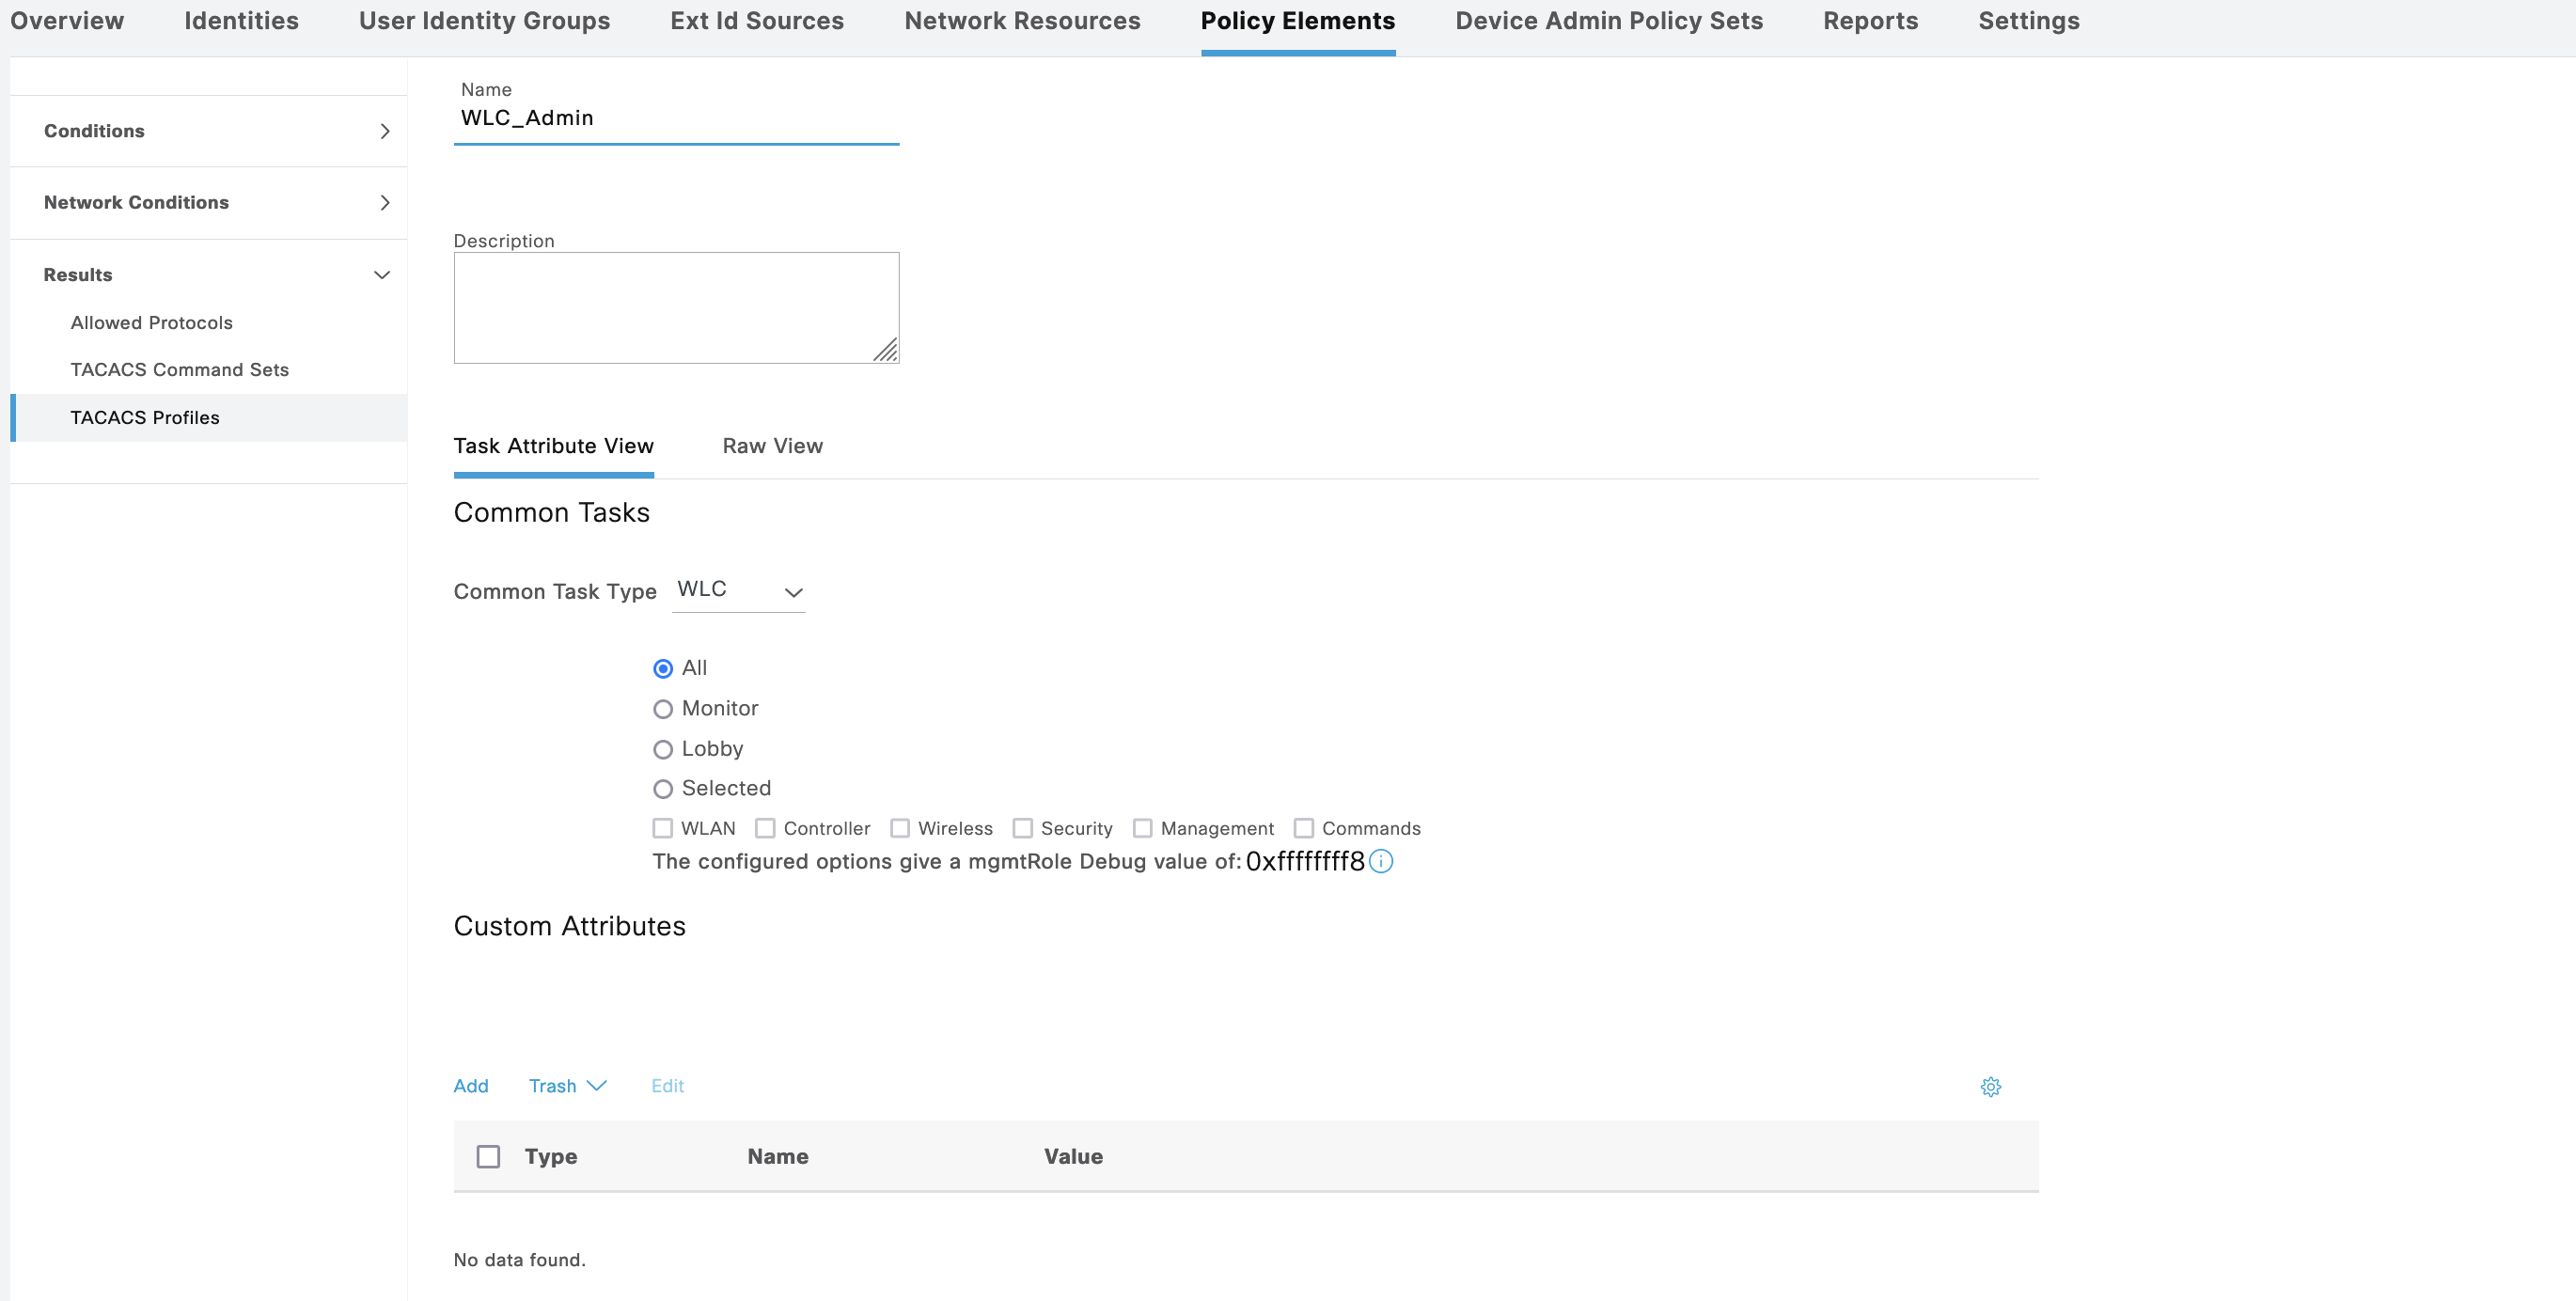
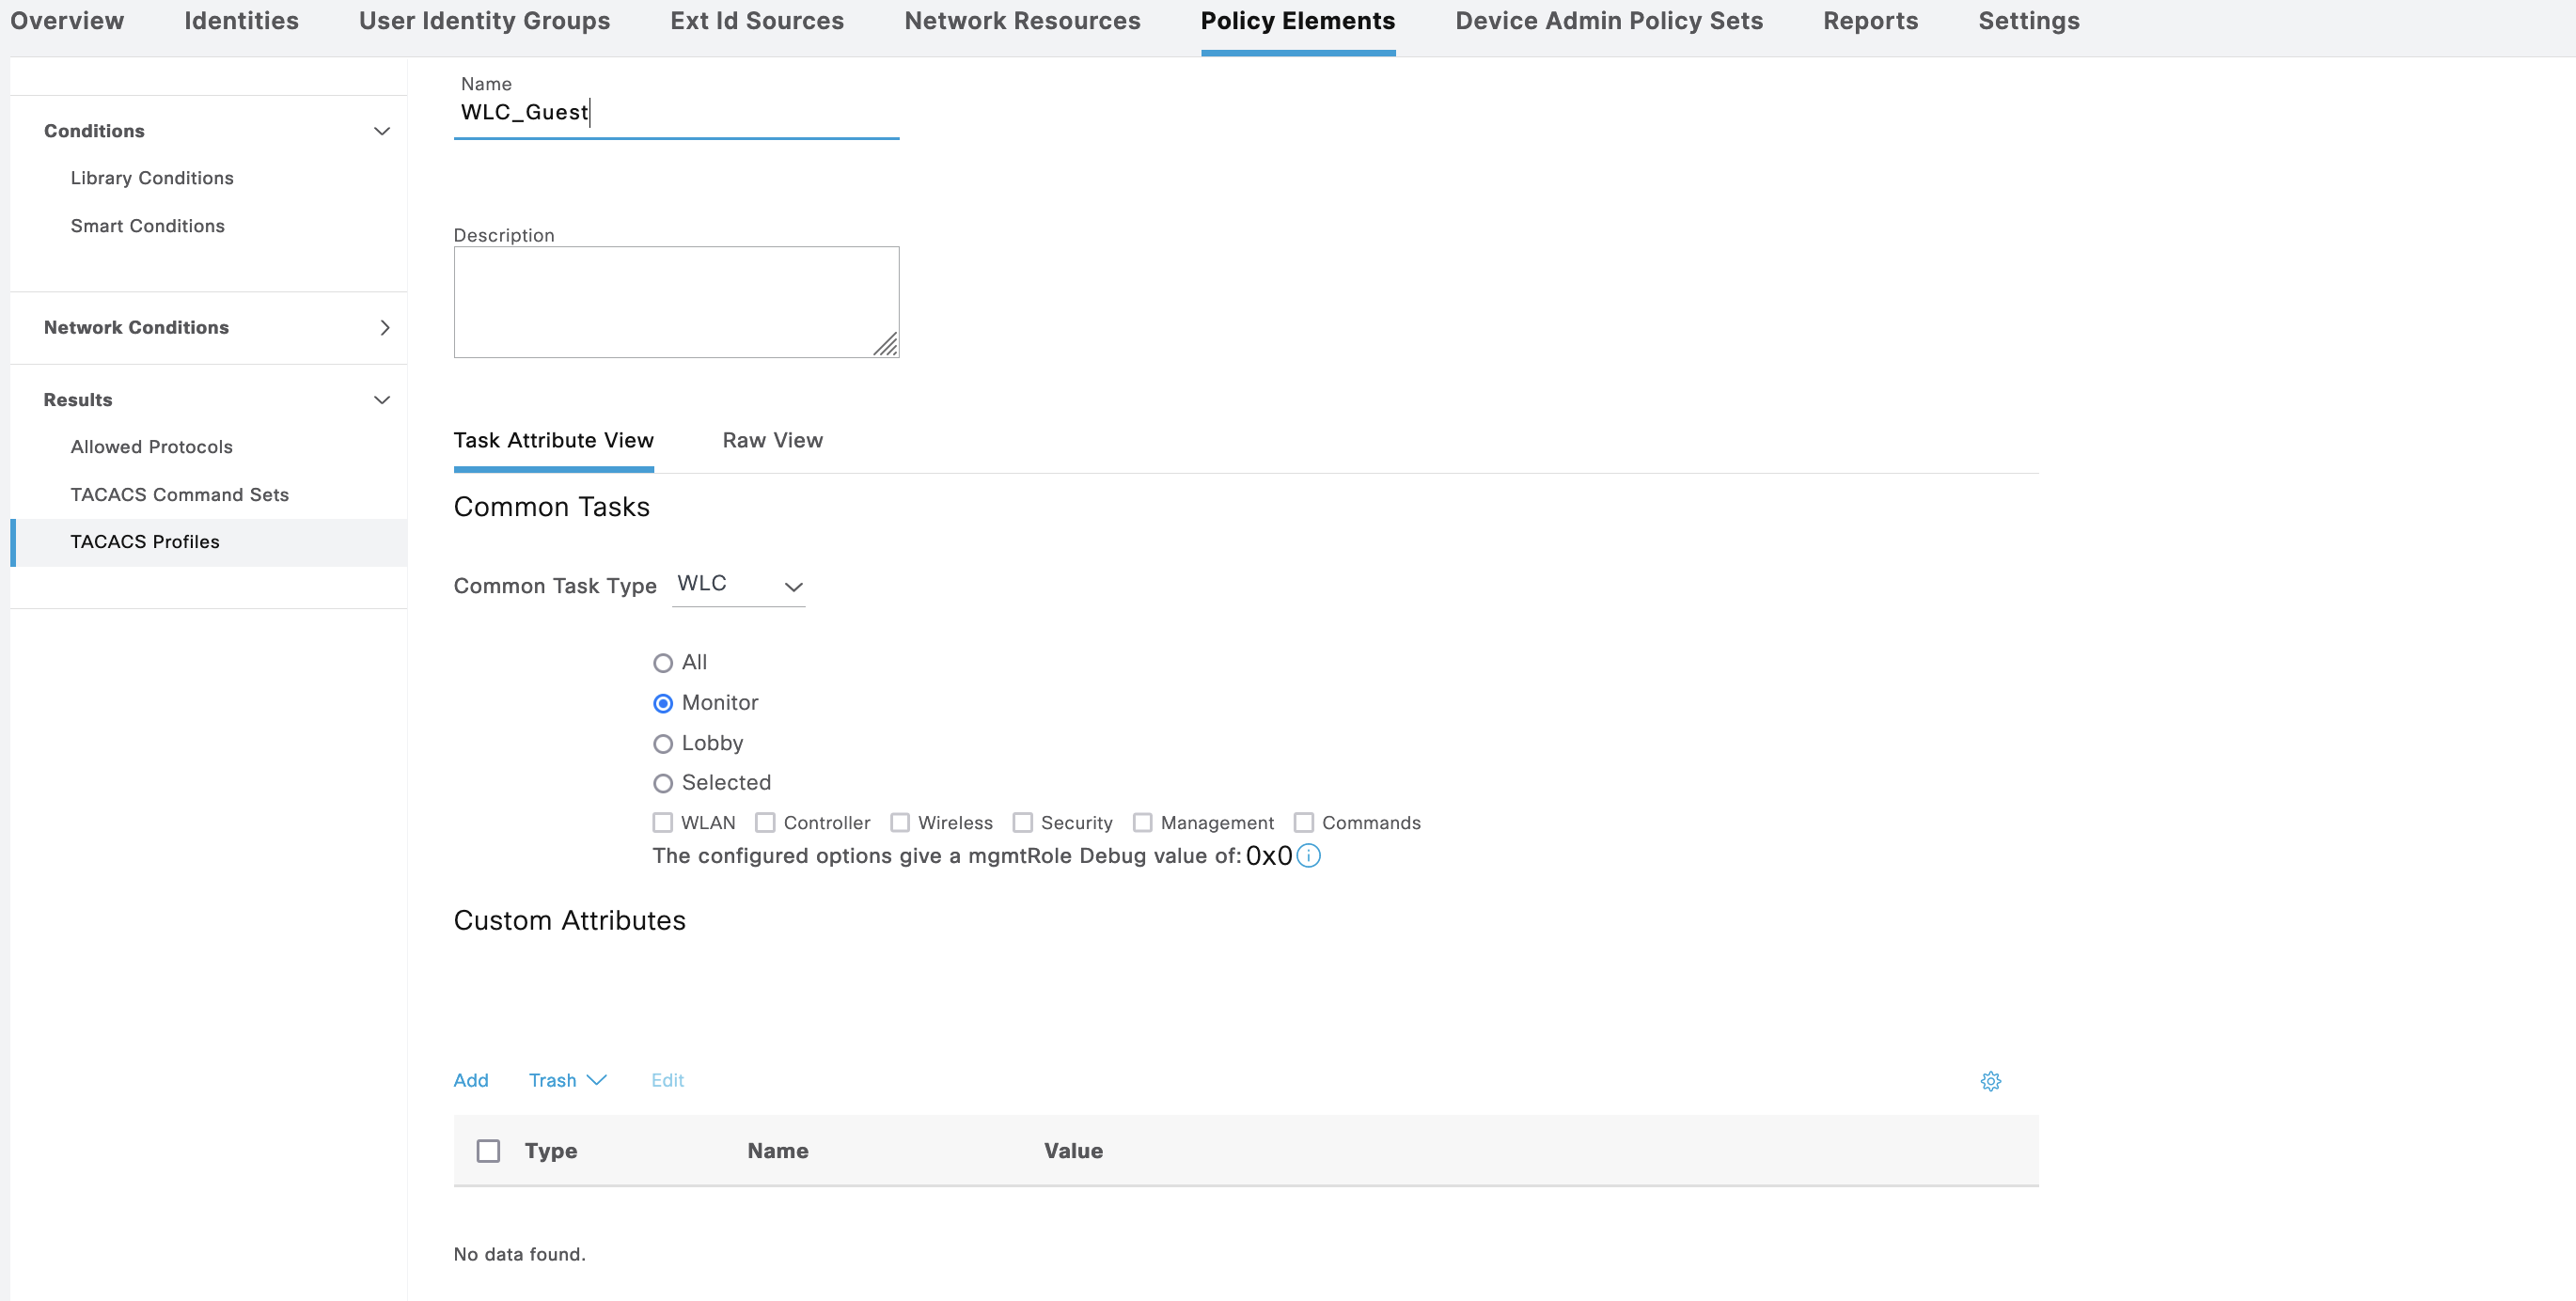
Cisco WLC
Next for Cisco WLC, we’ll also create a new Policy Sets with 2 Shell Profiles Authorization
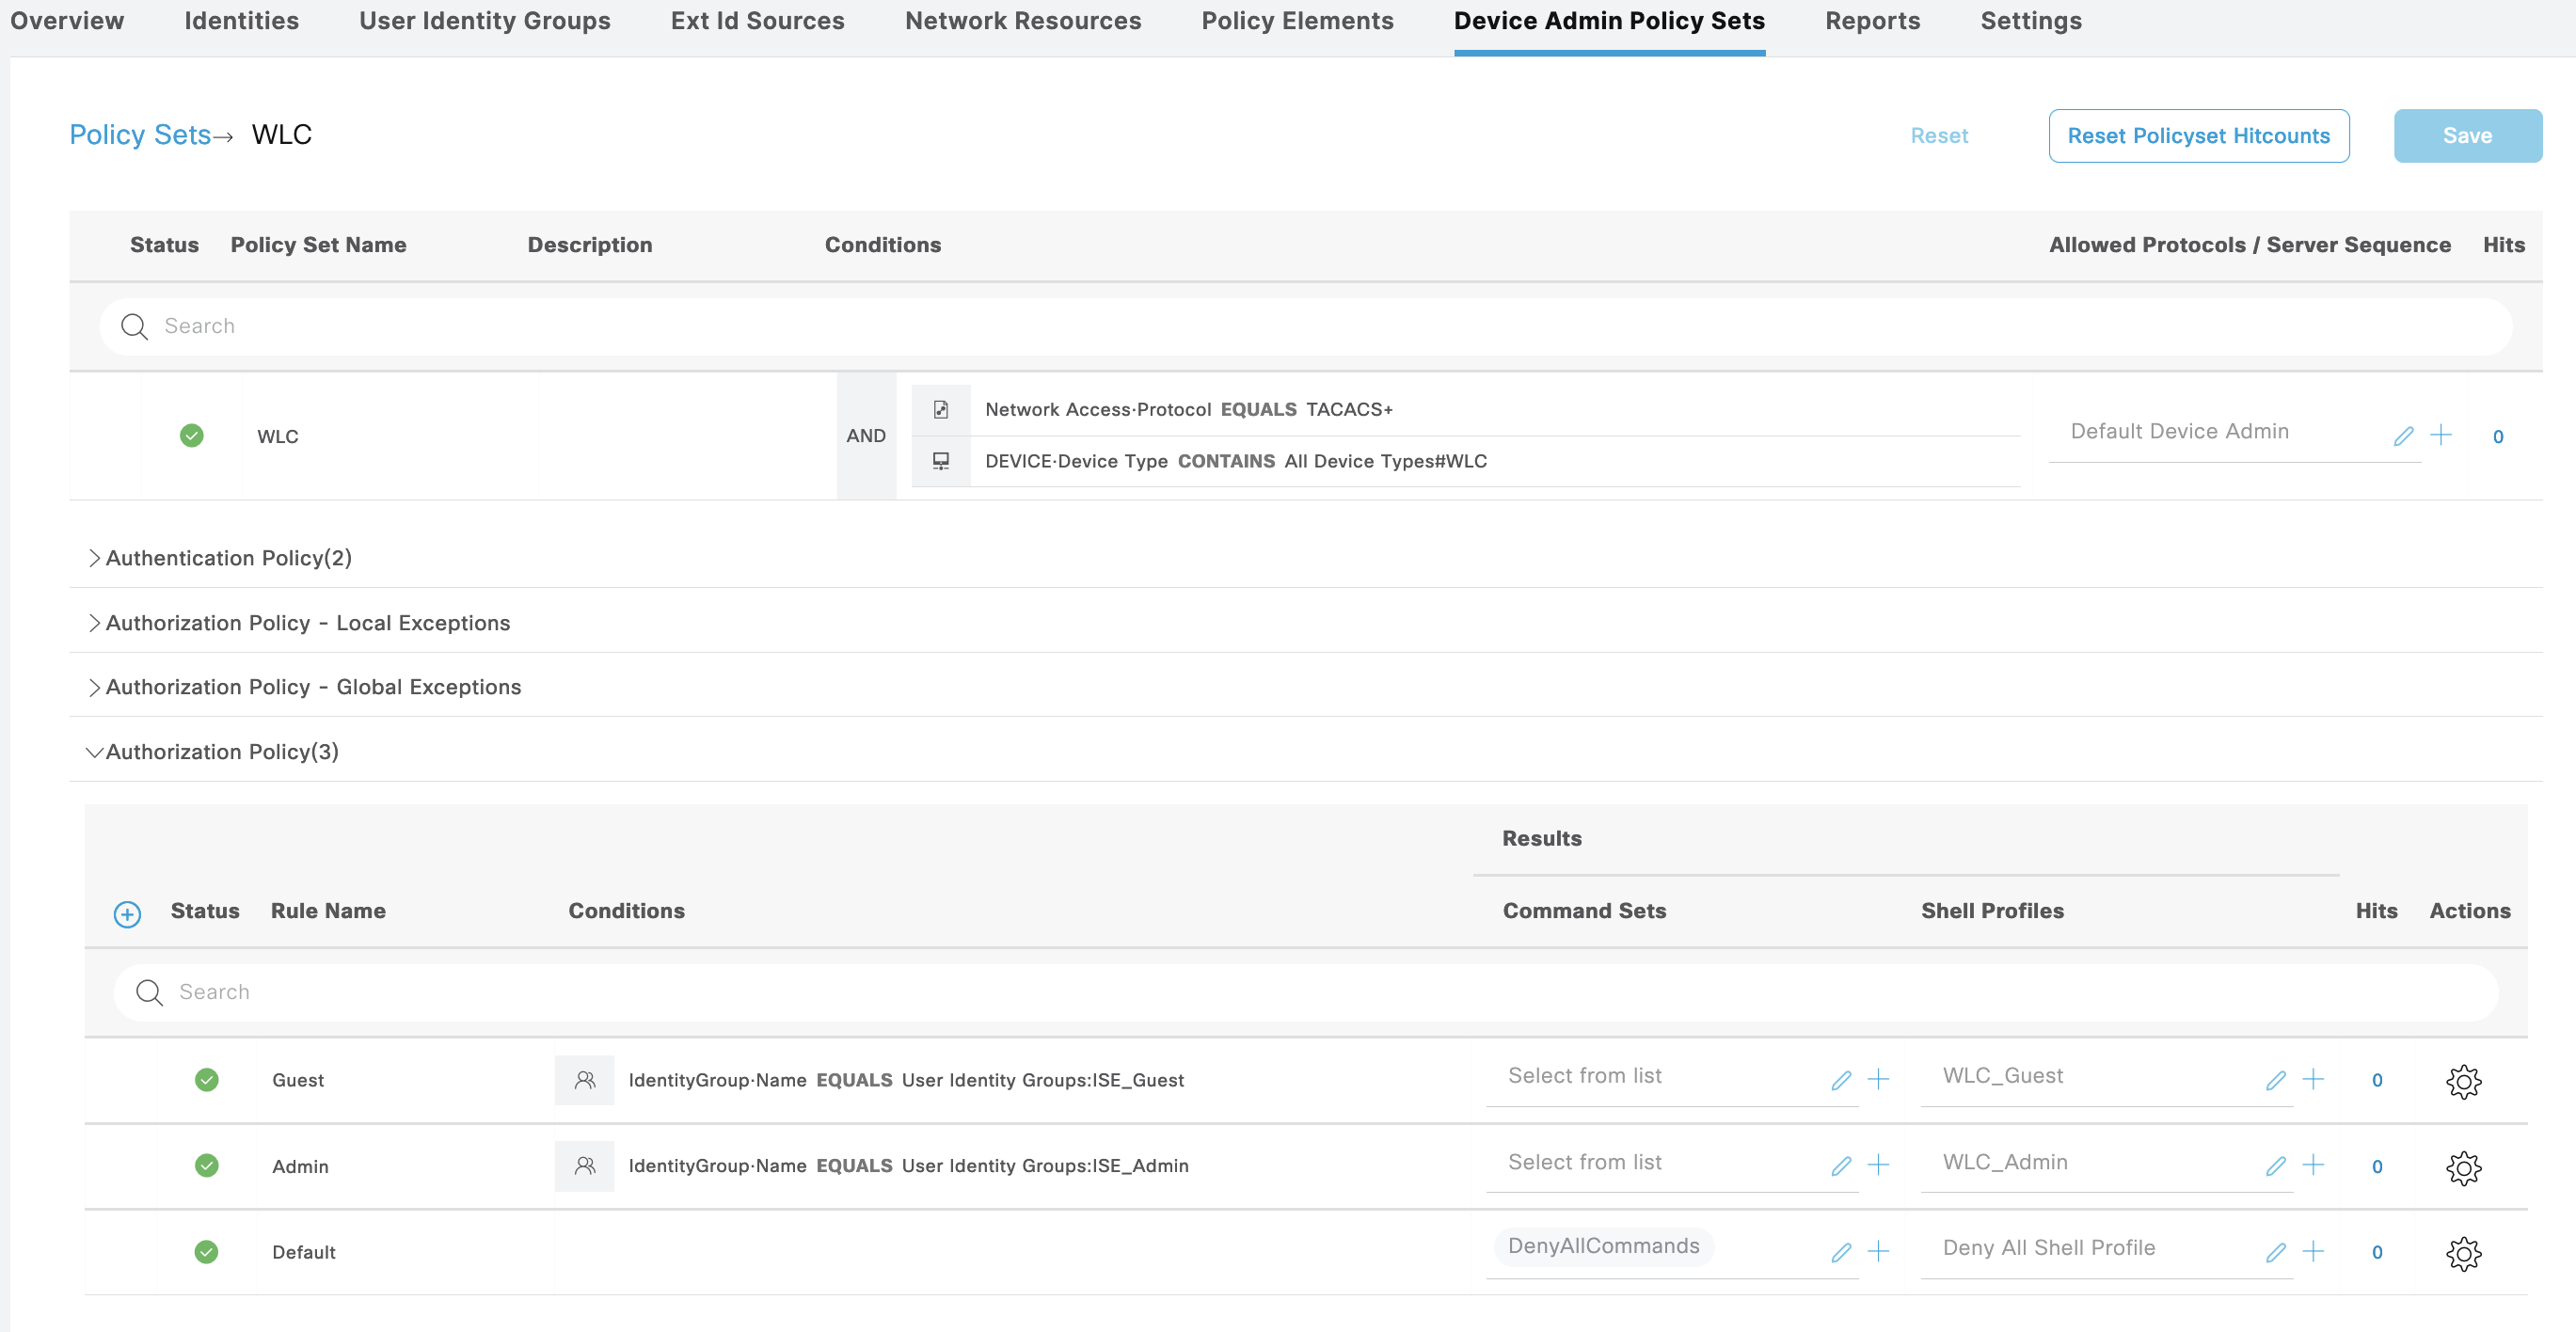
The WLC_Admin Shell Profile grants full WLC access
Whereas the WLC_Guest grants only monitoring
Next we configure the TACACS on WLC, on Security » AAA » TACACS+ » Authentication, add the ISE servers
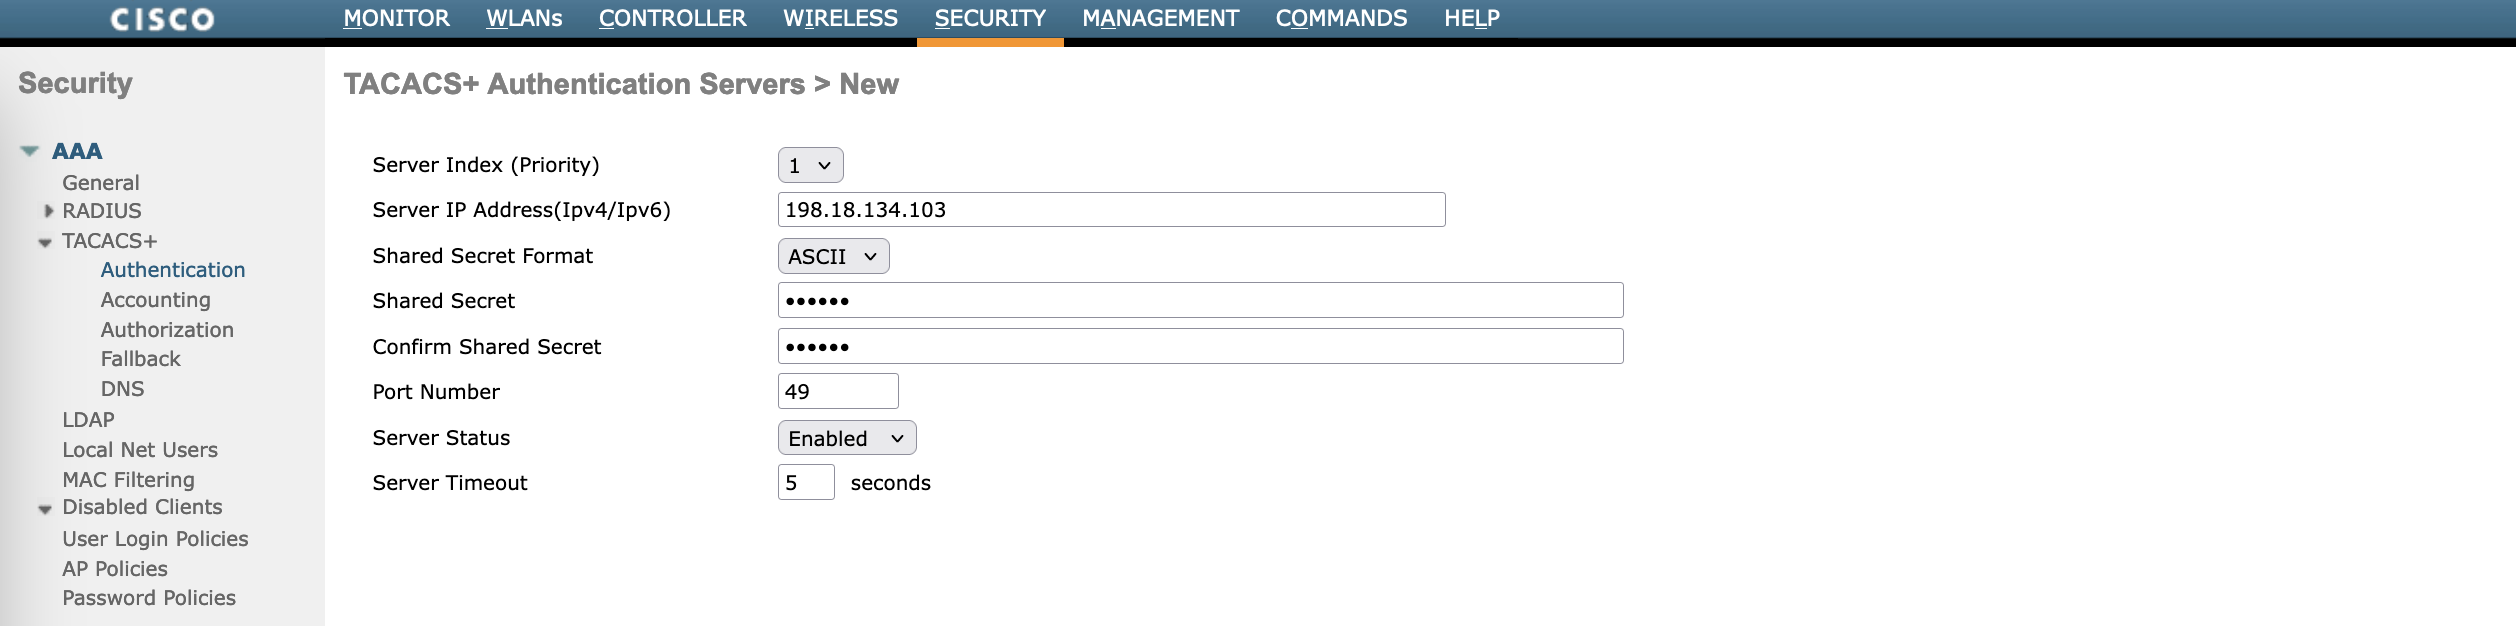

Optionally, also add the ISE servers as the Accounting servers

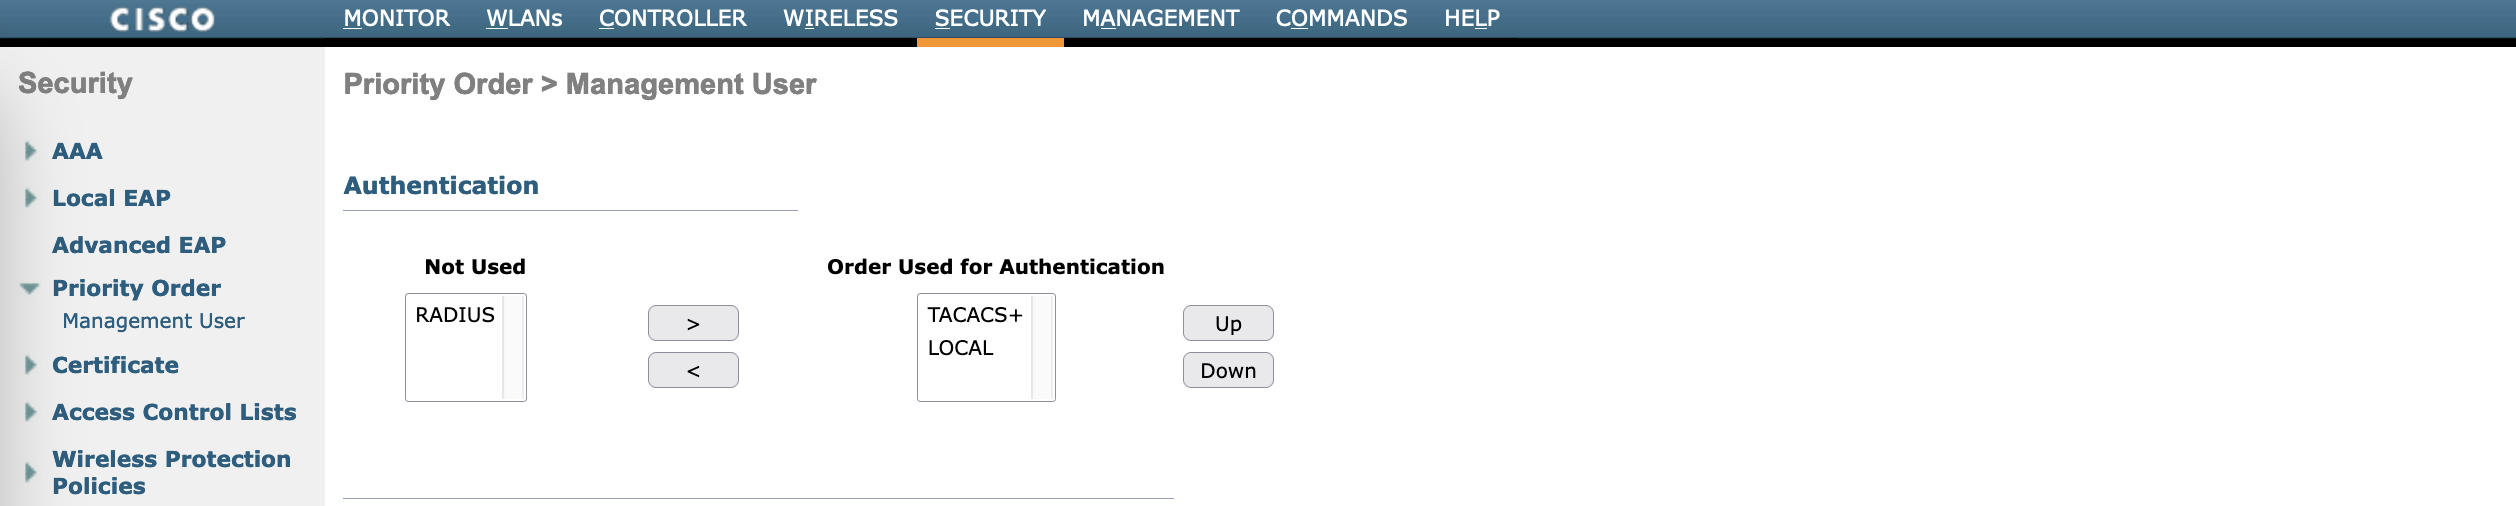
Next configure the authentication order on Prioriy Order » Management User
Now we can login with iseadmin and iseguest and we’ll be granted with its respective permission


The Live Logs shows the logging history as expected
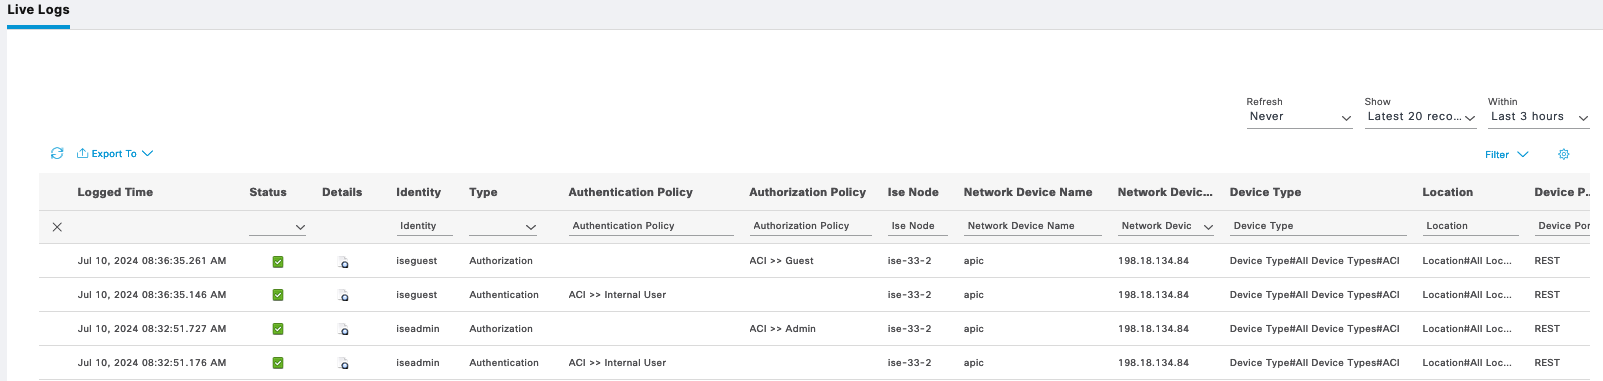
Cisco ACI
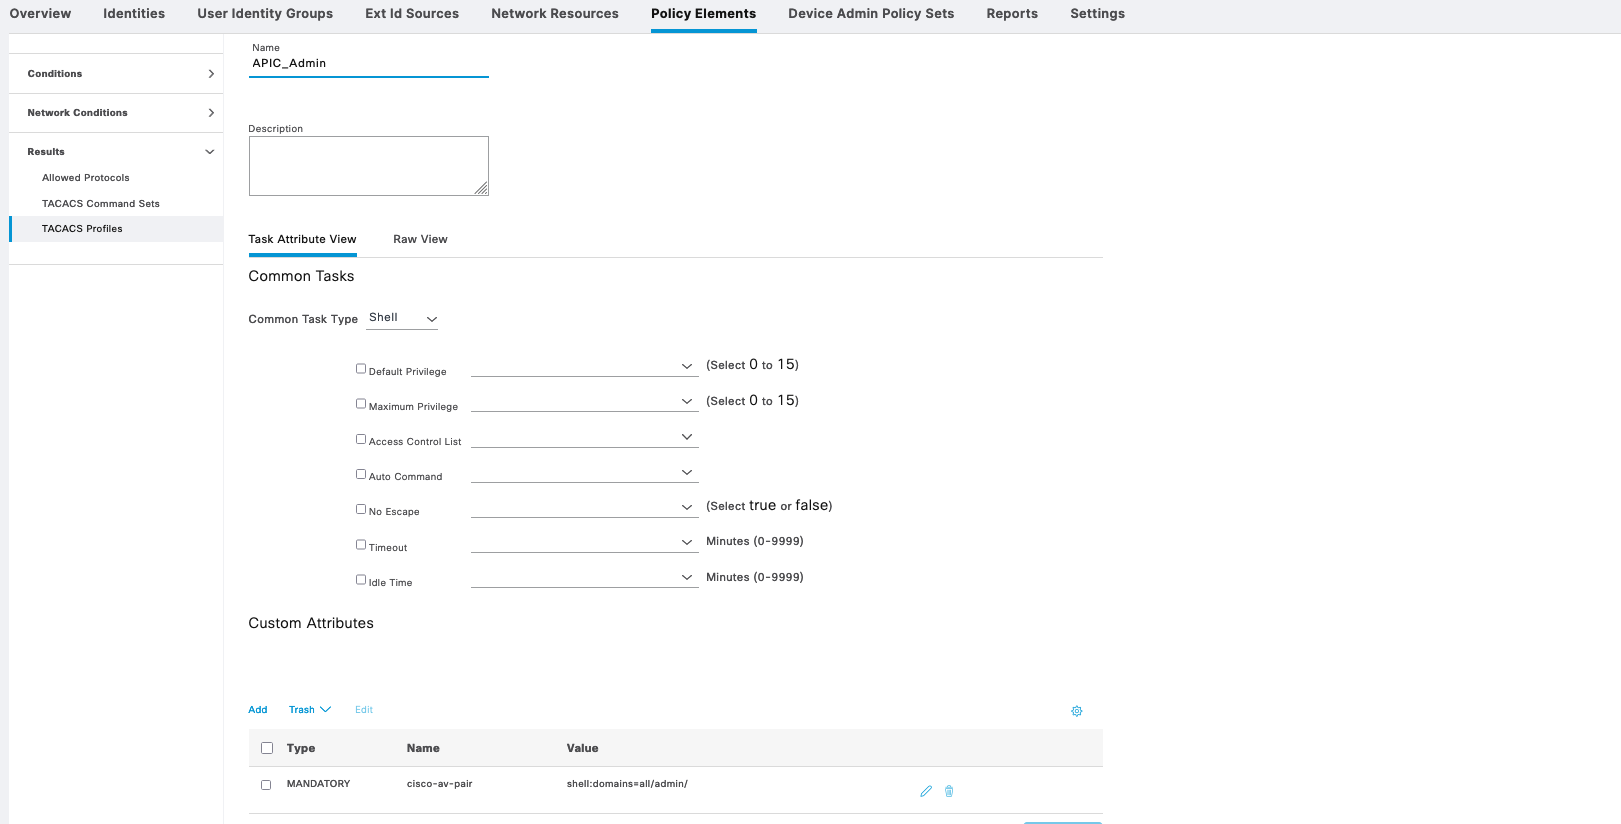
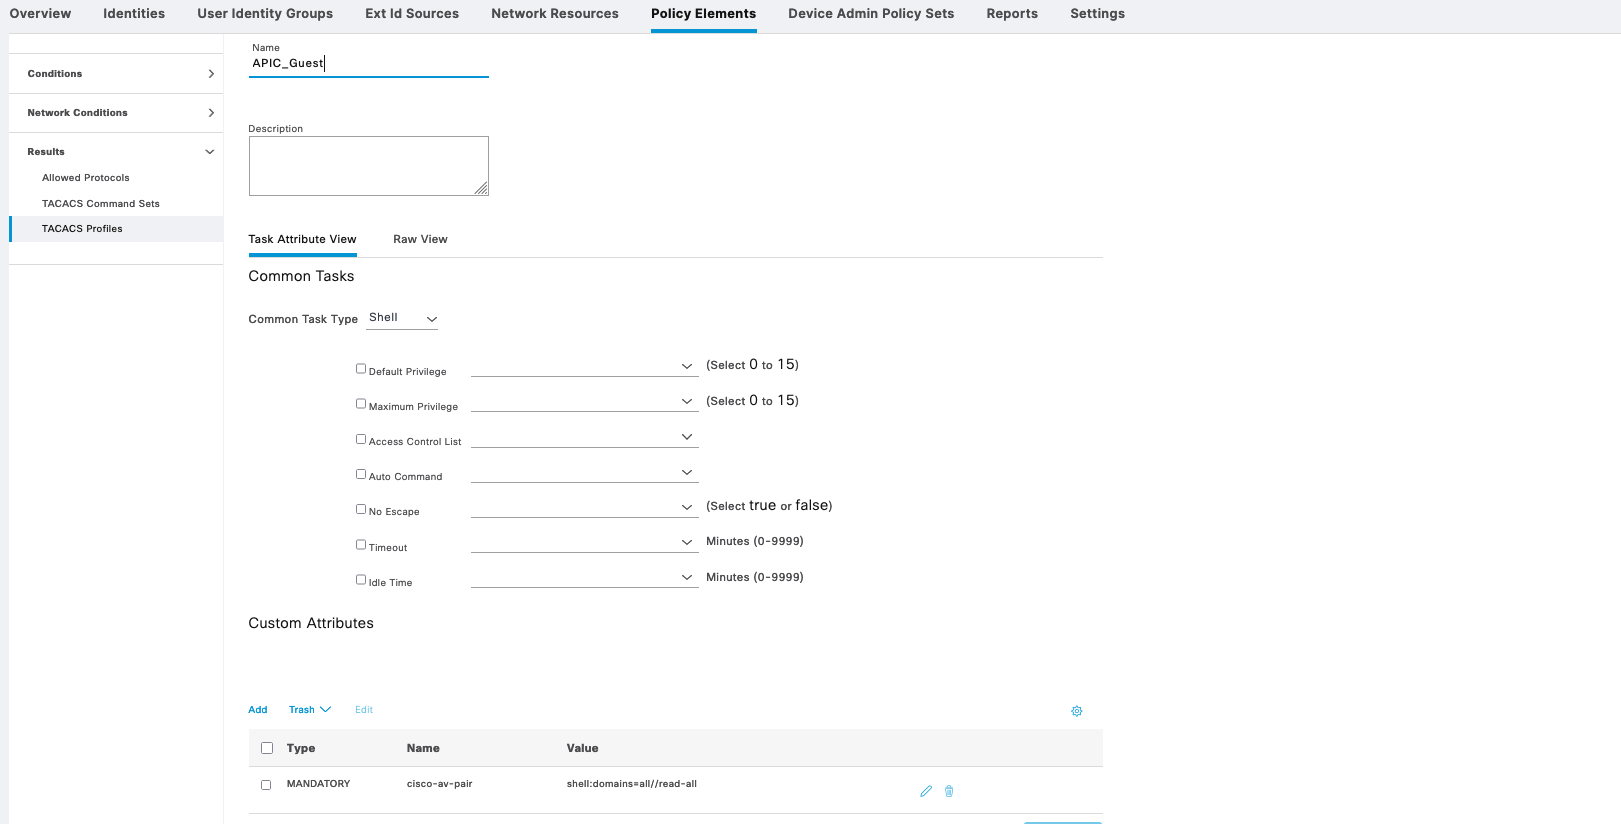
For APIC, we create another Policy Sets with also 2 Shell Profiles
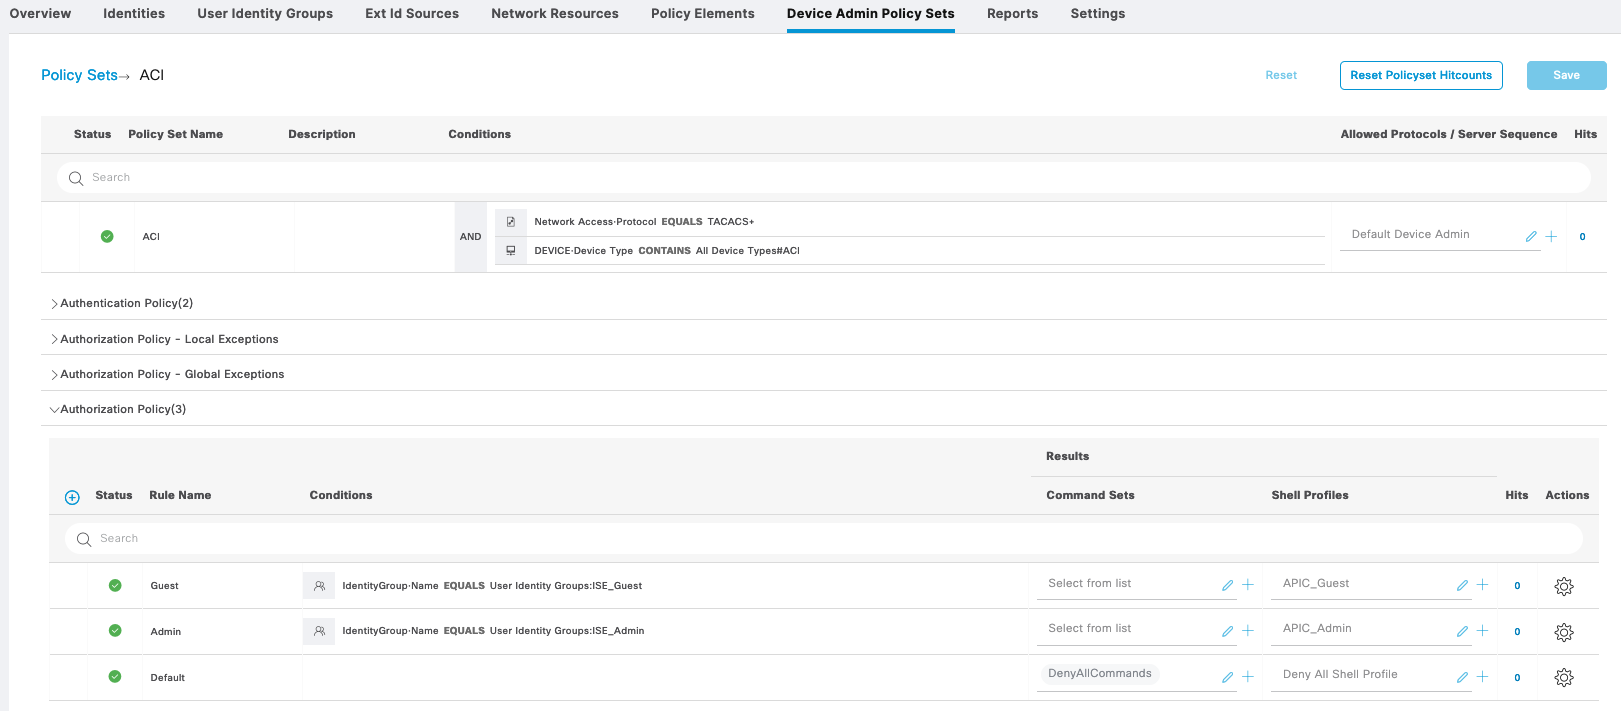
APIC_Admin contains custom attribute “cisco-av-pair=shell:domains=all/admin/” to give it full permission
Whereas APIC_guest contains custom attribute “cisco-av-pair=shell:domains=all//read-all” to only give read-only permission
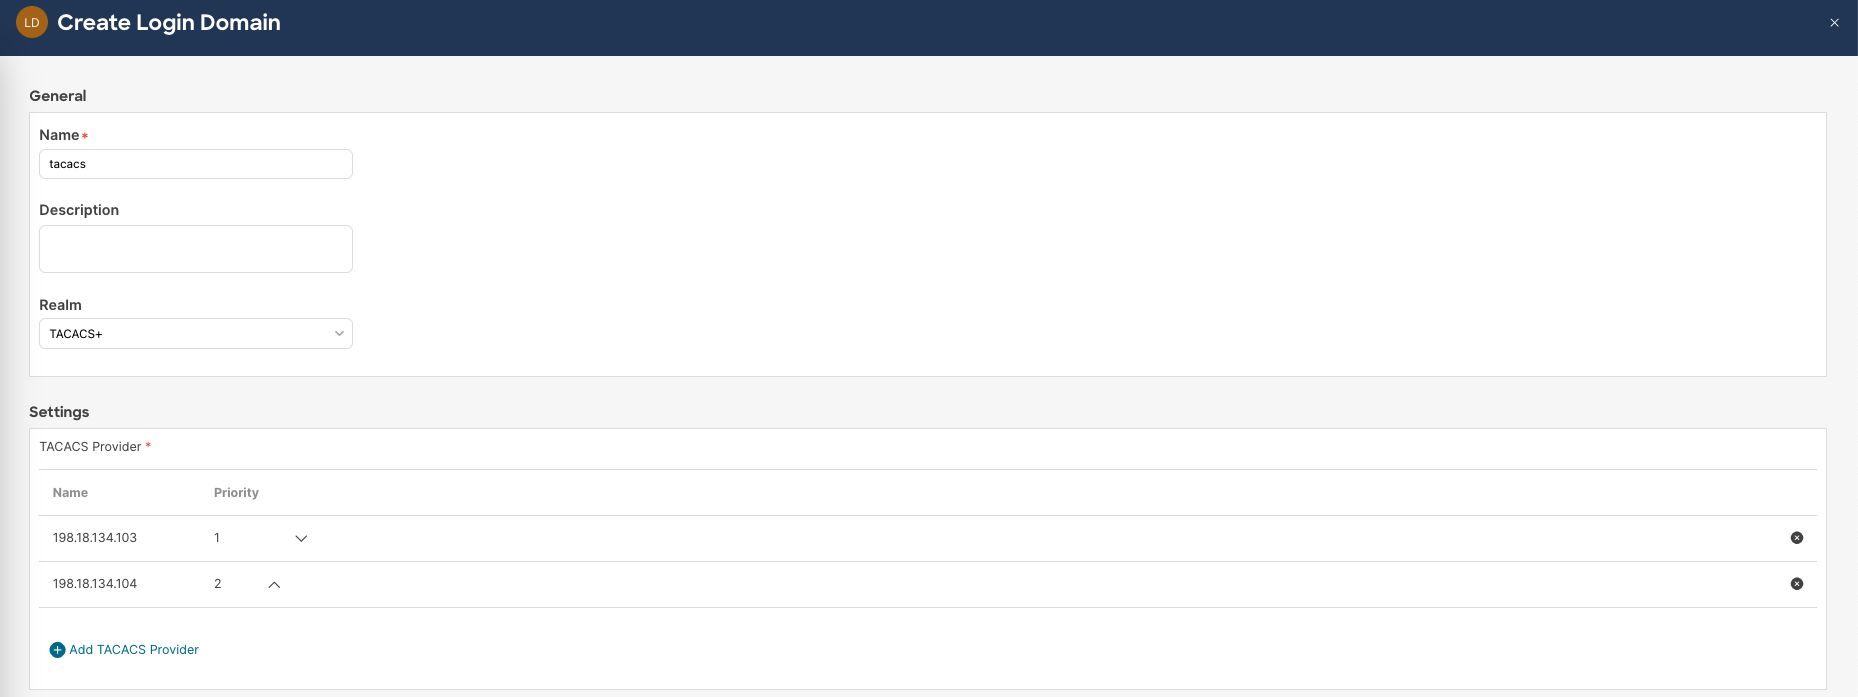
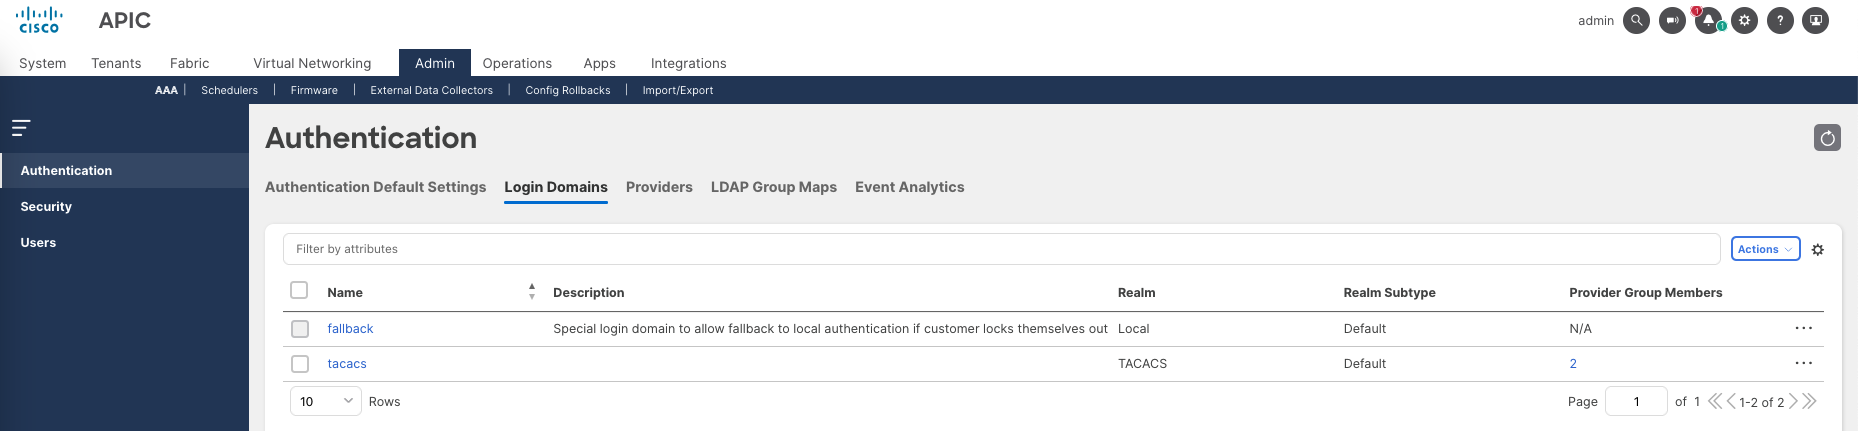
On APIC, go to Admin » AAA » Authentication » Login Domains, create new Login Domain for Tacacs+ containing ISE Servers
That should do it, logging in with iseadmin now grants full admin access

Logging in with iseguest only grants read-only access

ISE Live Logs shows these users authenticating to ISE
F5
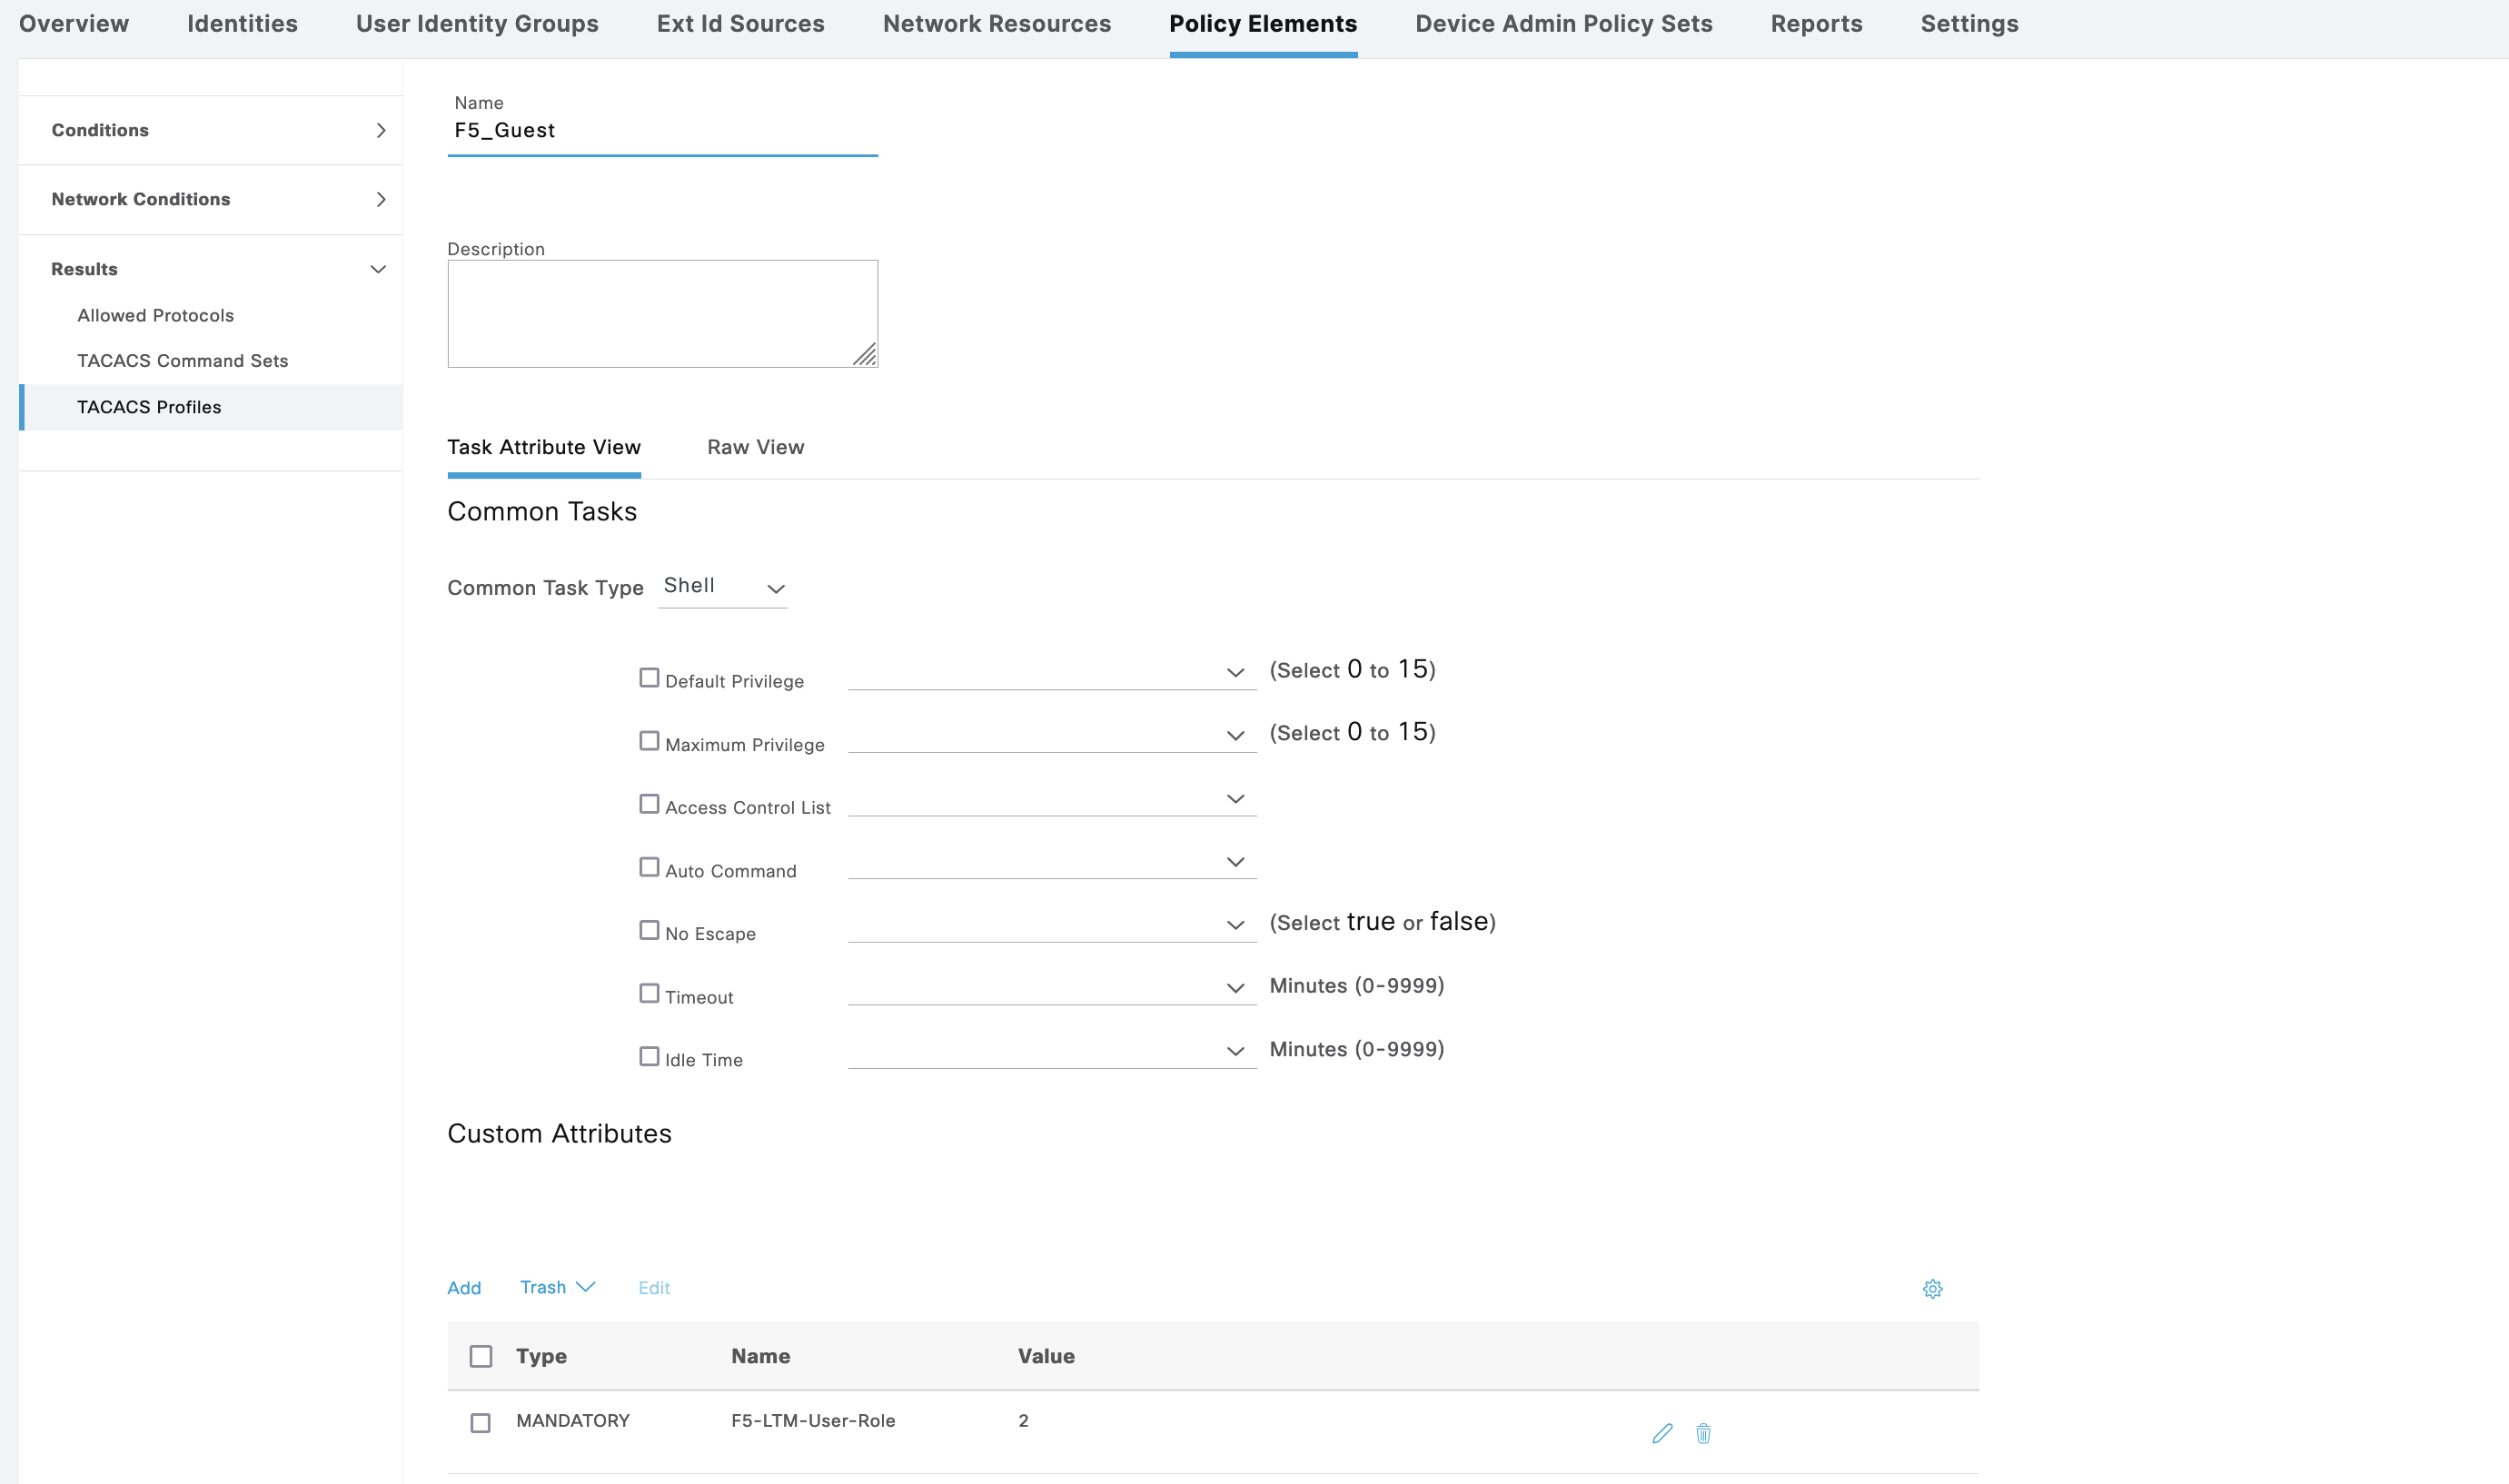
First we create a Policy Sets for F5 with 2 Shell Profiles

For F5_Admin, we add an attribute “F5-LTM-User-Role” with Value “1”

And for F5_Guest, the “F5-LTM-User-Role” has Value of “2”
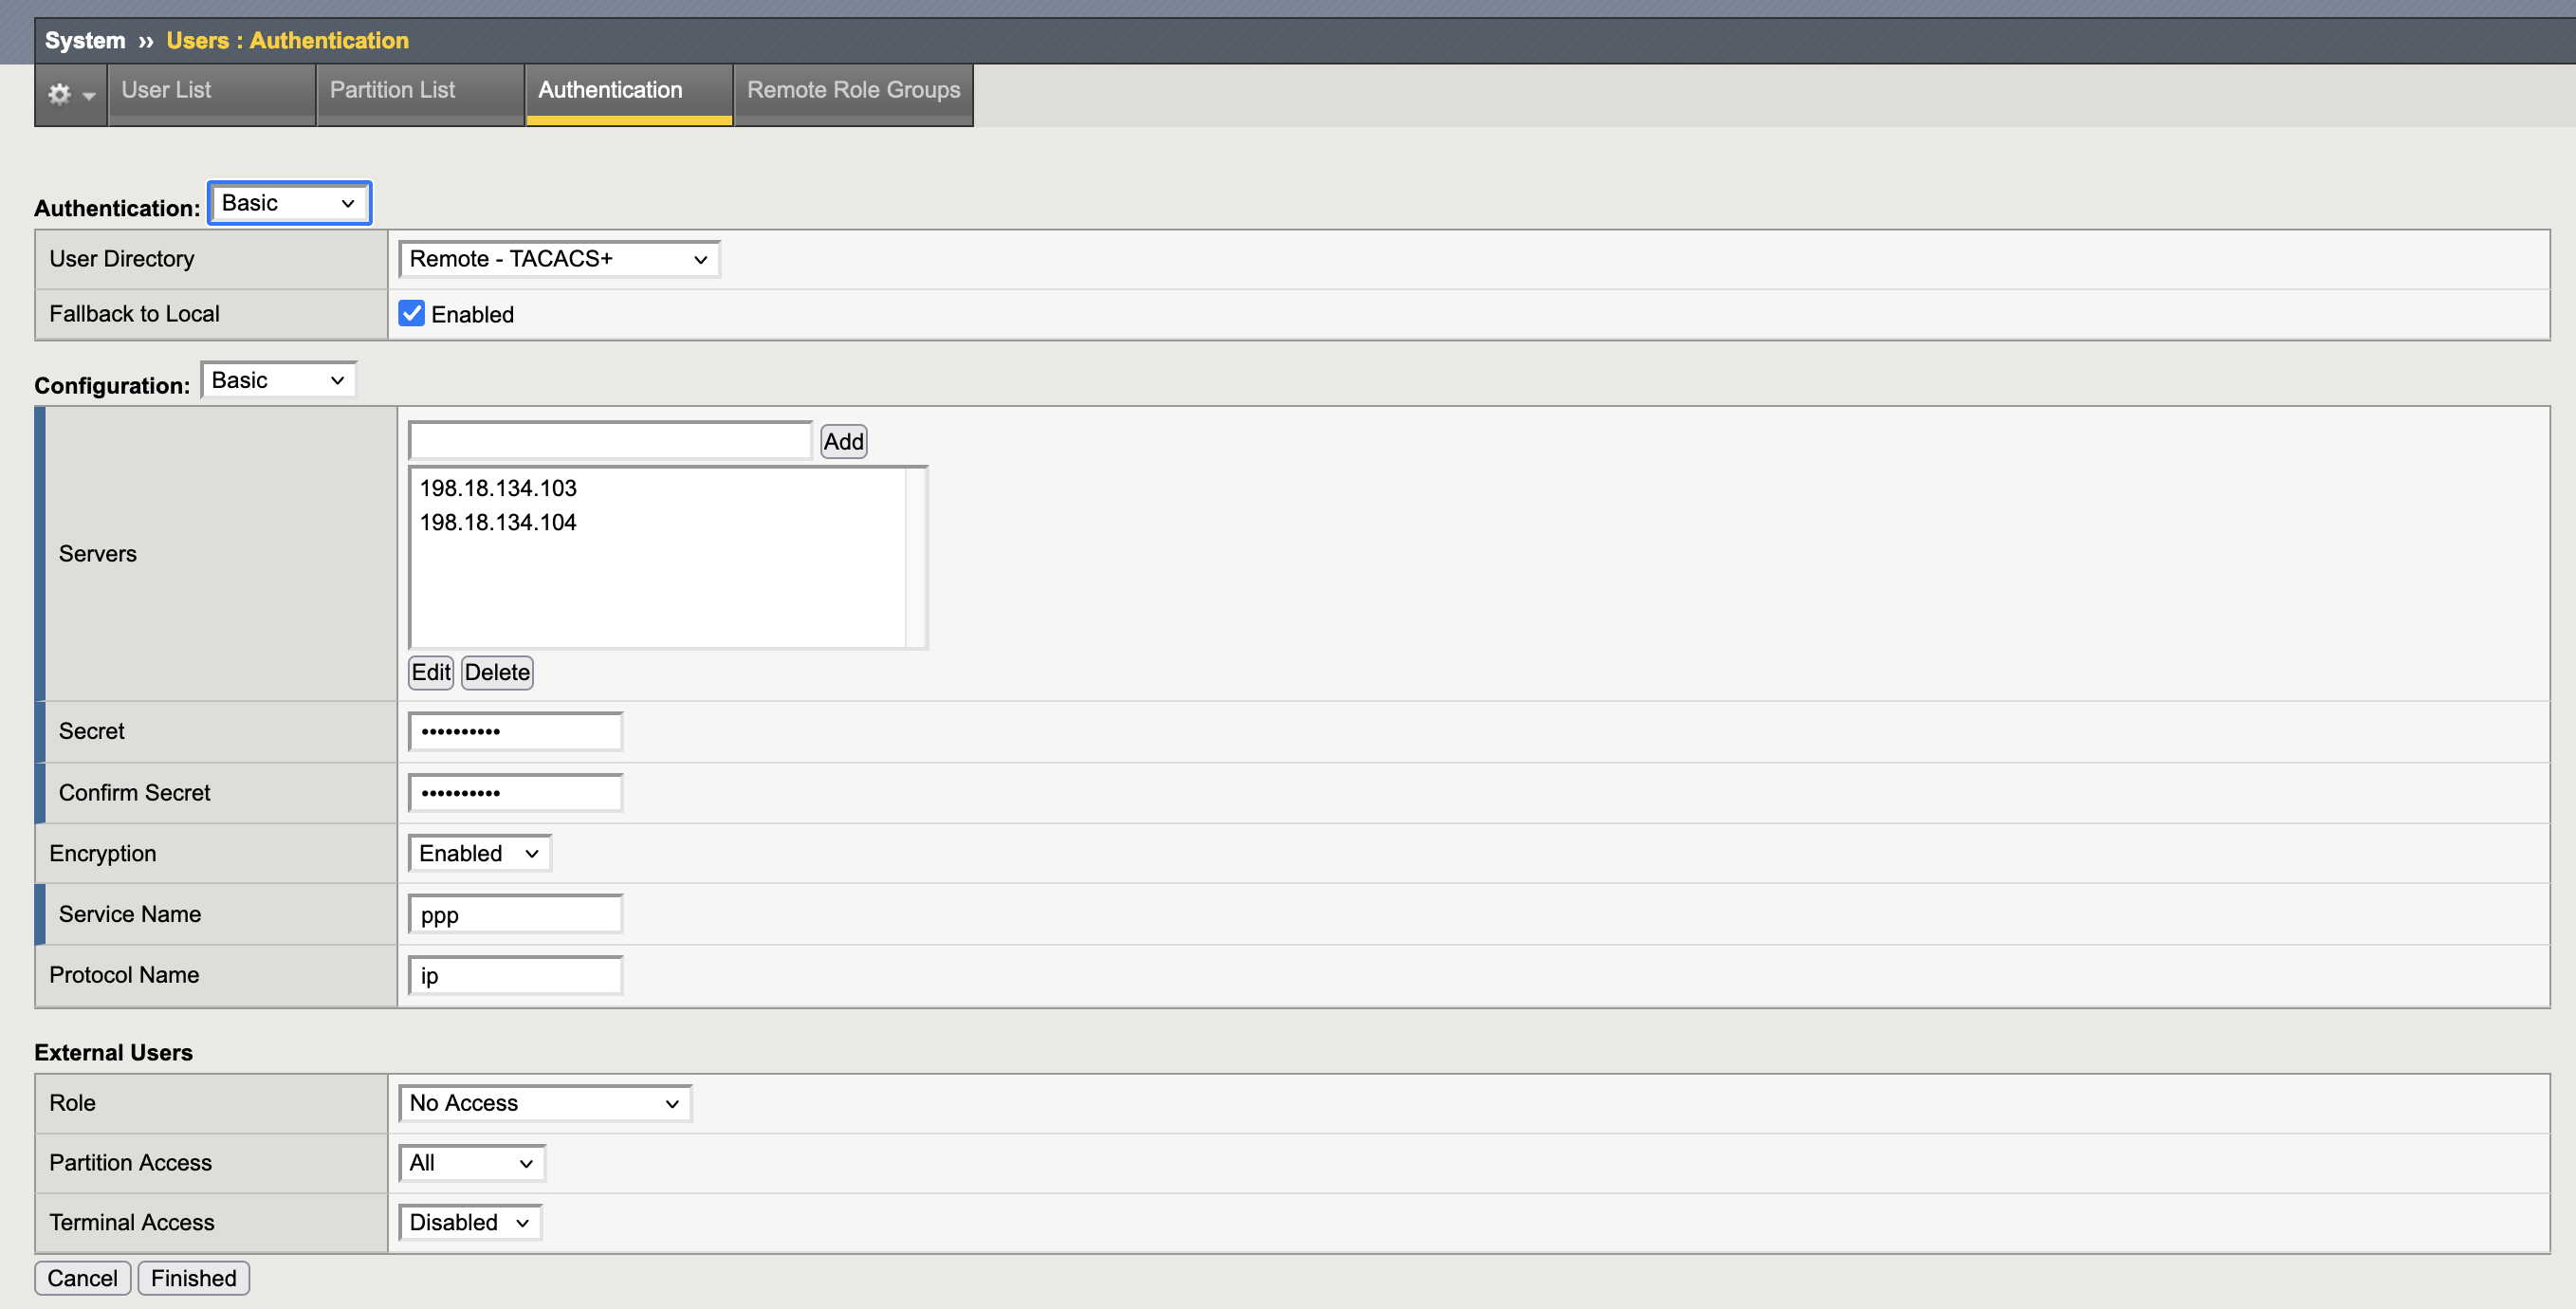
Now on the F5, on System » User » Remote Role Groups, we create 2 groups with the mapped attribute to correspond to its respective role

And then on Authentication, we enable TACACS+ and add the ISE Servers
Now if login with iseadmin, we are granted with Administrator role

With iseguest, the role is Guest

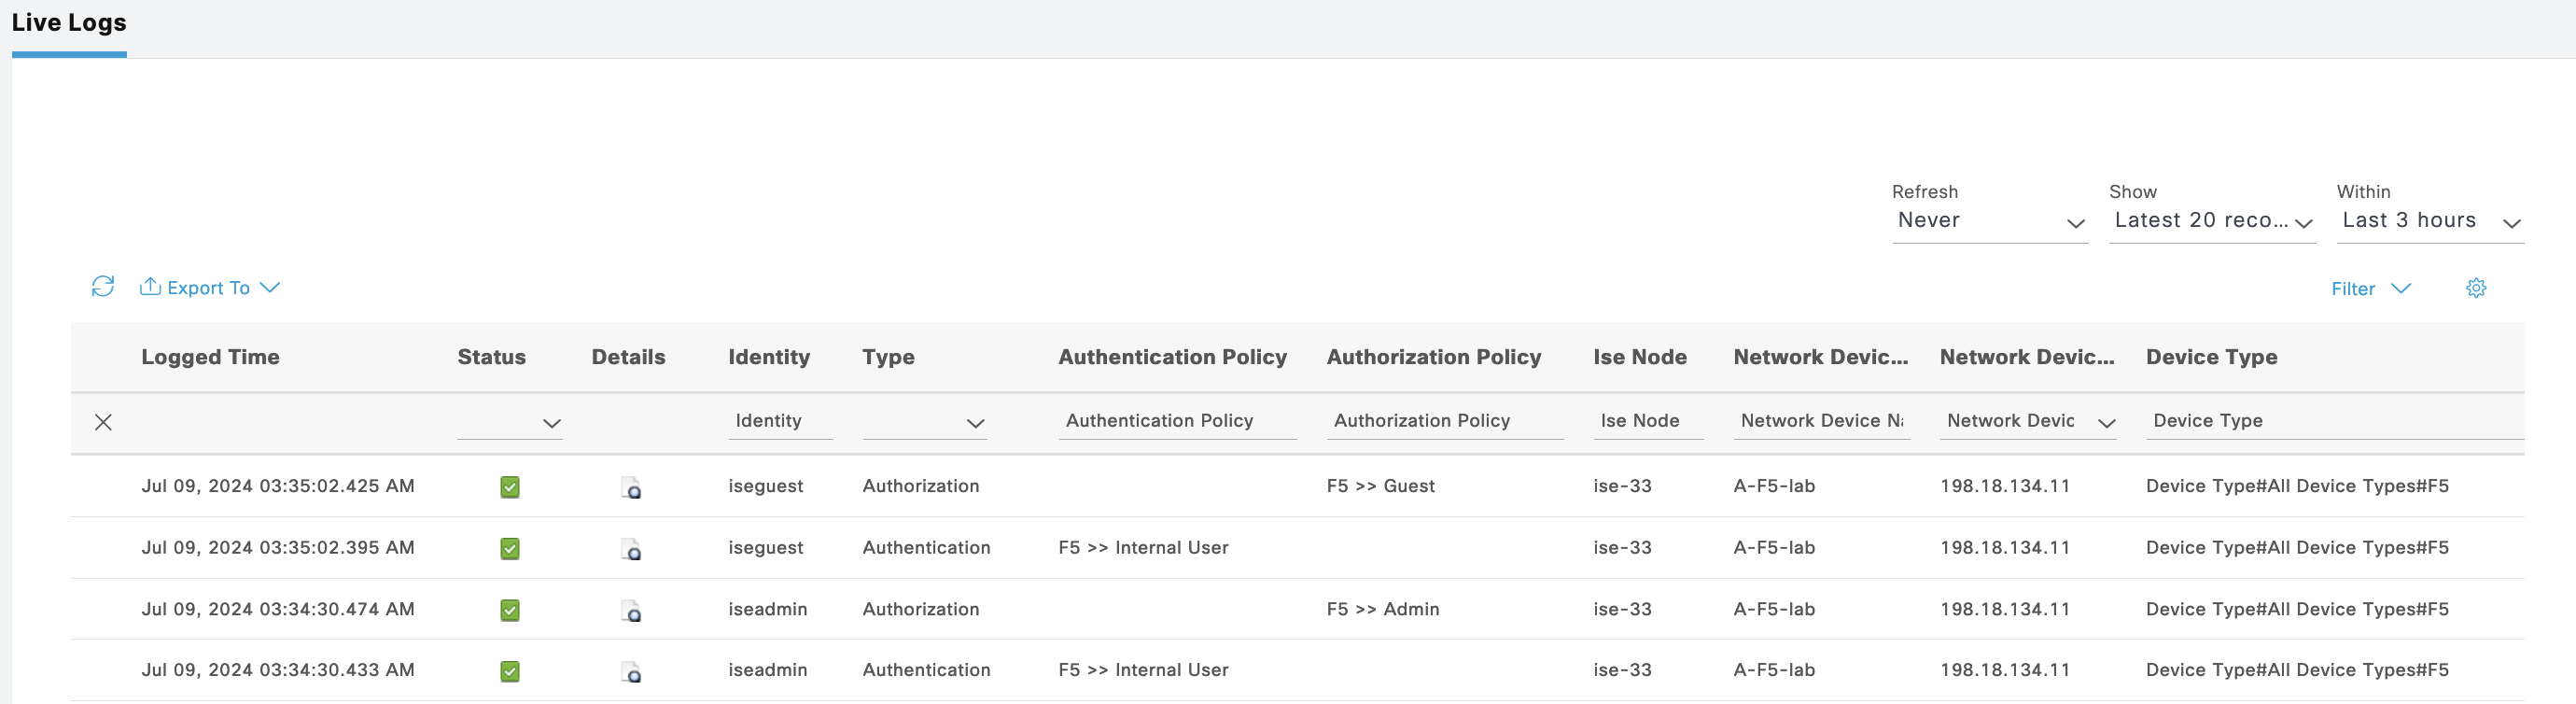
On ISE Live Logs, we can see both users authenticating
Fortigate
For Forti, we also create a Policy Sets with 2 Authorization Shell Profiles
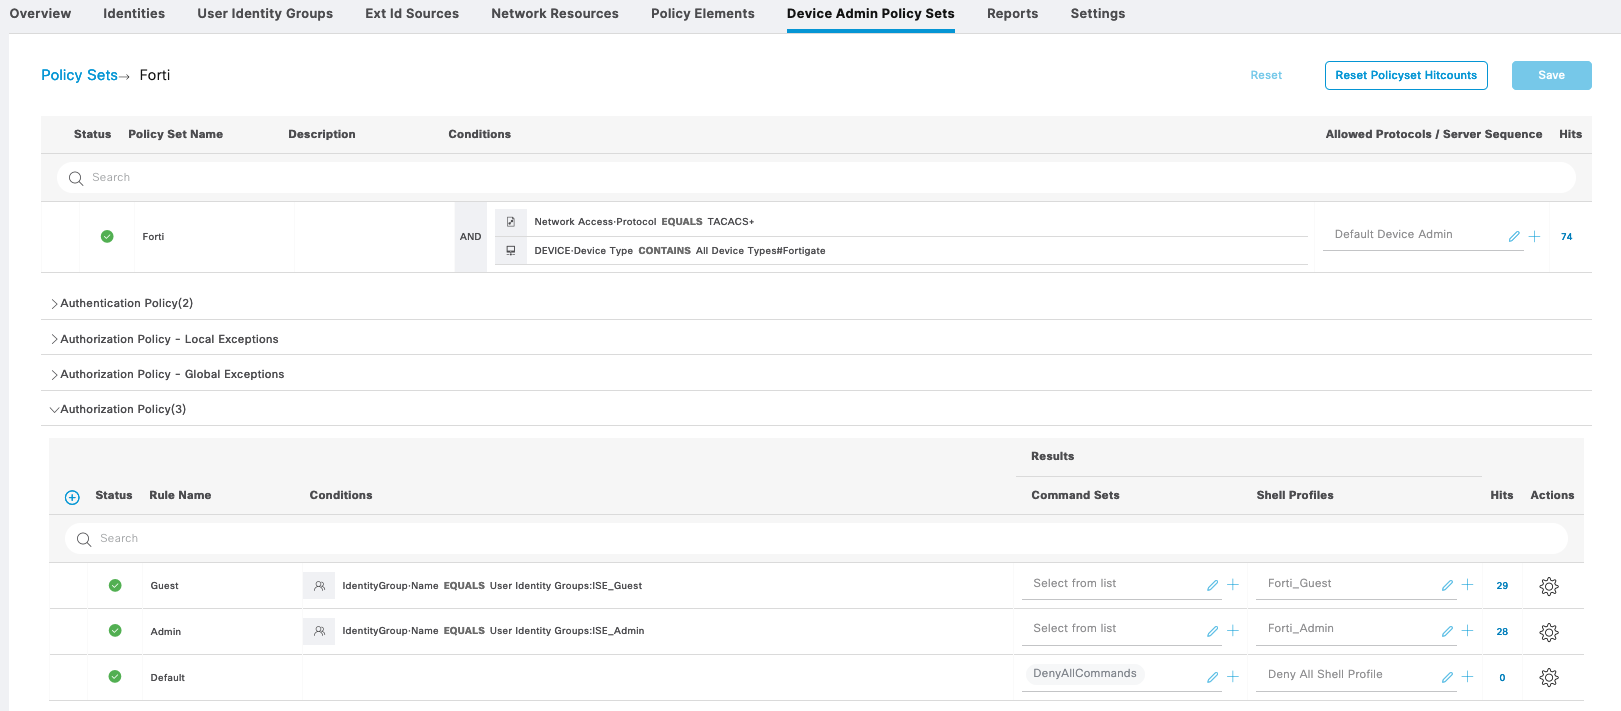
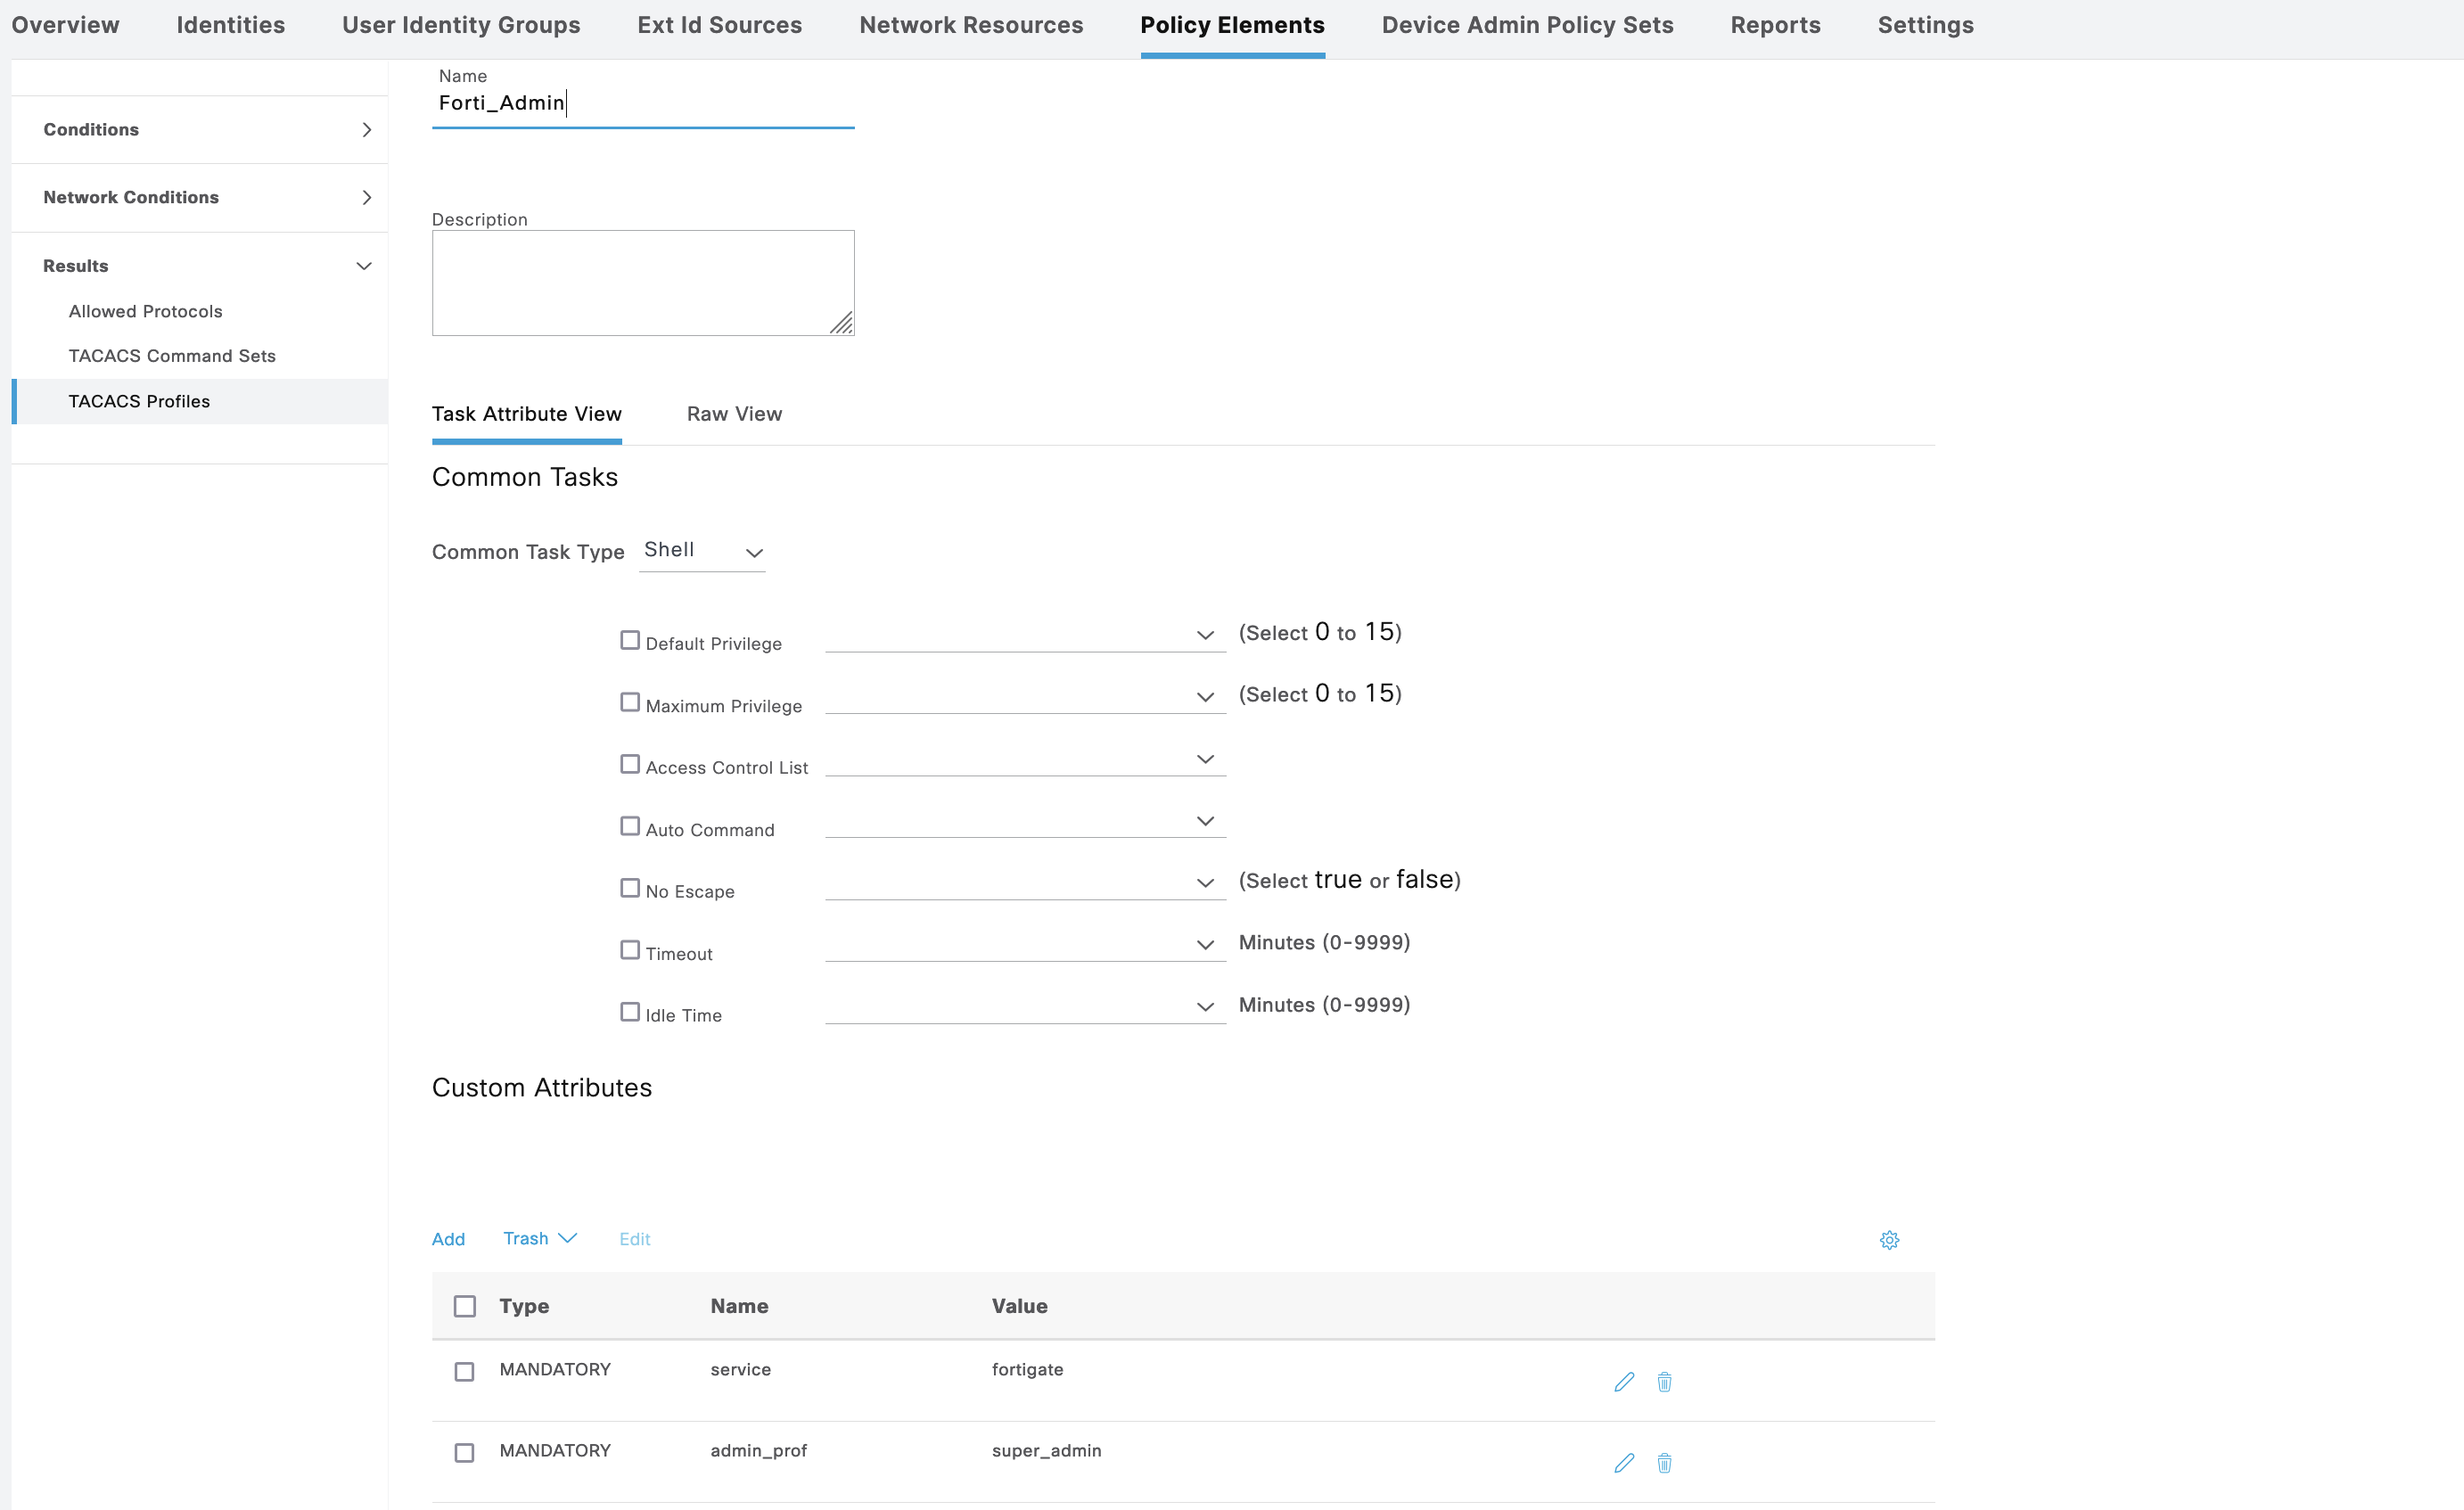
The Forti_Admin shell contains attribute “admin_prof” with value of “super_admin”
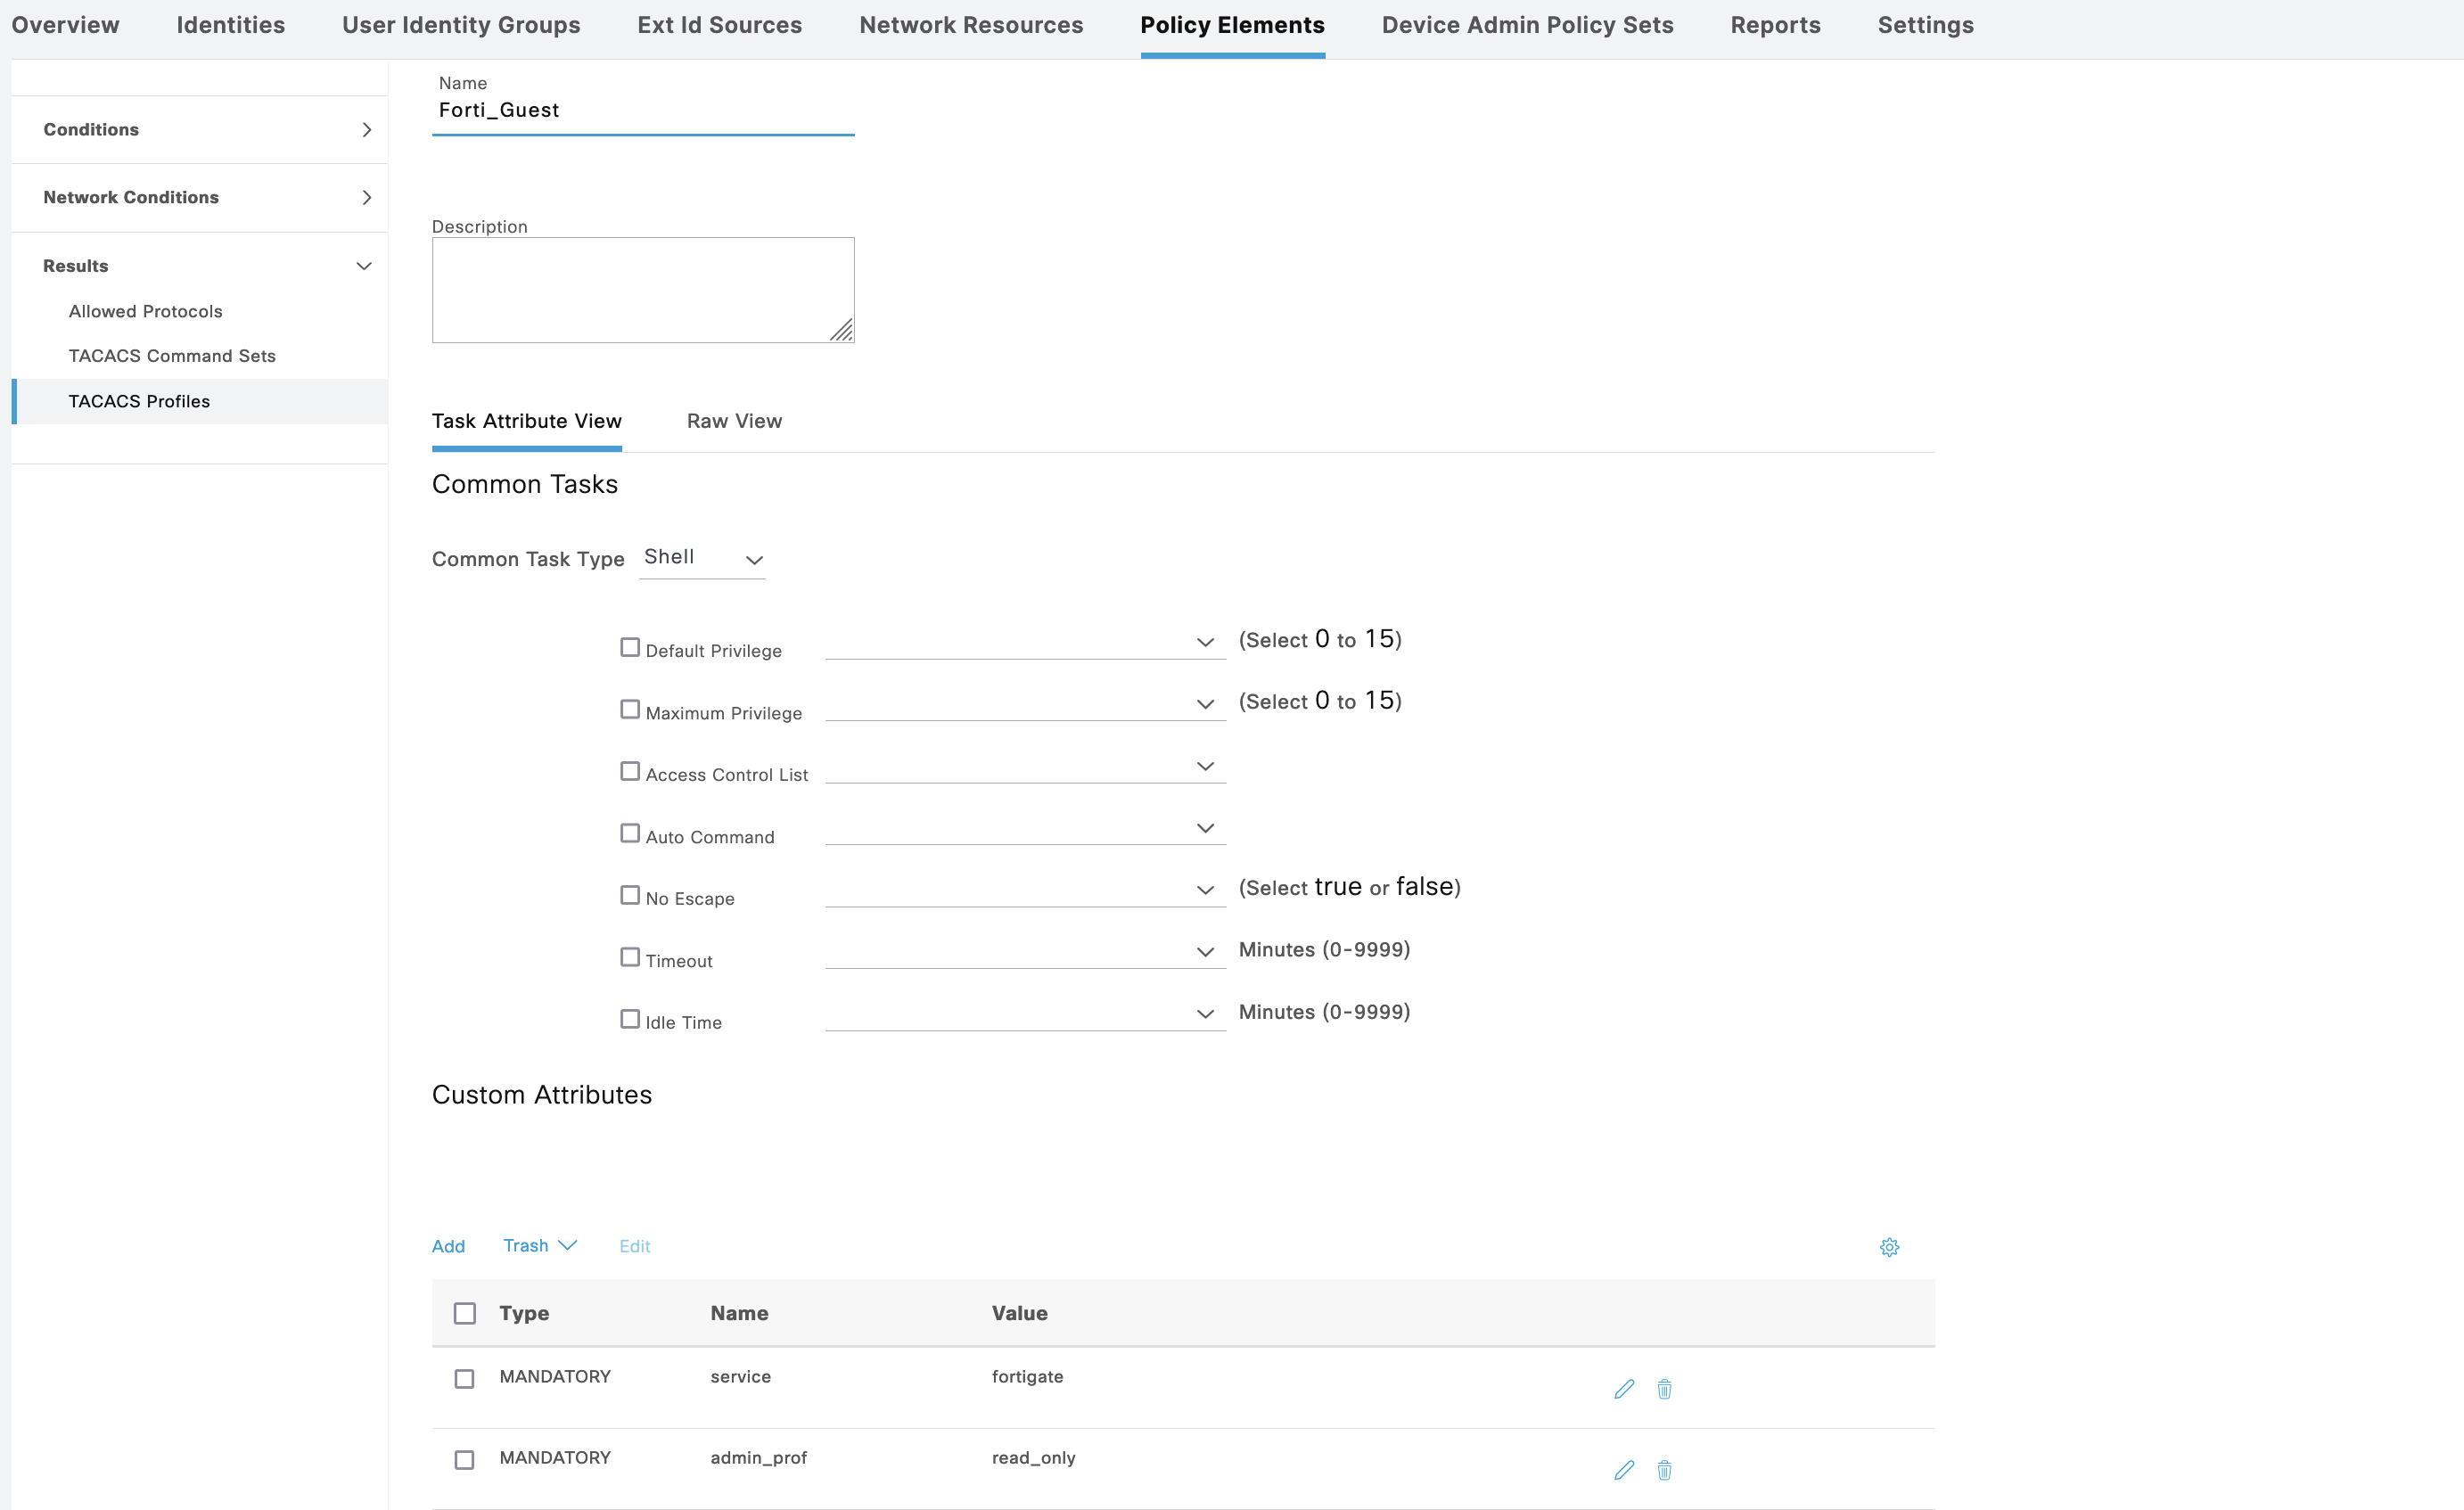
Wheraas the Forti_Guest has “admin_prof” with value of “read_only”
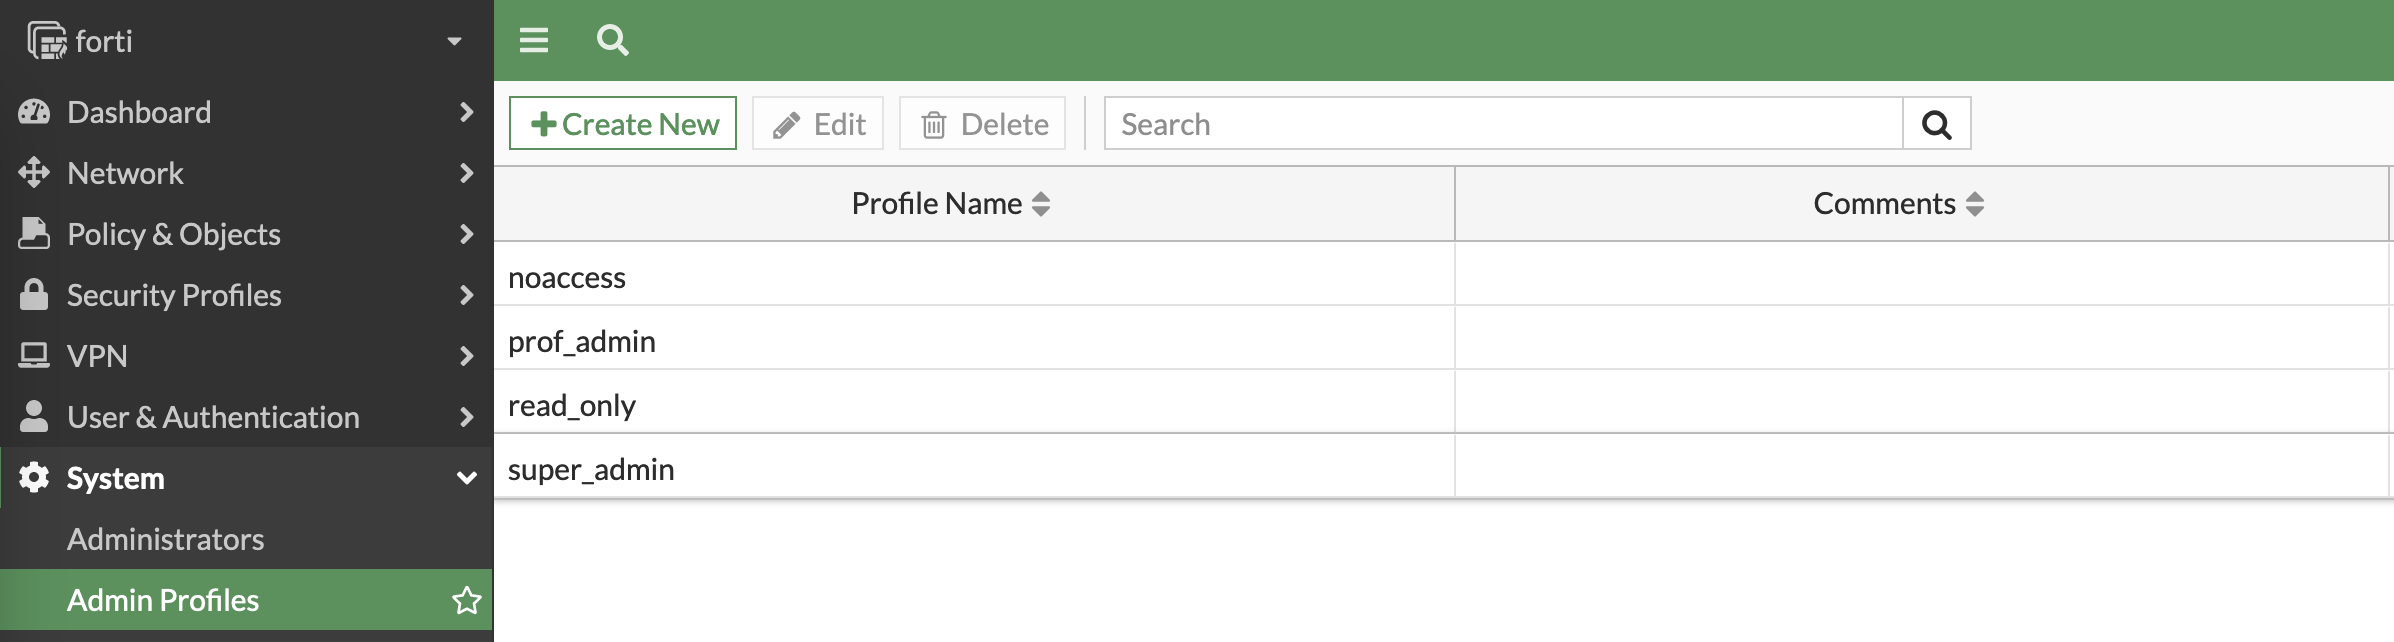
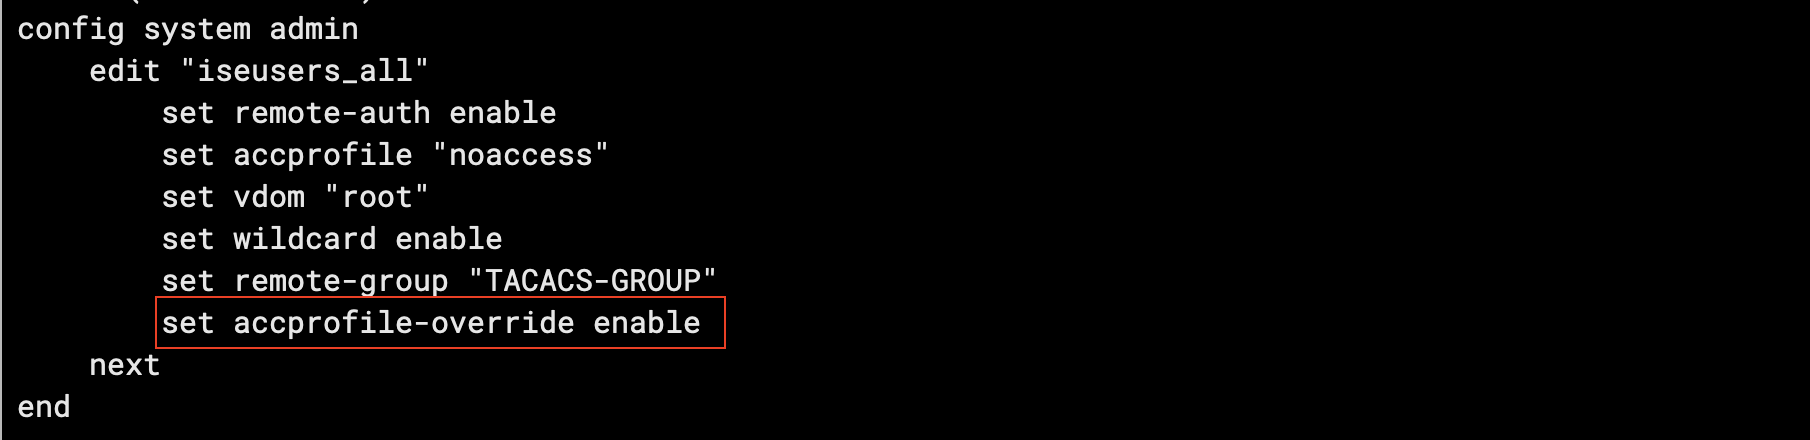
On the Fortigate, match those attributes set on ISE into Admin Profiles here, notice that we also add a new profile named “noaccess” which will be the default profile for all tacacs user until it is overriden by attribute pushed by ISE
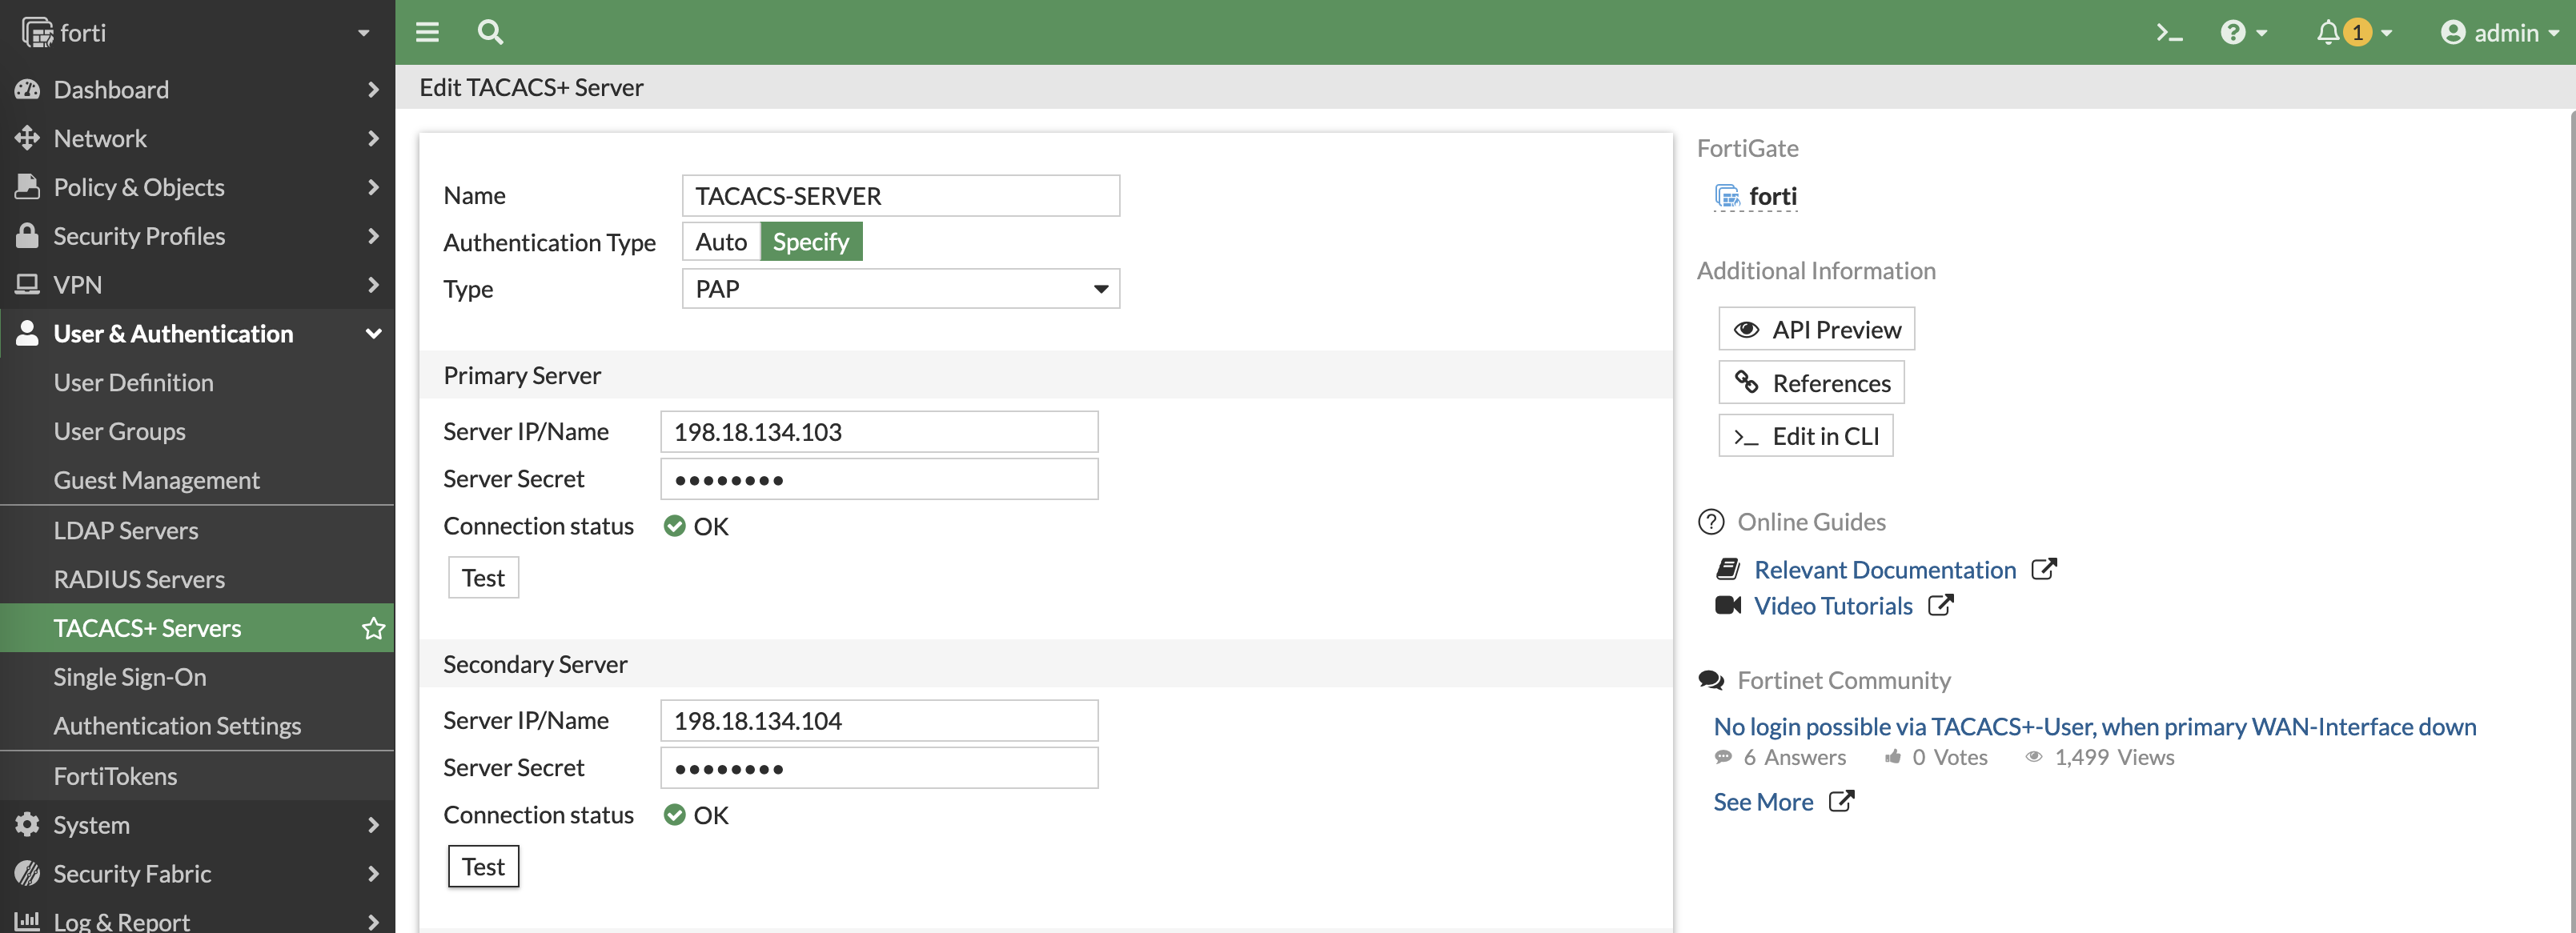
Next add the TACACS Servers
1
2
3
4
5
6
7
8
config user tacacs+
    edit "TACACS-SERVER"
        set server "198.18.134.103"
        set secondary-server "198.18.134.104"
        set key "helena"
        set authen-type pap
        set authorization enable
next
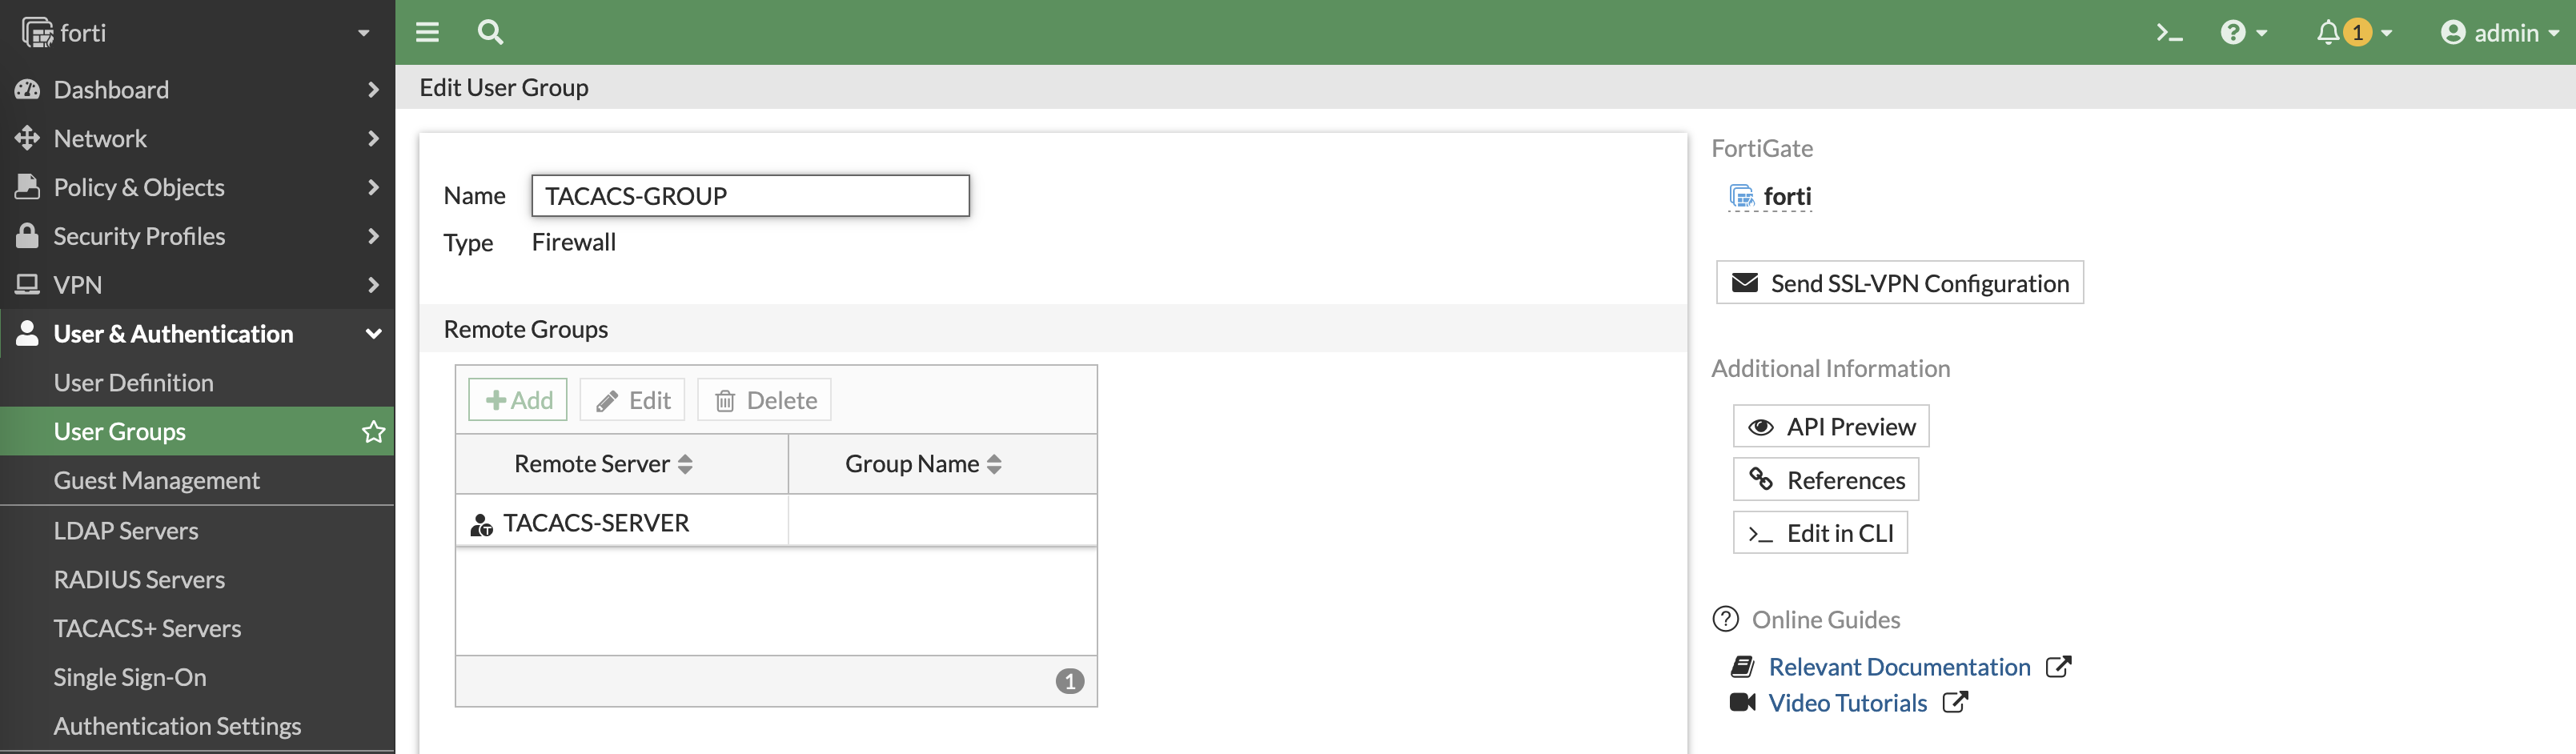
Then create a User Group with the TACACS-SERVERS as the member
Now we create an admin user to actually login to Fortigate, there’s basically 2 ways to do this, the first one is by matching the exact ISE user on the Fortigate. This means every ISE user authenticating to Fortigate needs to also be created here, which is tideous
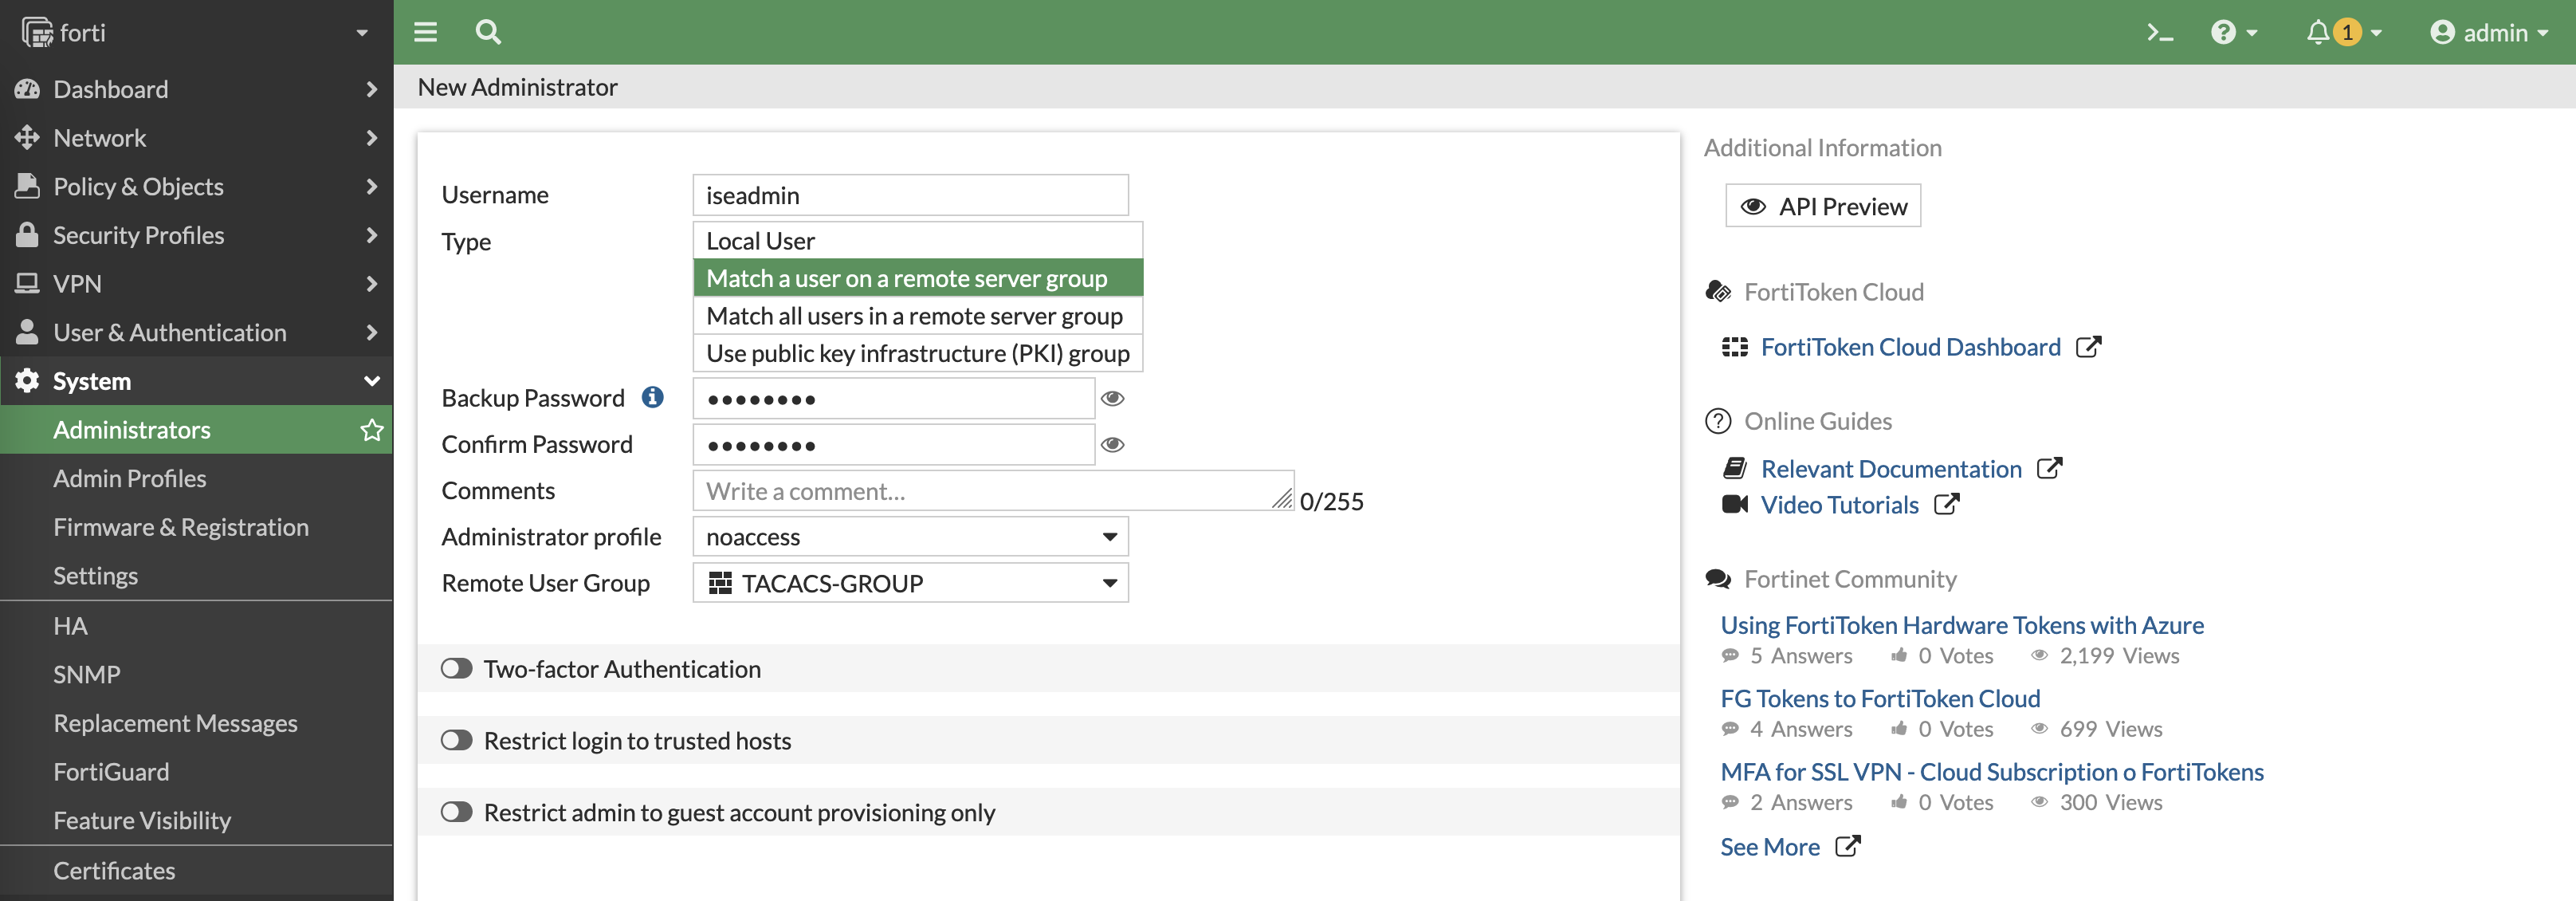
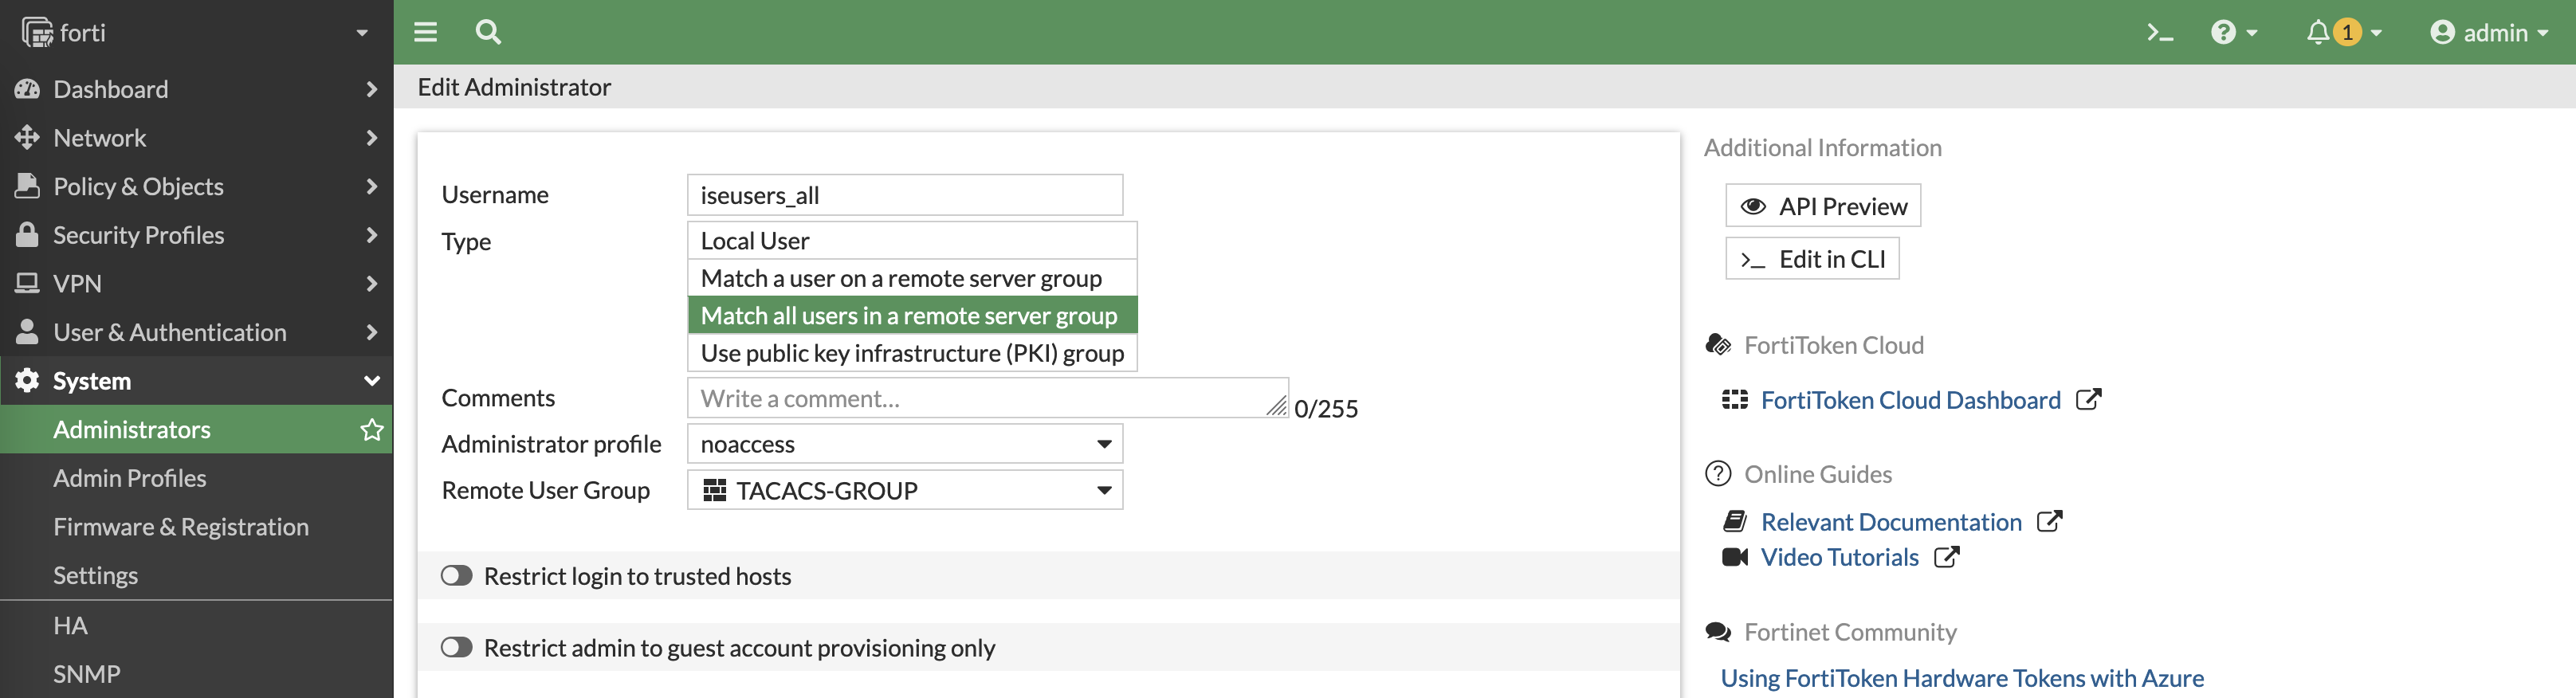
The second way is by using wildcard match, where it basically lets all users authenticated on ISE to access the Fortigate
After that, we need to access the CLI and add this command to ensure that ISE is able to assign the correct profile by overriding the “noaccess” profile given by default
Now if we try loggin in with iseadmin, we are given full super_admin access

But with iseguest, we are only given read_only access

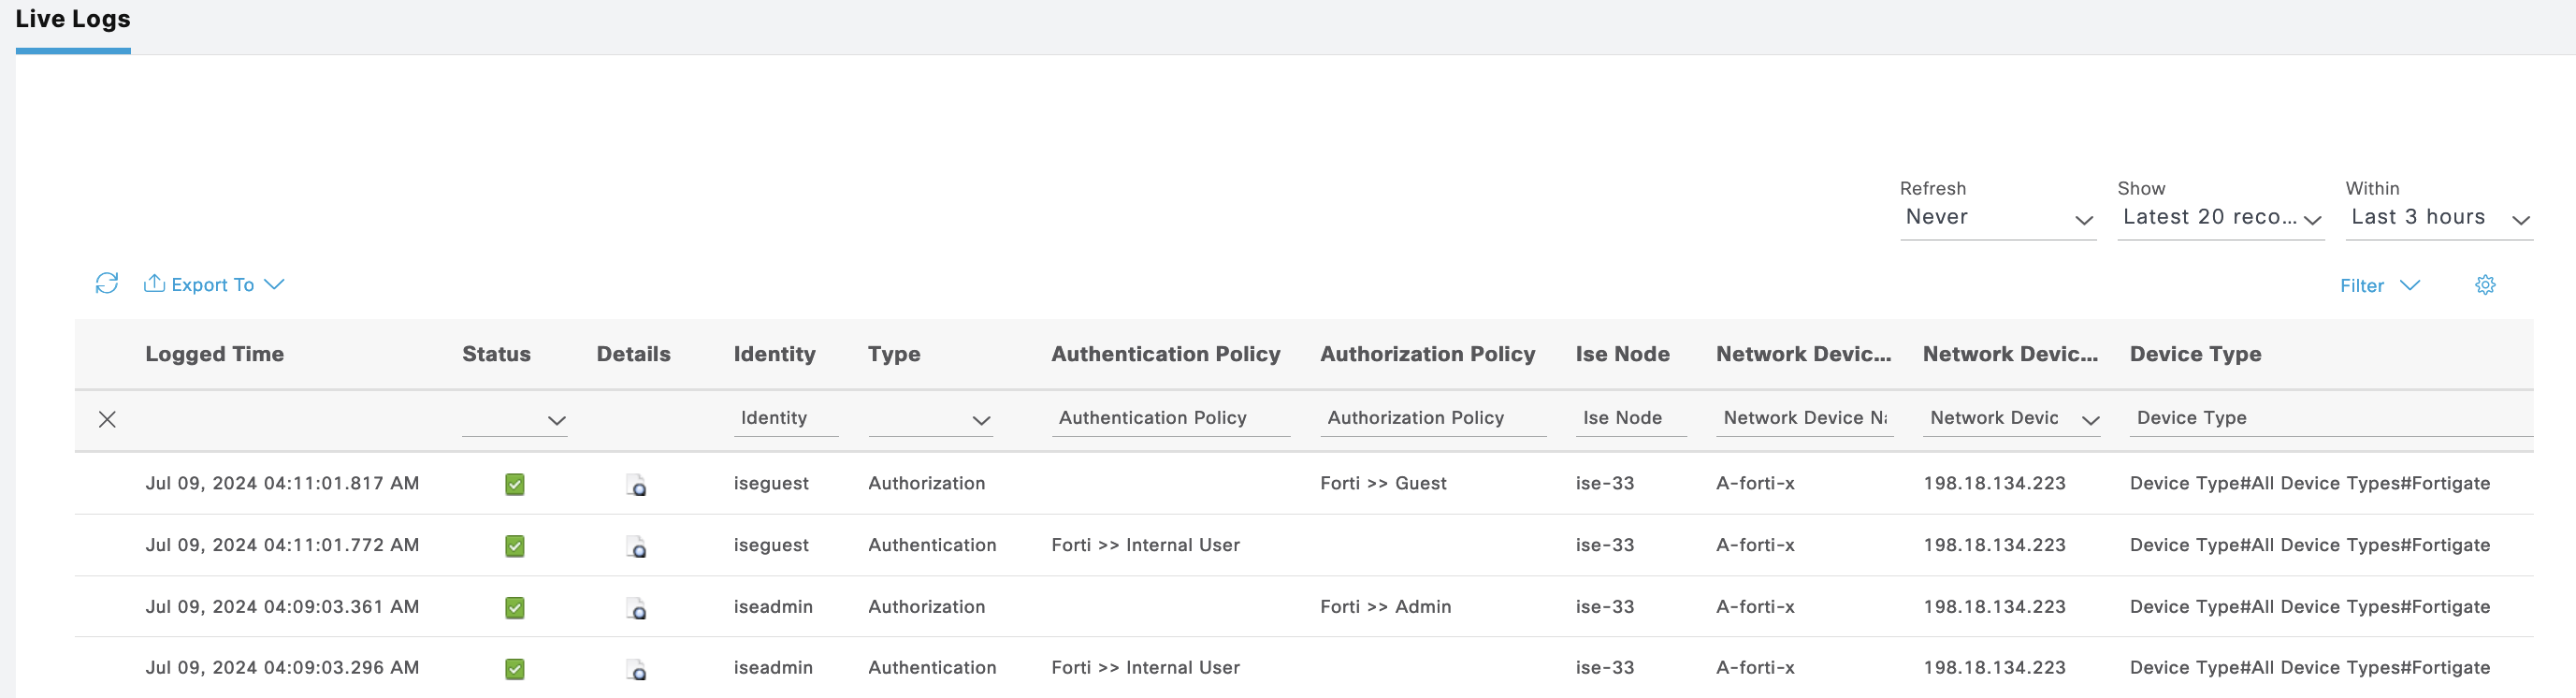
ISE Live Logs shows both users authenticating with its respective permission
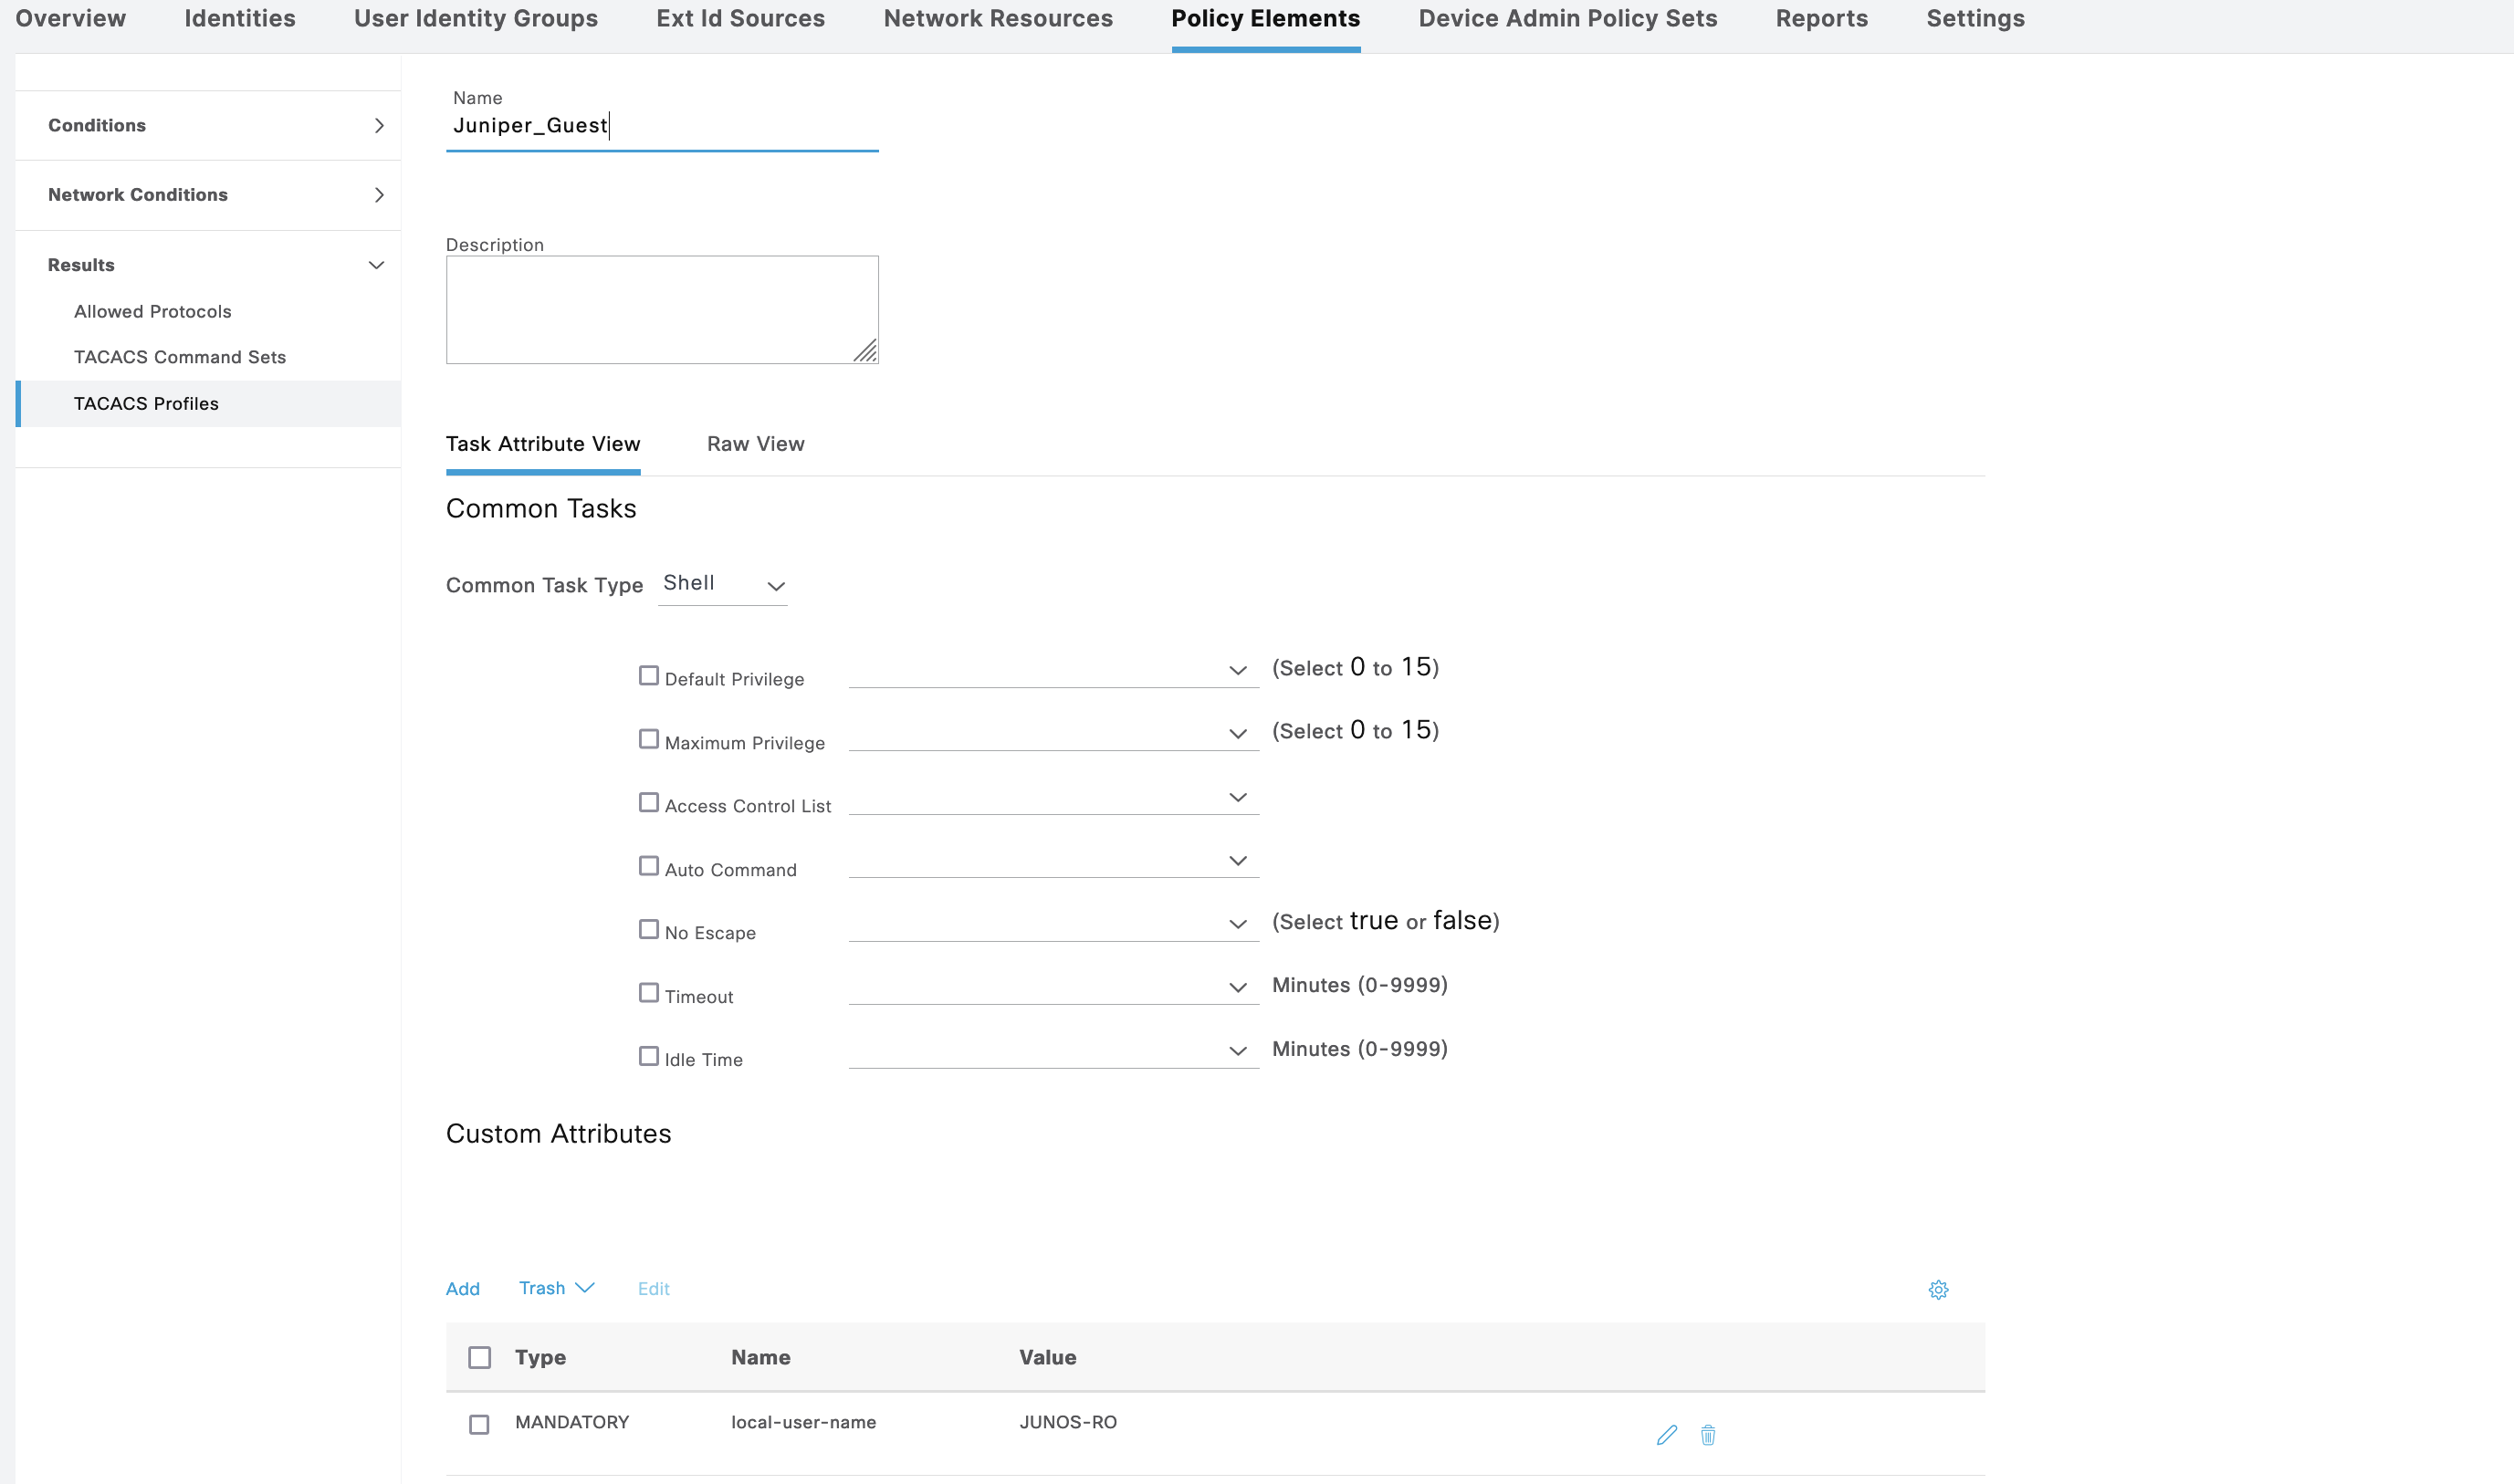
Juniper
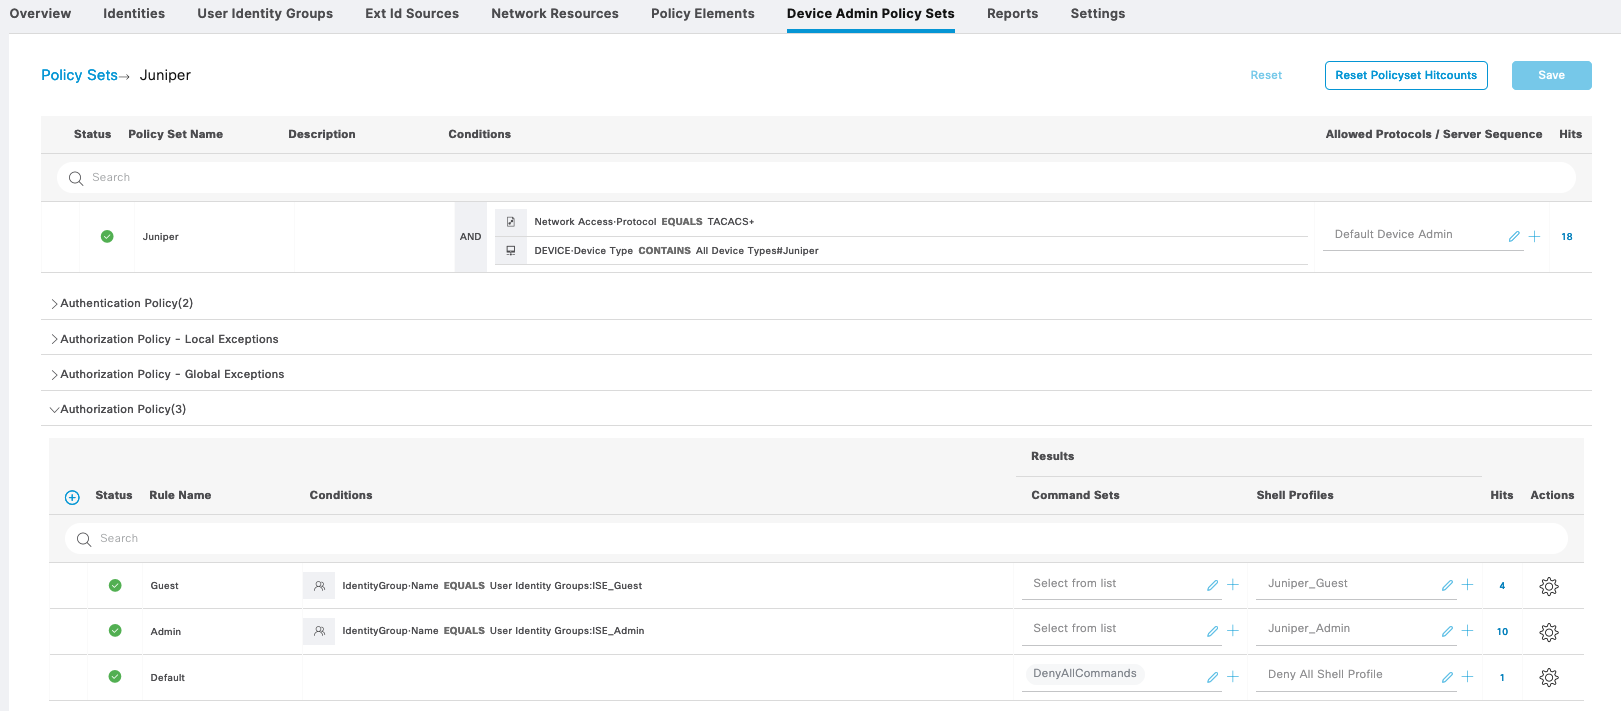
Next for Juniper, as usual we’ll create a Policy Sets
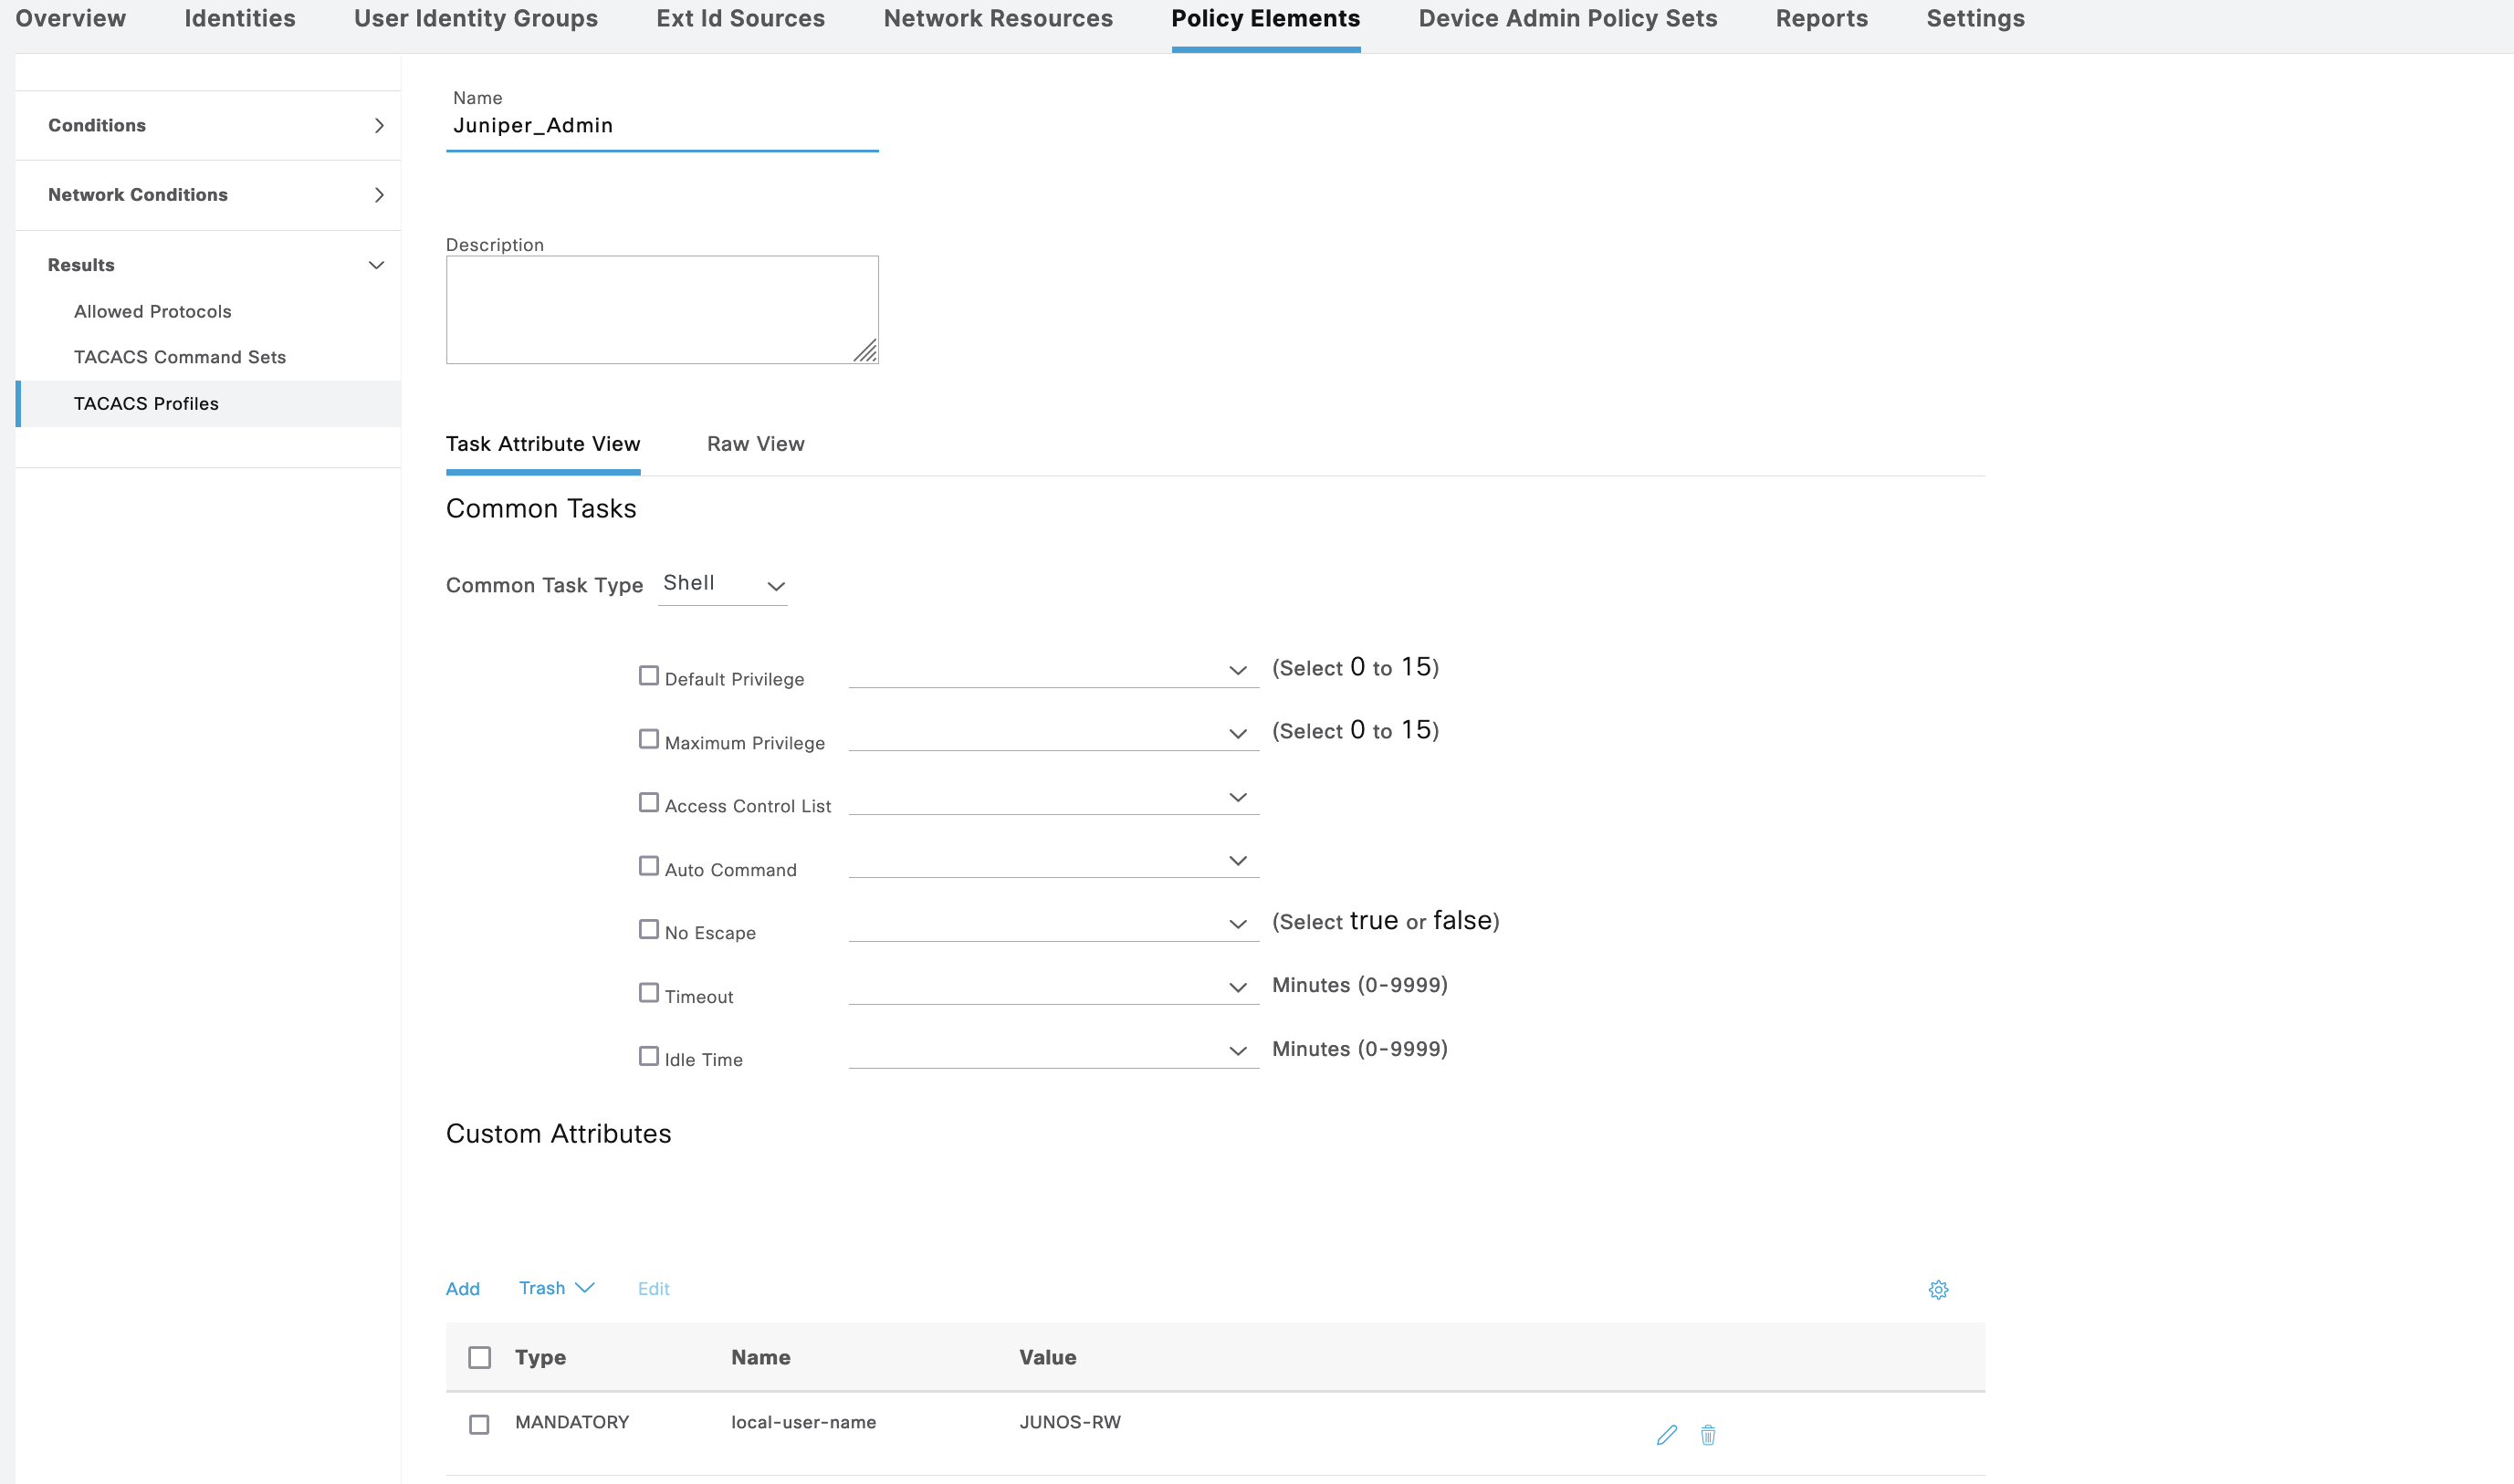
For shell profile Juniper_Admin, we add attribute “local-user-name” with value of “JUNOS-RW”
And for Juniper_Guest, the “local-user-name” has value of “JUNOS-RO”
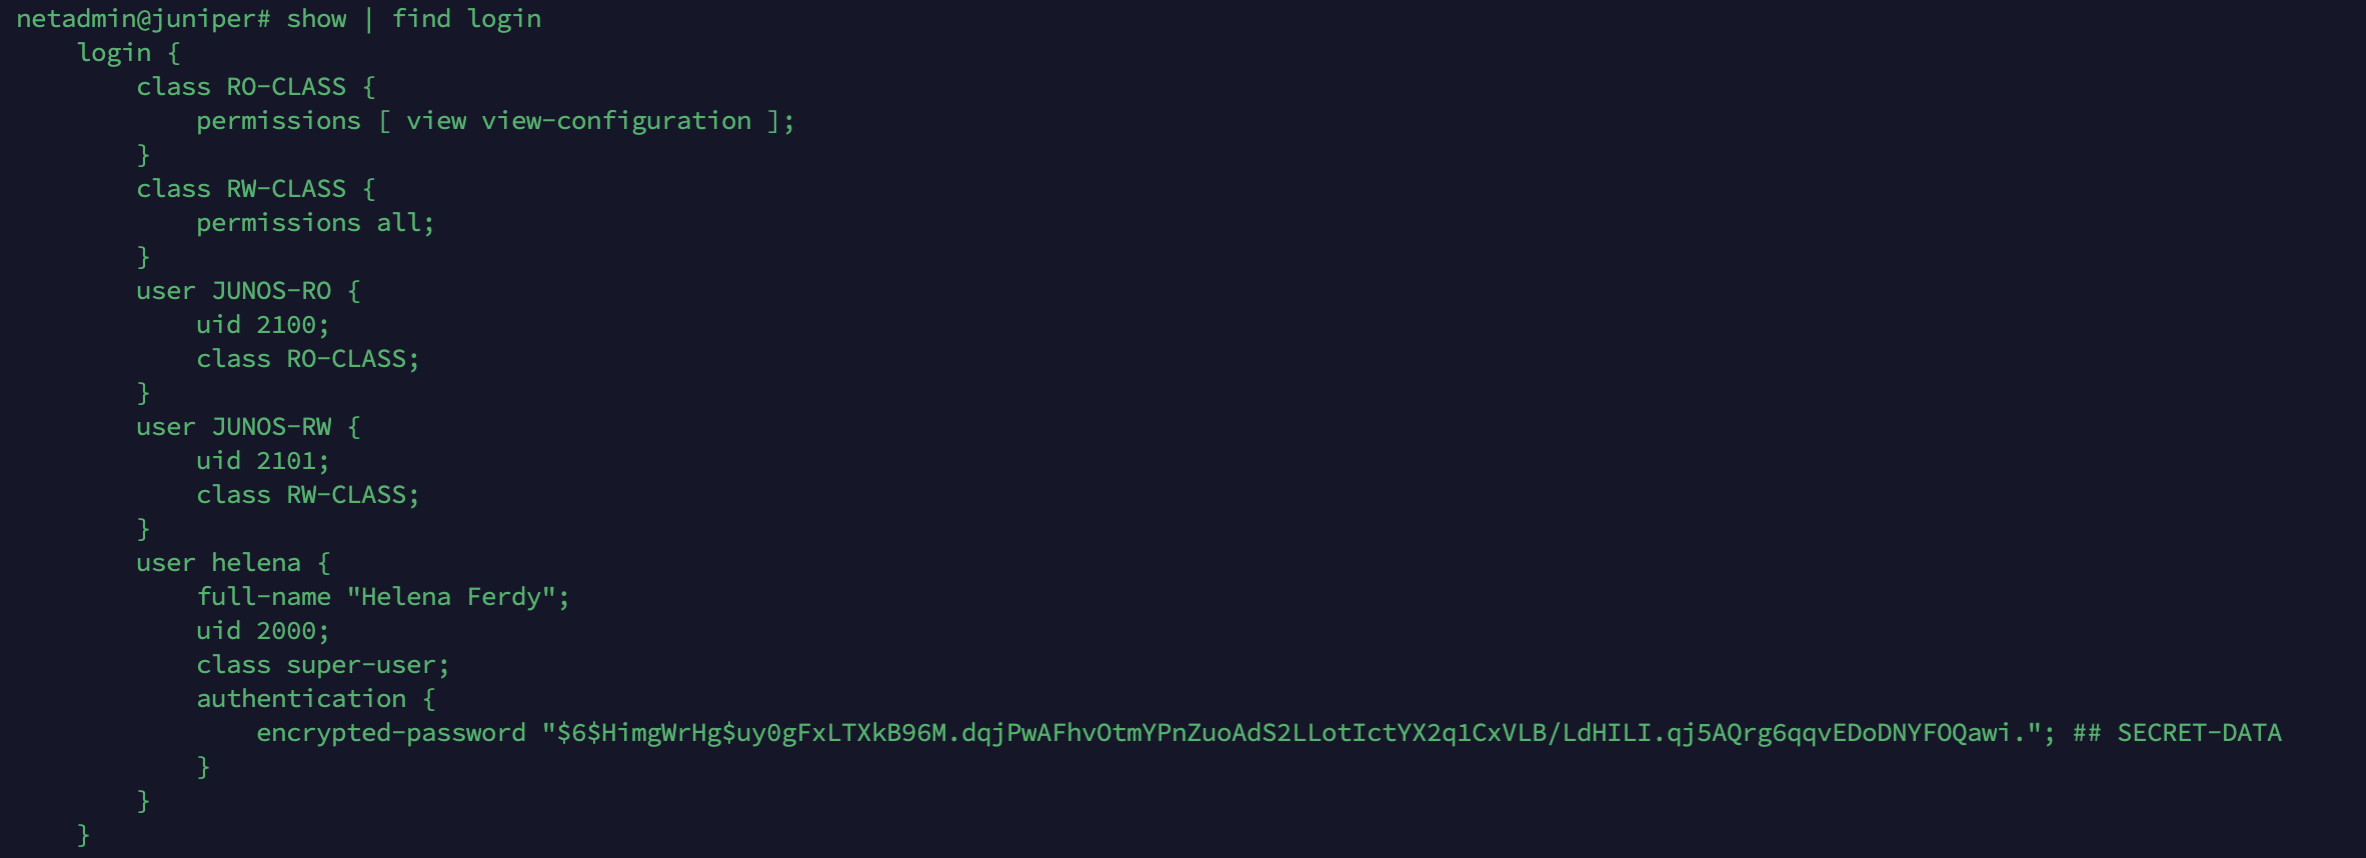
On the Juniper Device, we create 2 login class permission, one is Read-only, the other is Read-write full permission
1
2
3
4
set system login class RO-CLASS permissions view
set system login class RO-CLASS permissions view-configuration

set system login class RW-CLASS permissions all
Now we match the user attribute set on ISE to the its respective class permission
1
2
set system login user JUNOS-RO uid 2100 class RO-CLASS
set system login user JUNOS-RW uid 2101 class RW-CLASS
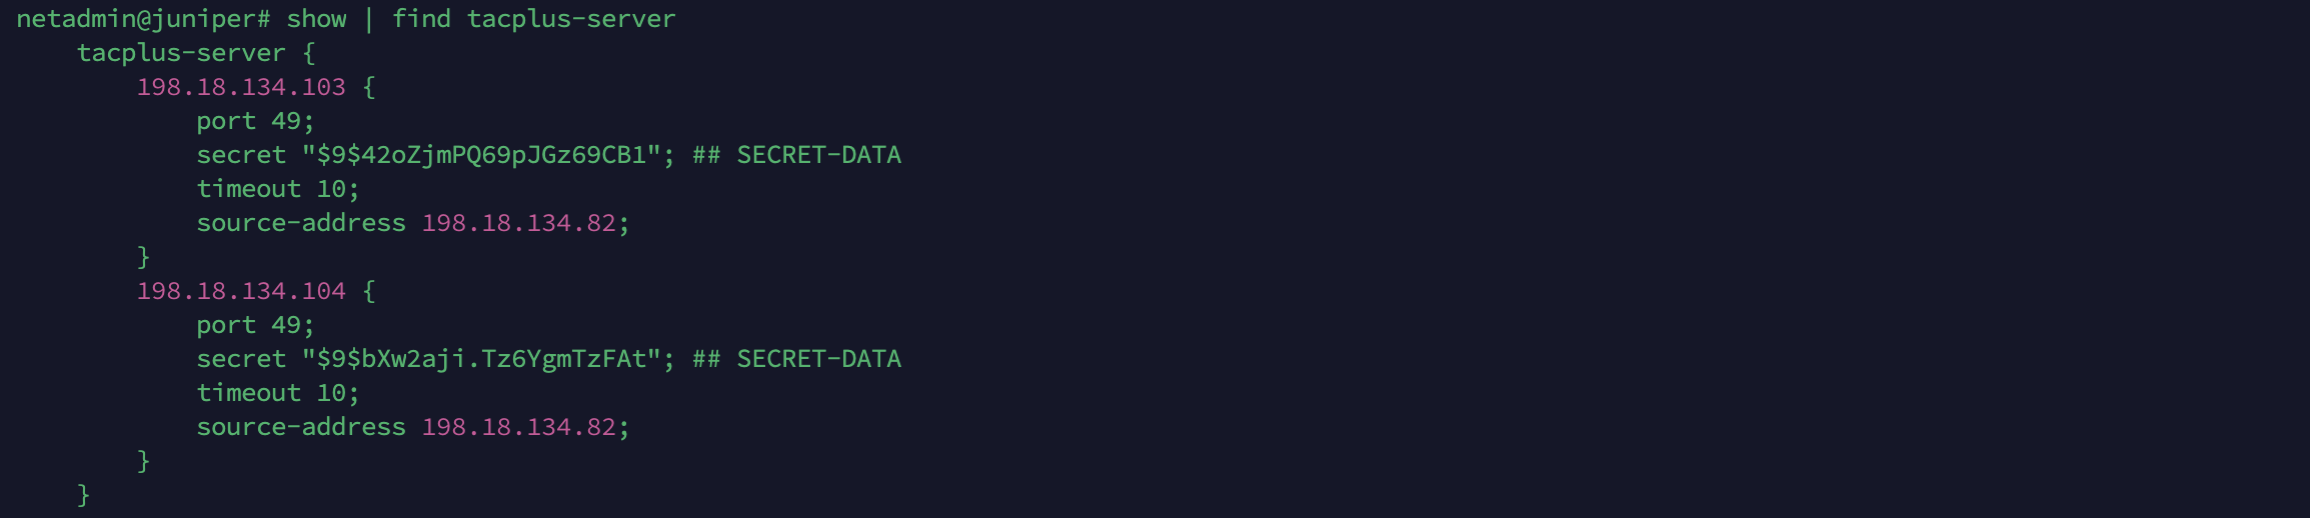
Then add the ISE as the tacacs servers
1
2
3
4
5
6
7
8
9
10
11
12
13
set system tacplus-server 198.18.134.103 source-address 198.18.134.82
set system tacplus-server 198.18.134.103 port 49
set system tacplus-server 198.18.134.103 timeout 10
set system tacplus-server 198.18.134.103 secret helena
set system authentication-order tacplus authentication-order password

insert system tacplus-server 198.18.134.104 after 198.18.134.103

set system tacplus-server 198.18.134.104 source-address 198.18.134.82
set system tacplus-server 198.18.134.104 port 49
set system tacplus-server 198.18.134.104 timeout 10
set system tacplus-server 198.18.134.104 secret helena
set system authentication-order tacplus authentication-order password
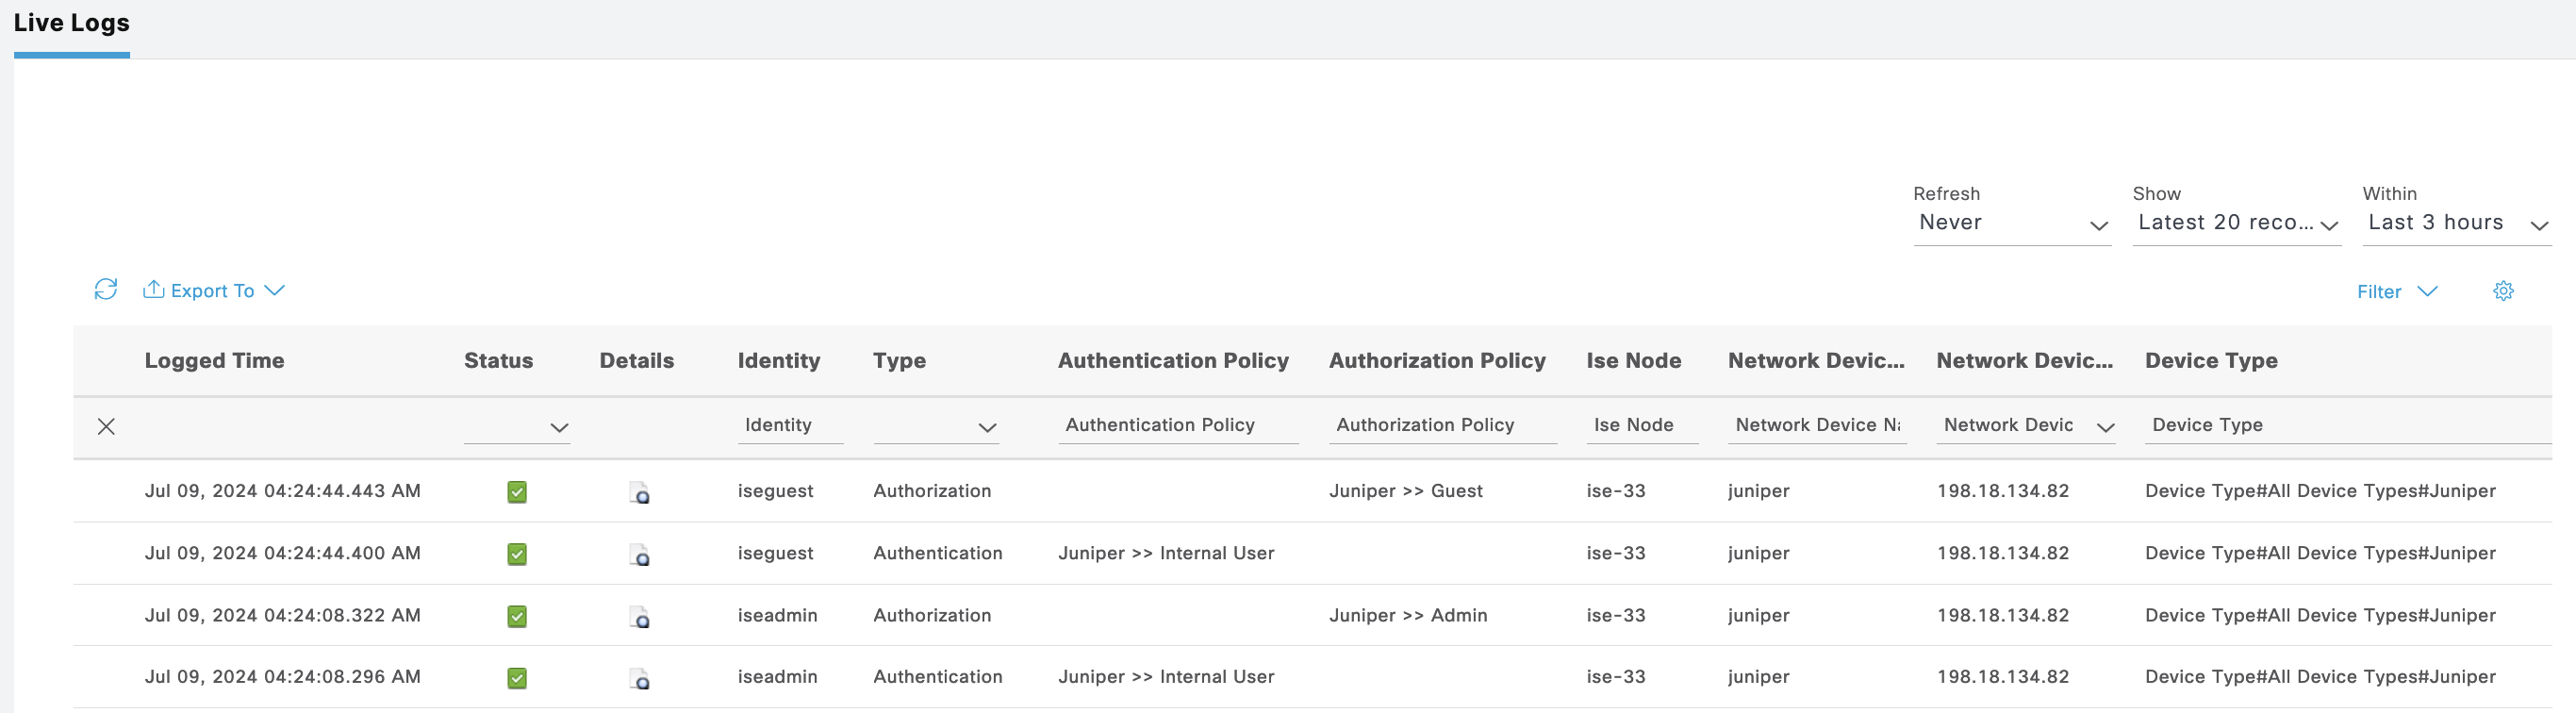
That should do it, logging in with iseadmin grants us the RW-CLASS permission

And loggin in with iseguest grants us RO-CLASS permission

The ISE Live Logs shows the authentication made by these 2 users on Juniper
Check Point
Here we create another Policy Sets for Check Point
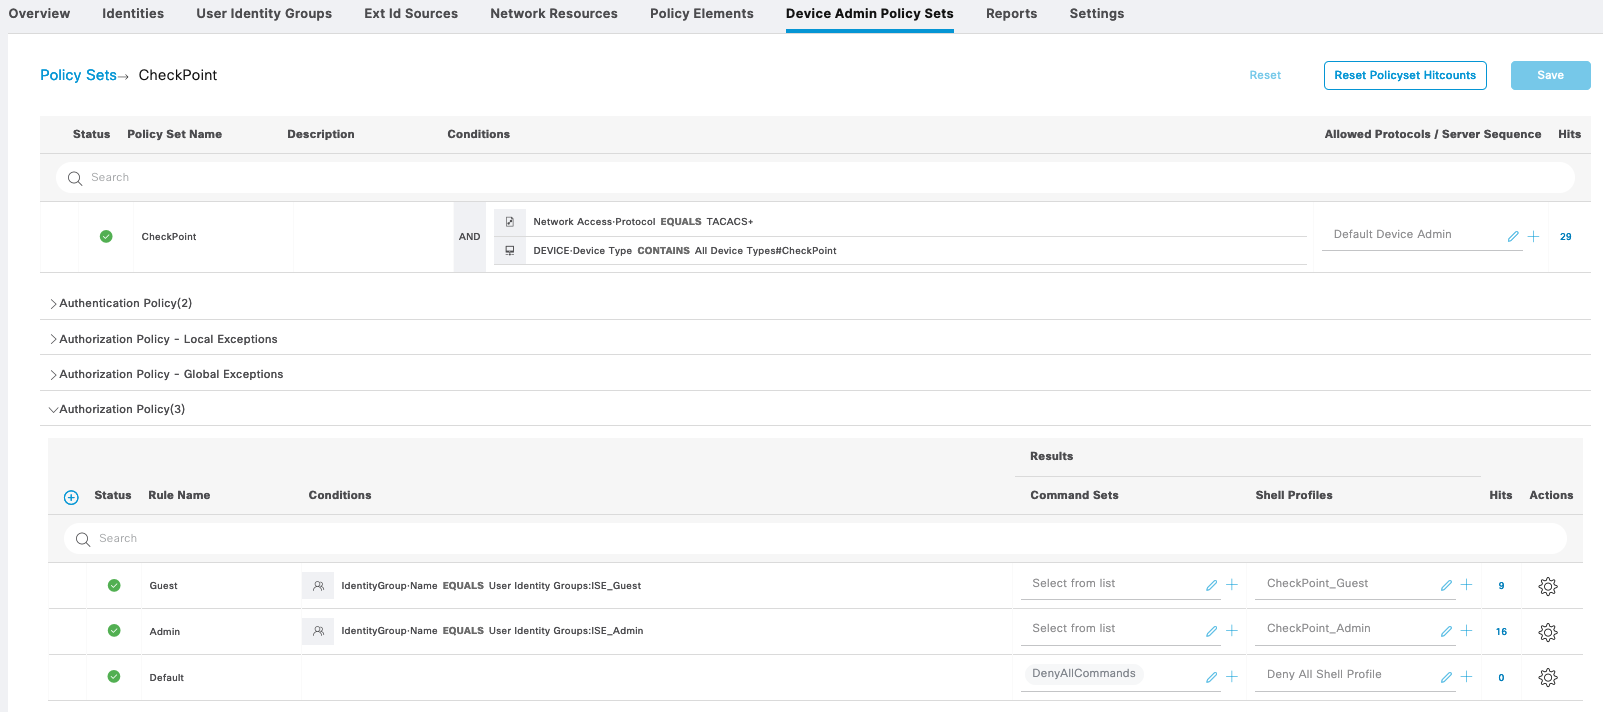
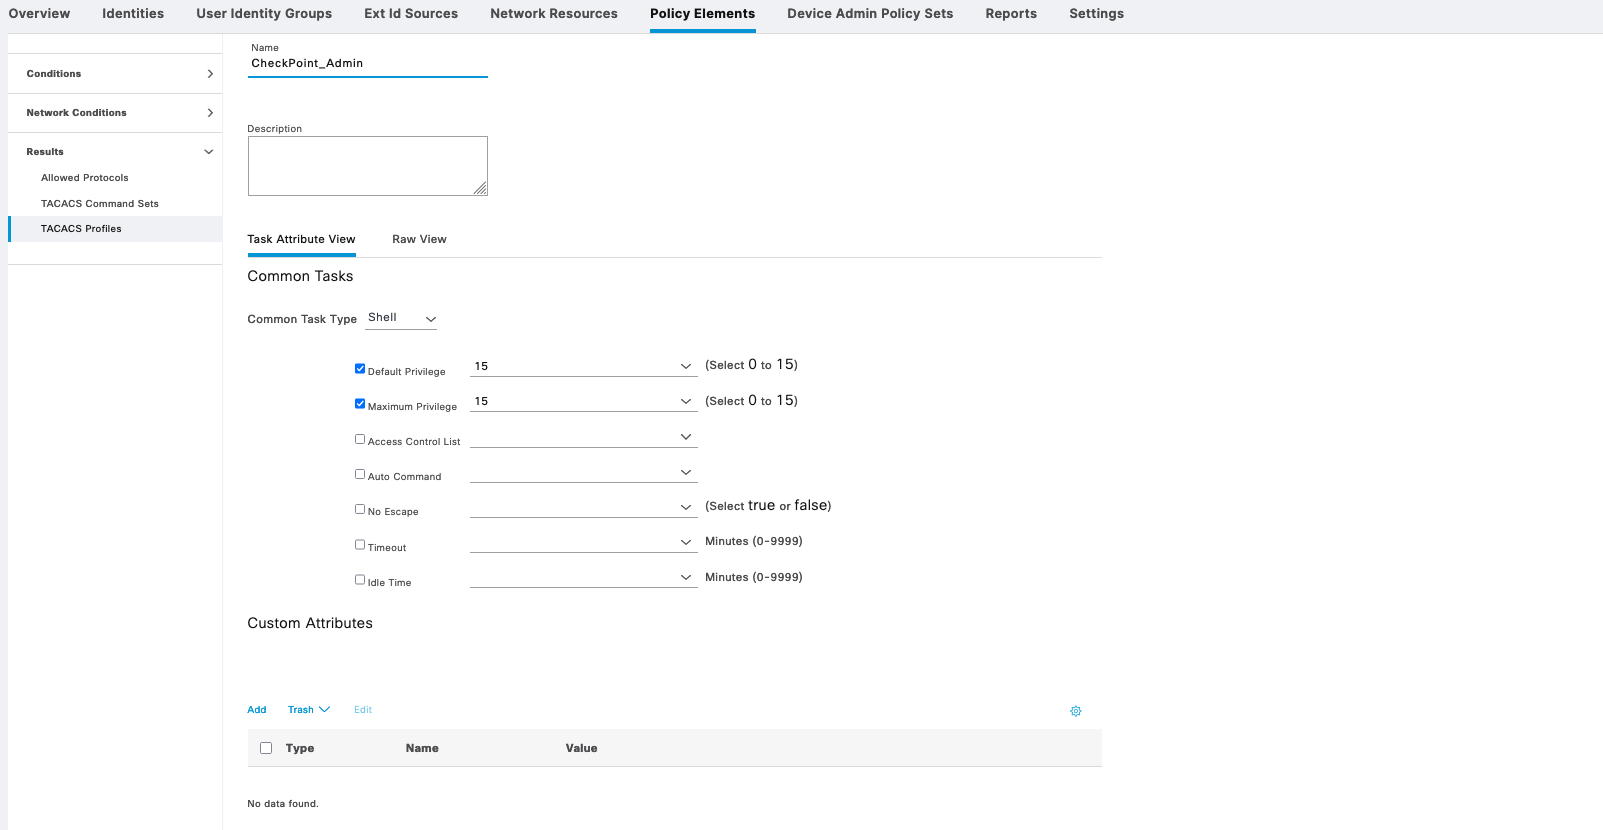
Then we give each of the Shell Profile its appropriate privilege level

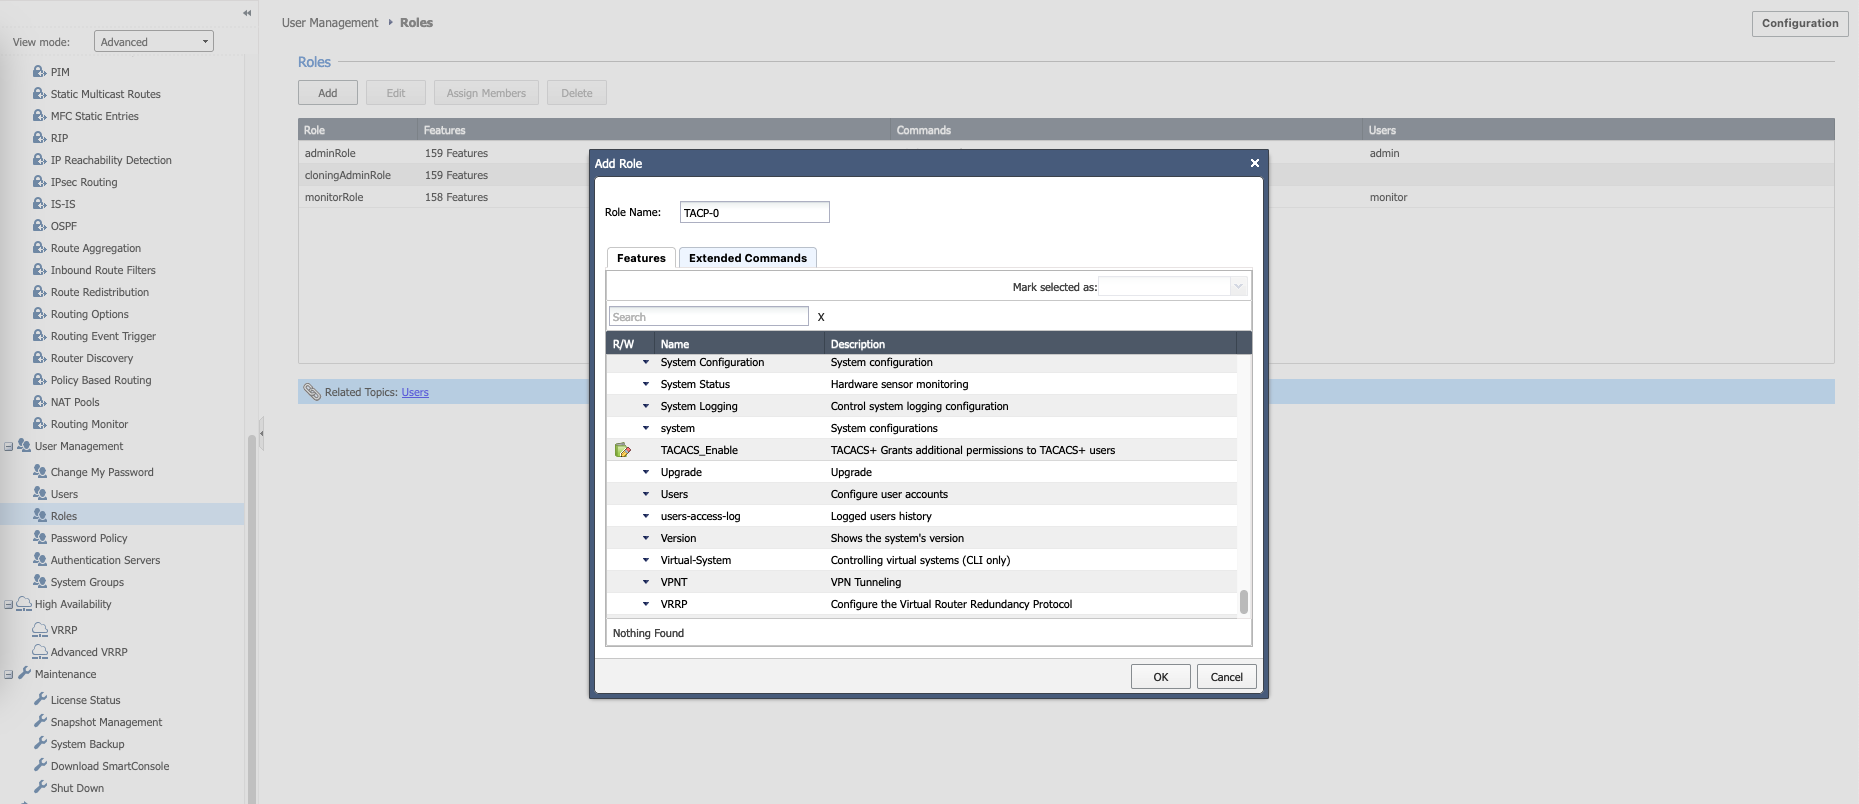
On the Checkpoint, on User Management » Roles, create a new role named “TACP-0” with only “TACACS_Enable” feature. This will be the default access for any user authenticating through tacacs, where then this user will be able to escalate the privile to TACP-15 through “tacacs_enable” if their permission allows
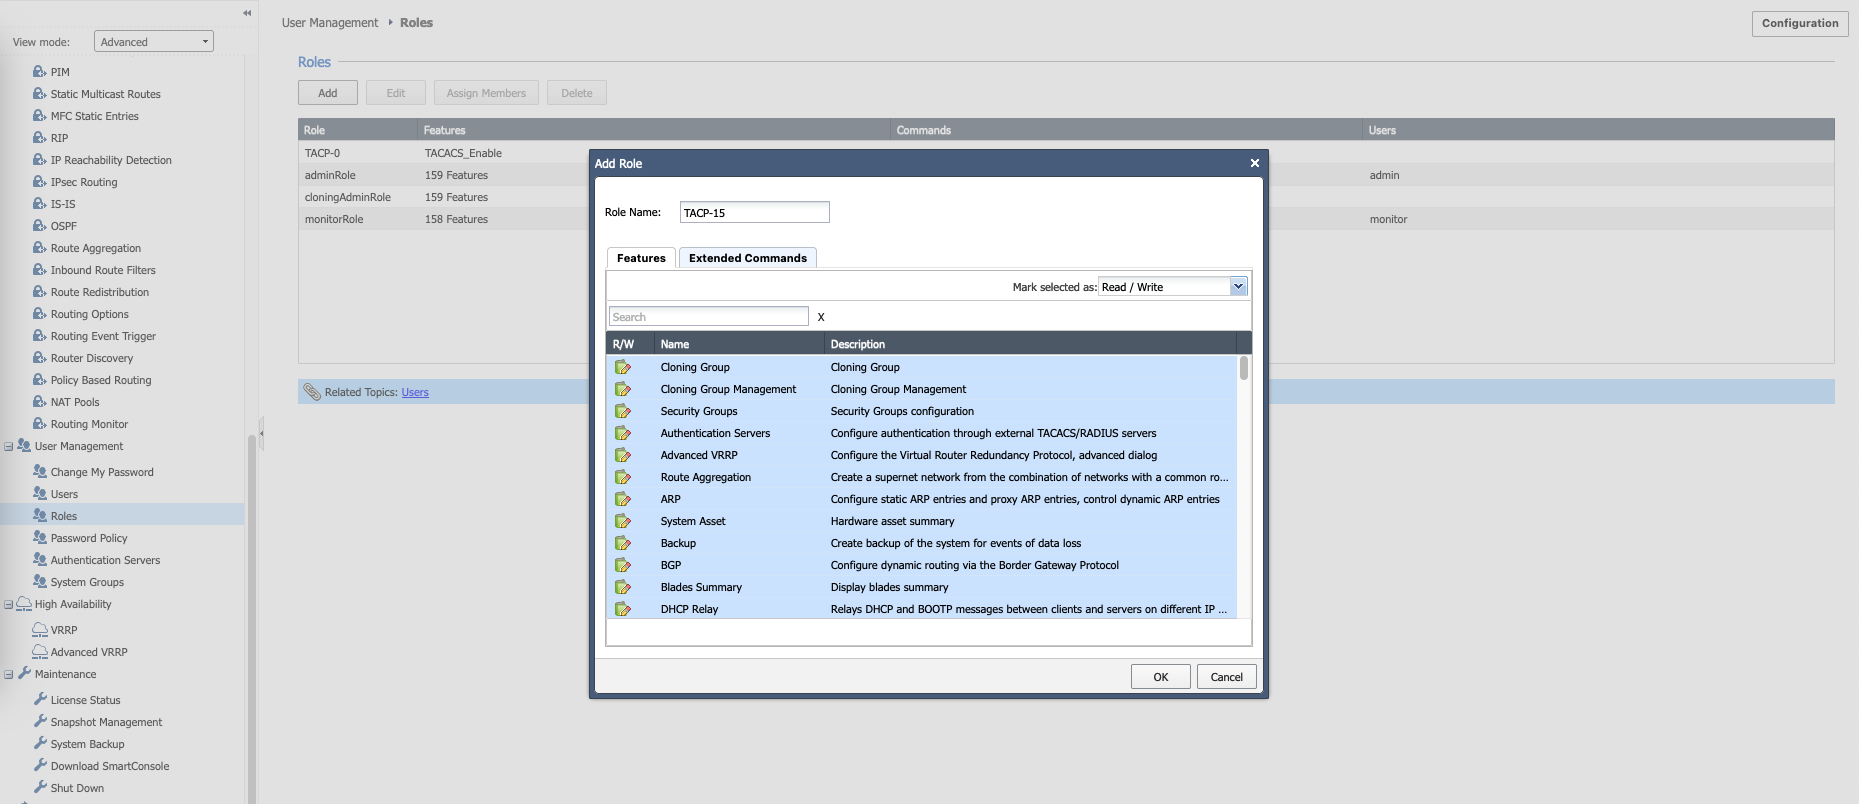
Then create another role named “TACP-15” with all features and commands checked. This will be the full fledged super admin user that can access basically everything
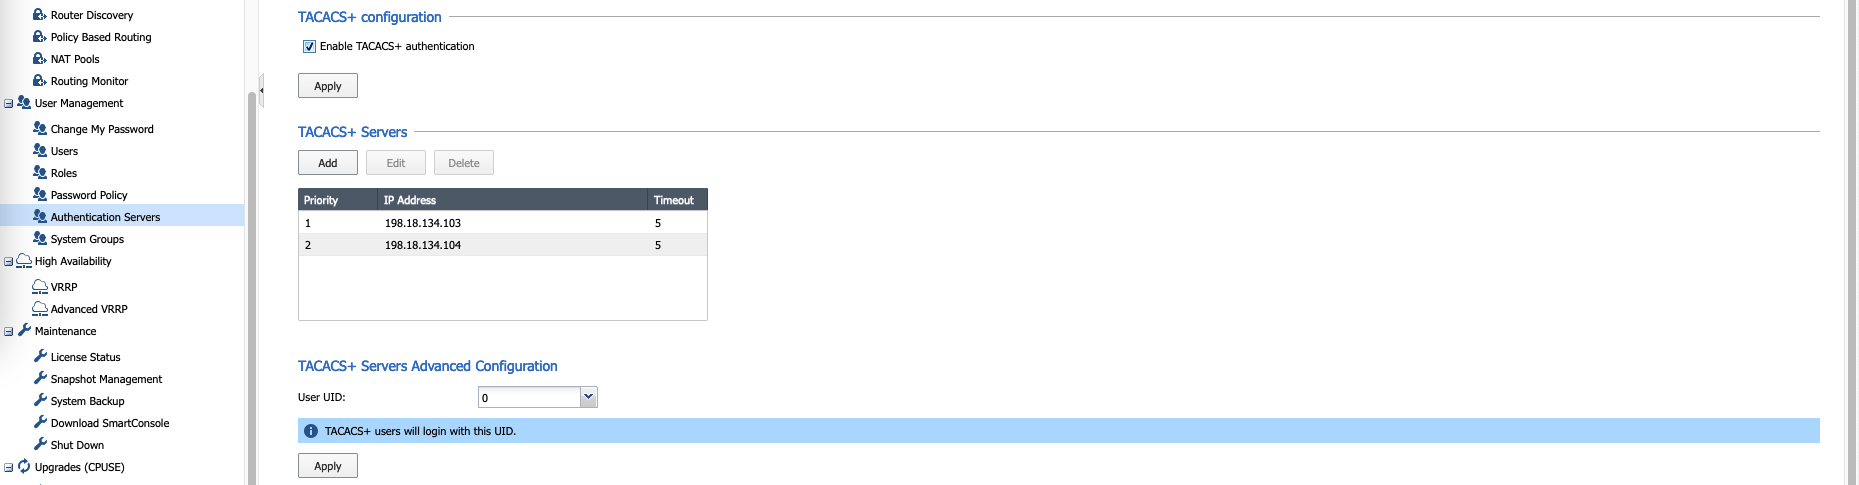
Next on Authentication Servers, add the ISE Servers and enable TACACS+
Now if we login with iseadmin, we’ll be given TACP-0 role by default, which we can escalate by clicking TACACS+ Enable
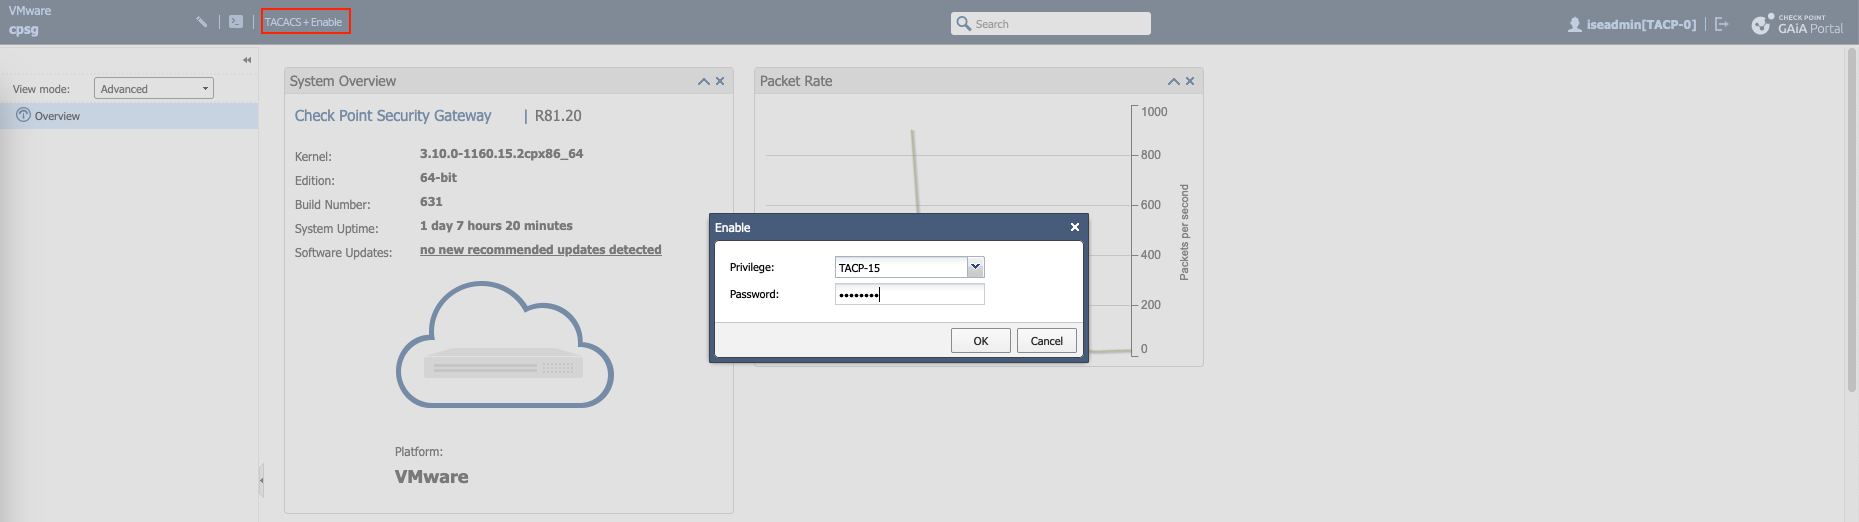
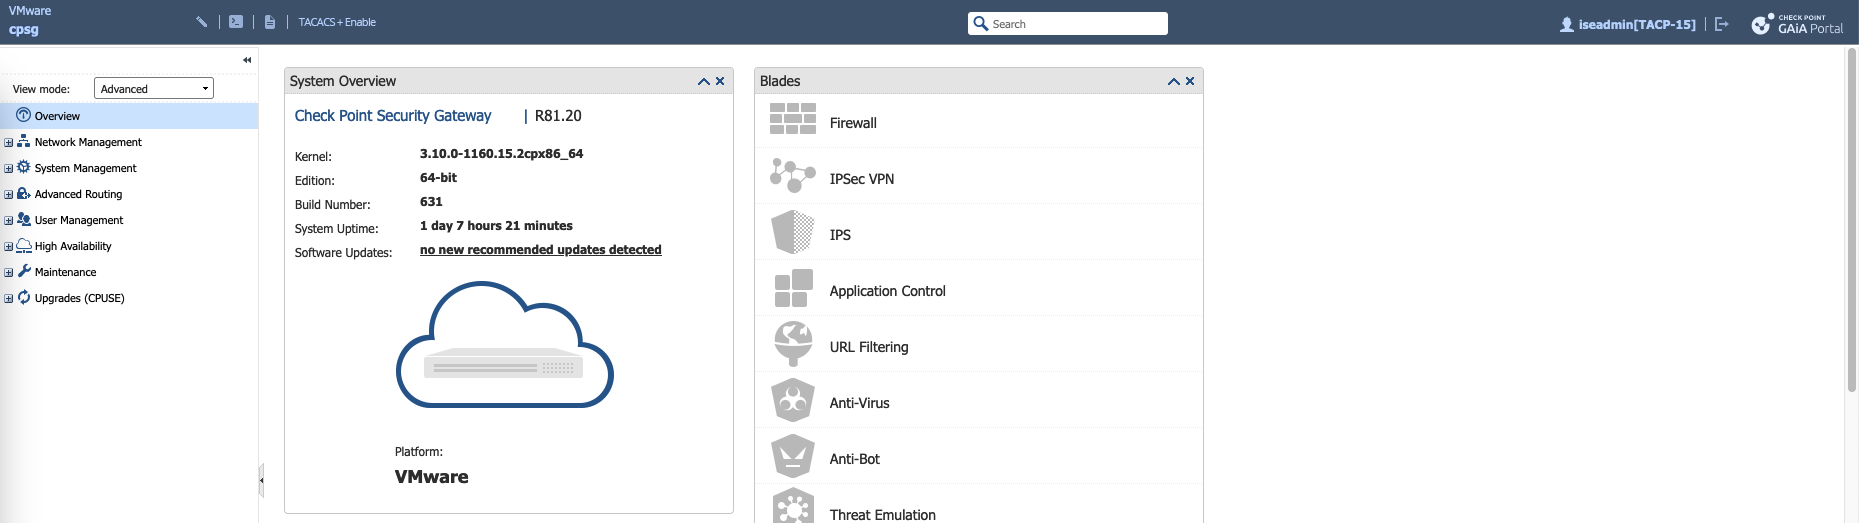
And after that we now have TACP-15 role
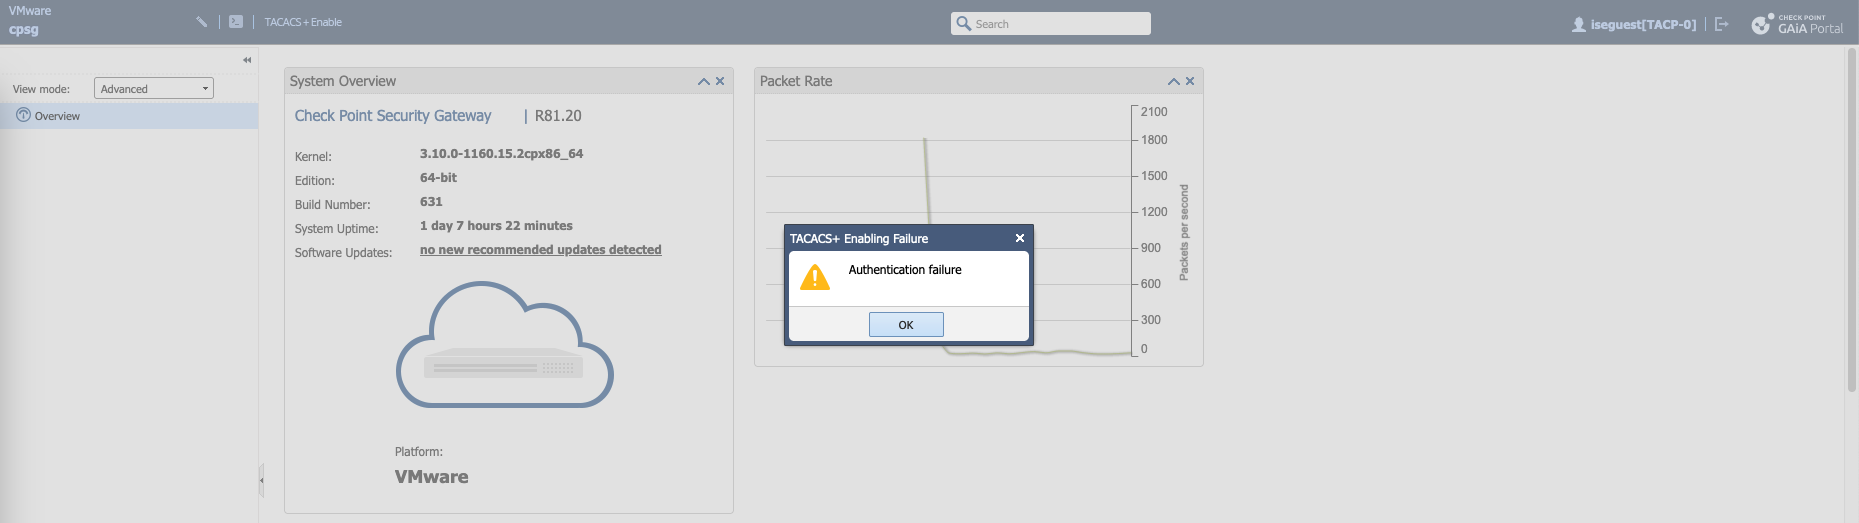
If we login with iseguest, we’ll also be given TACP-0 role by default, but we don’t have permission to escalate the privilege to TACP-15
The same goes if we connect to CLI through SSH


And all the authentication logs can be viewed on Cisco ISE Tacacs Live Logs
Palo Alto
On ISE, create a new Policy Set to handle traffic from Palo Devices

We also create 2 Tacacs Profiles with an attribute “PaloAlto-Admin-Role” and value of either “Read-Write” or “Read-Only”, following the value of created Admin Roles on Palo Alto

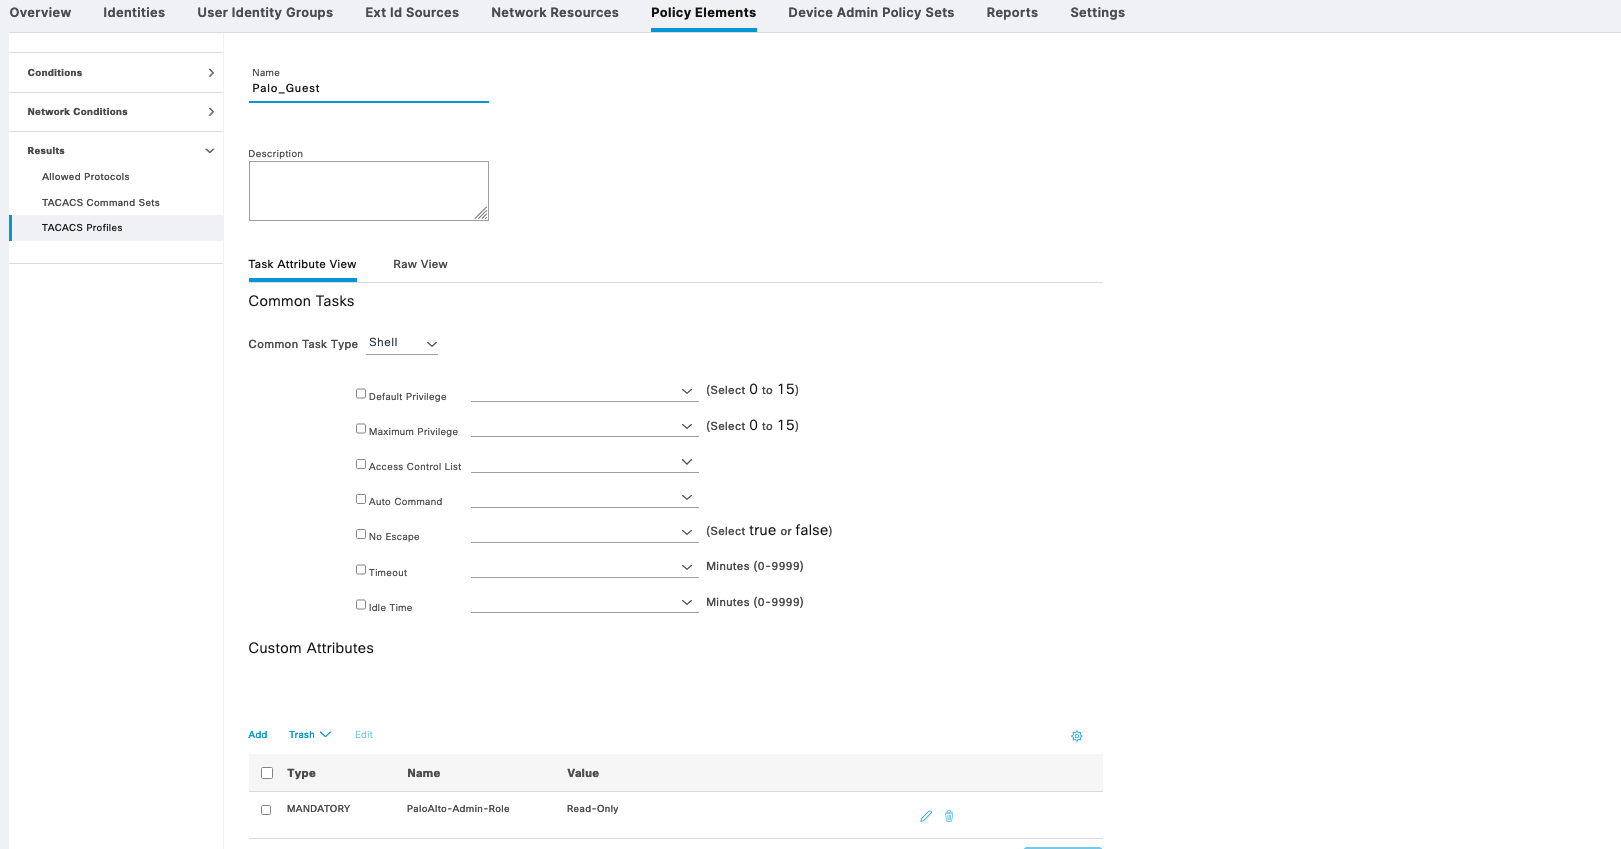
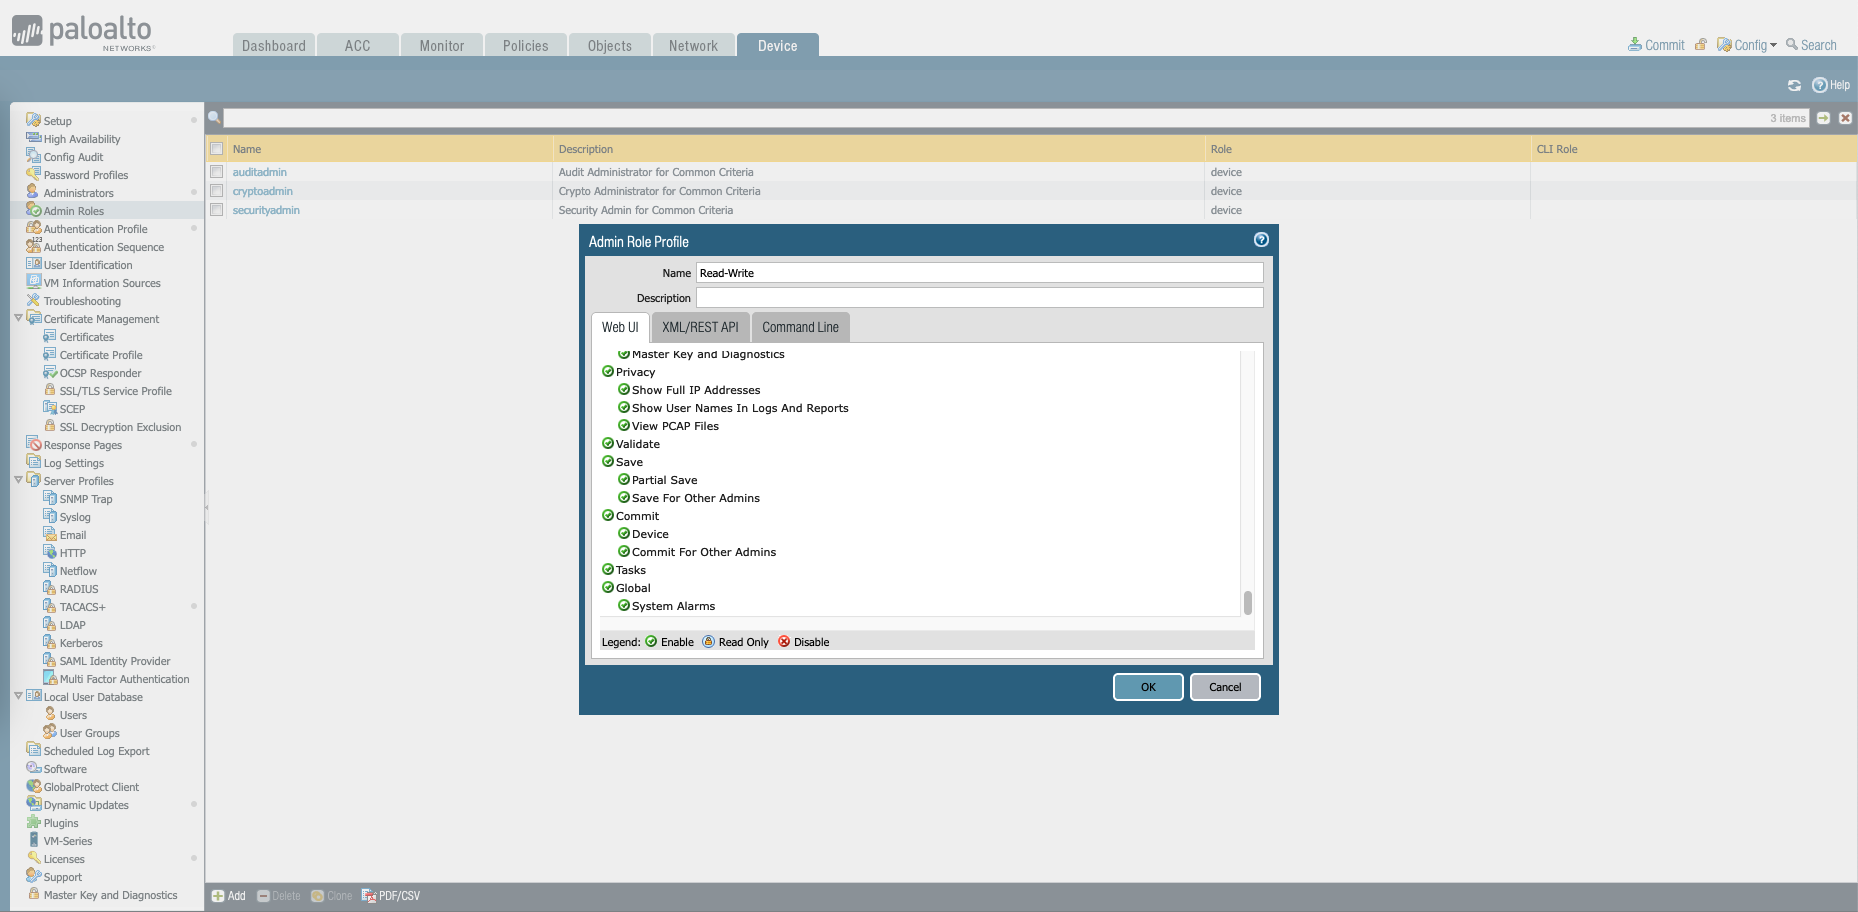
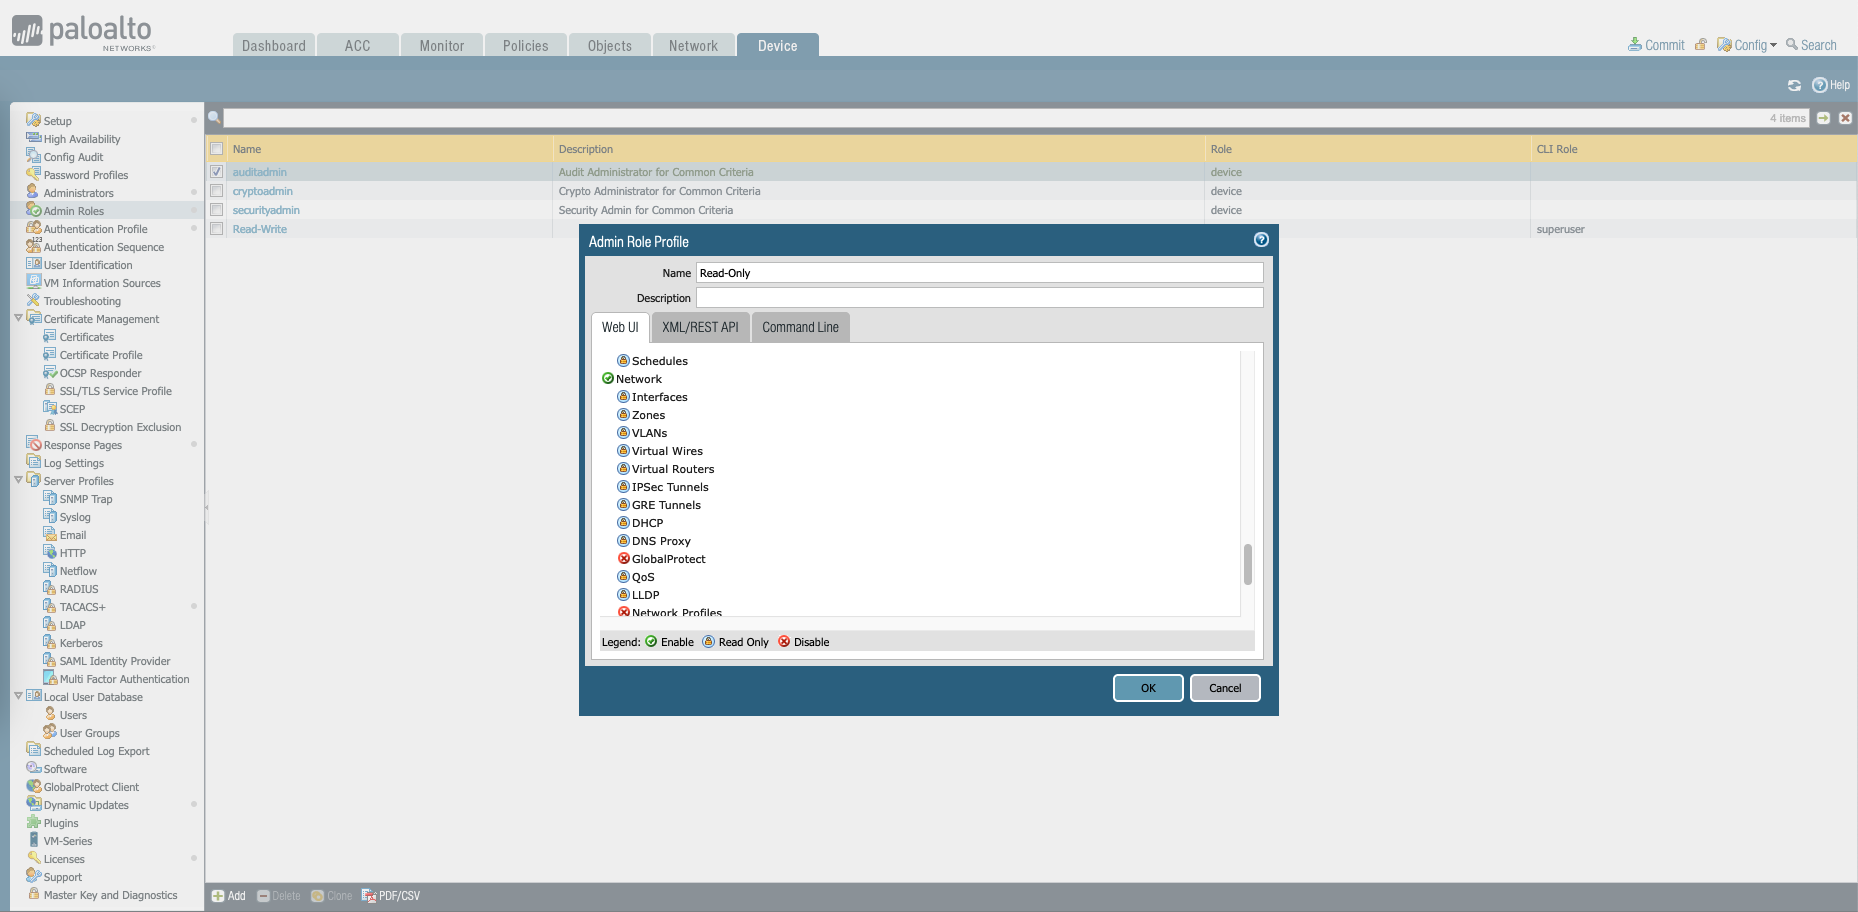
On the Palo Device, create two Admin Roles for Read-Write and Read-Only roles
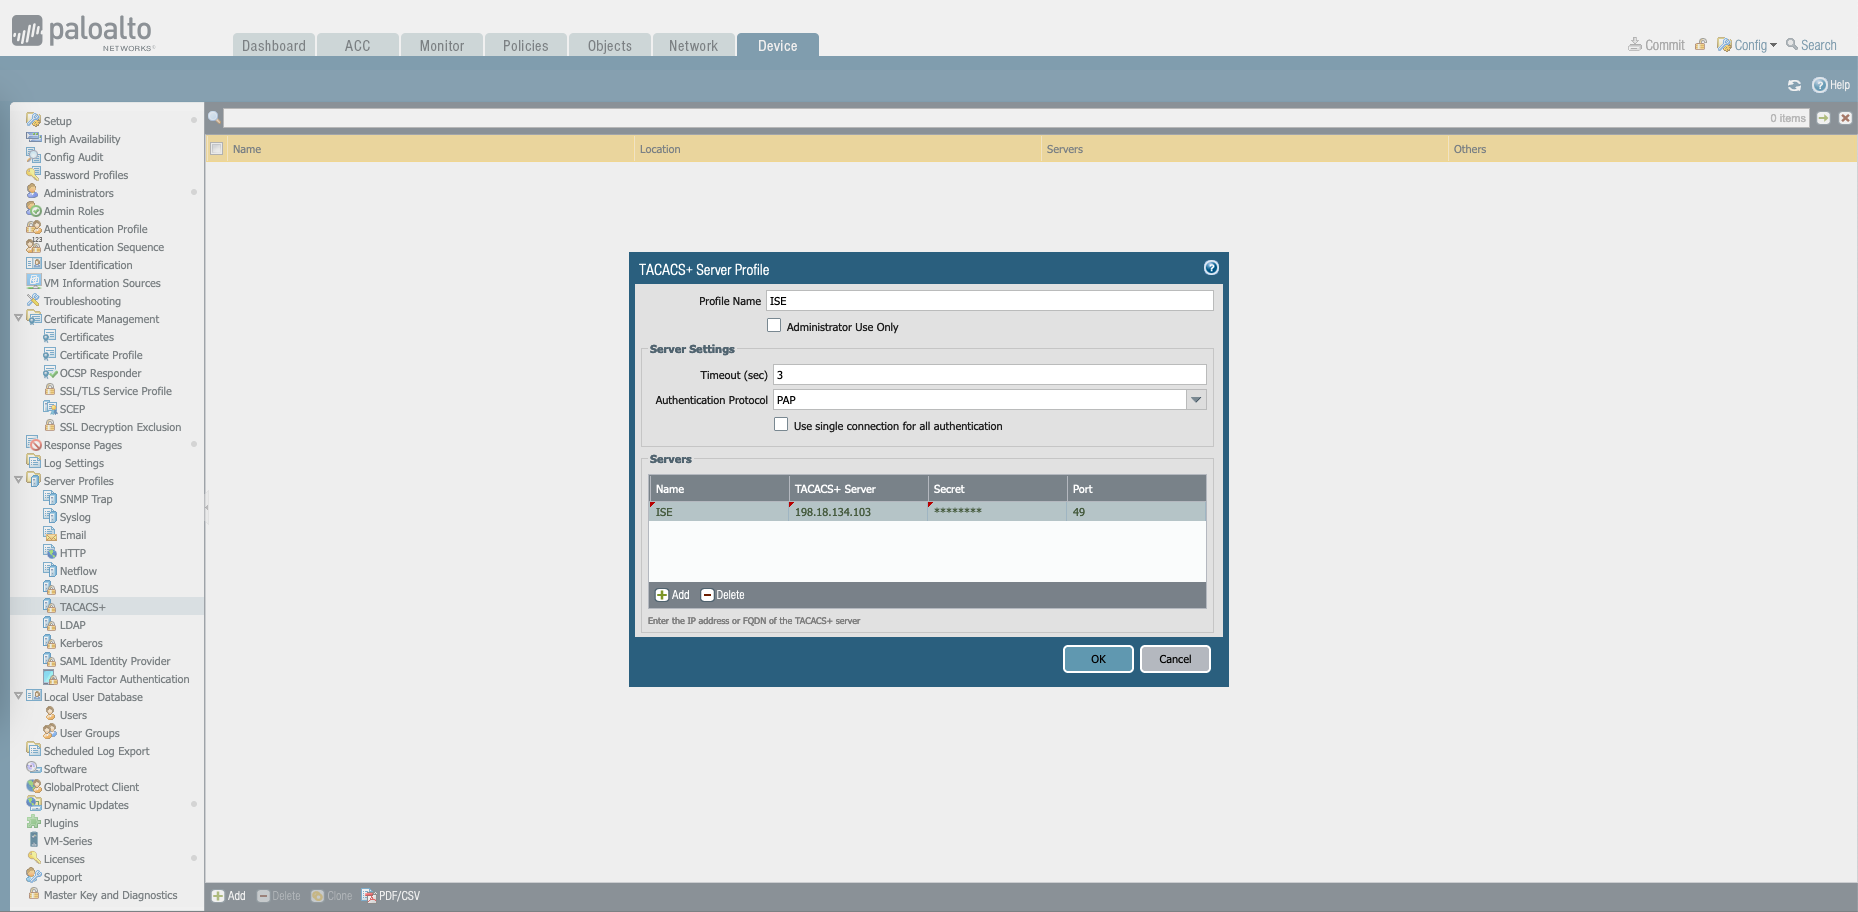
Then on Device » TACACS+, create a new profile containing the ISE servers
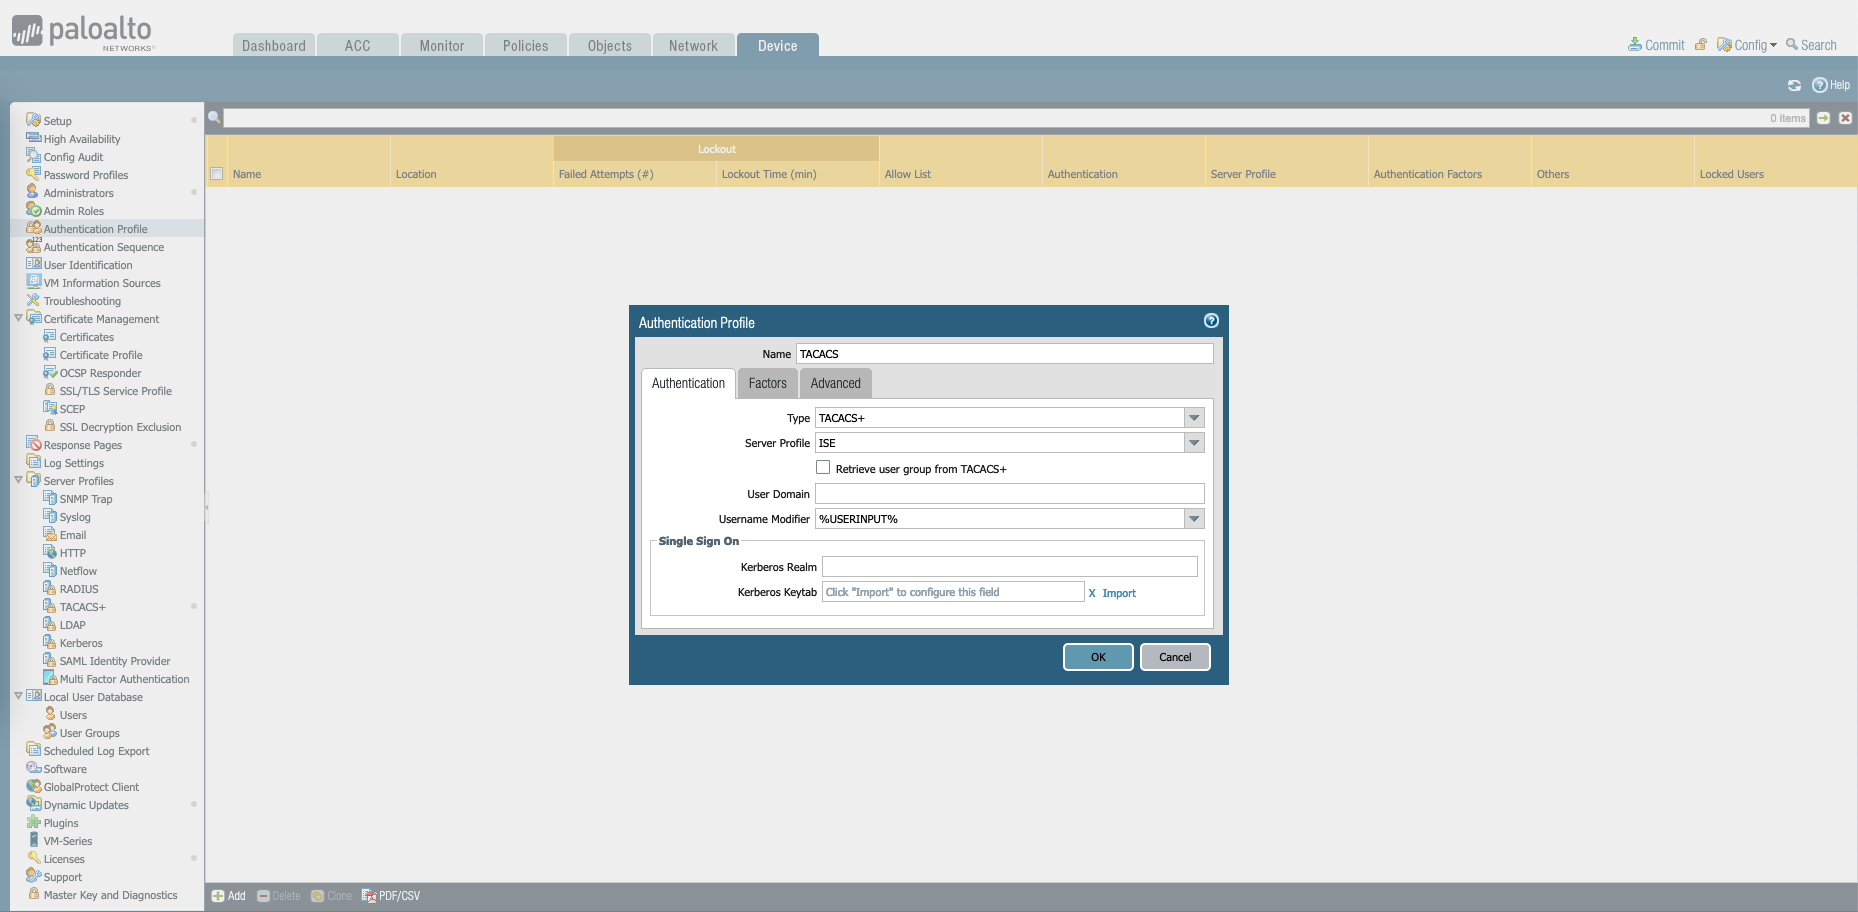
Then on Authentication Profile, create a new Profile with type of “TACACS+” and the Server Profile created just now
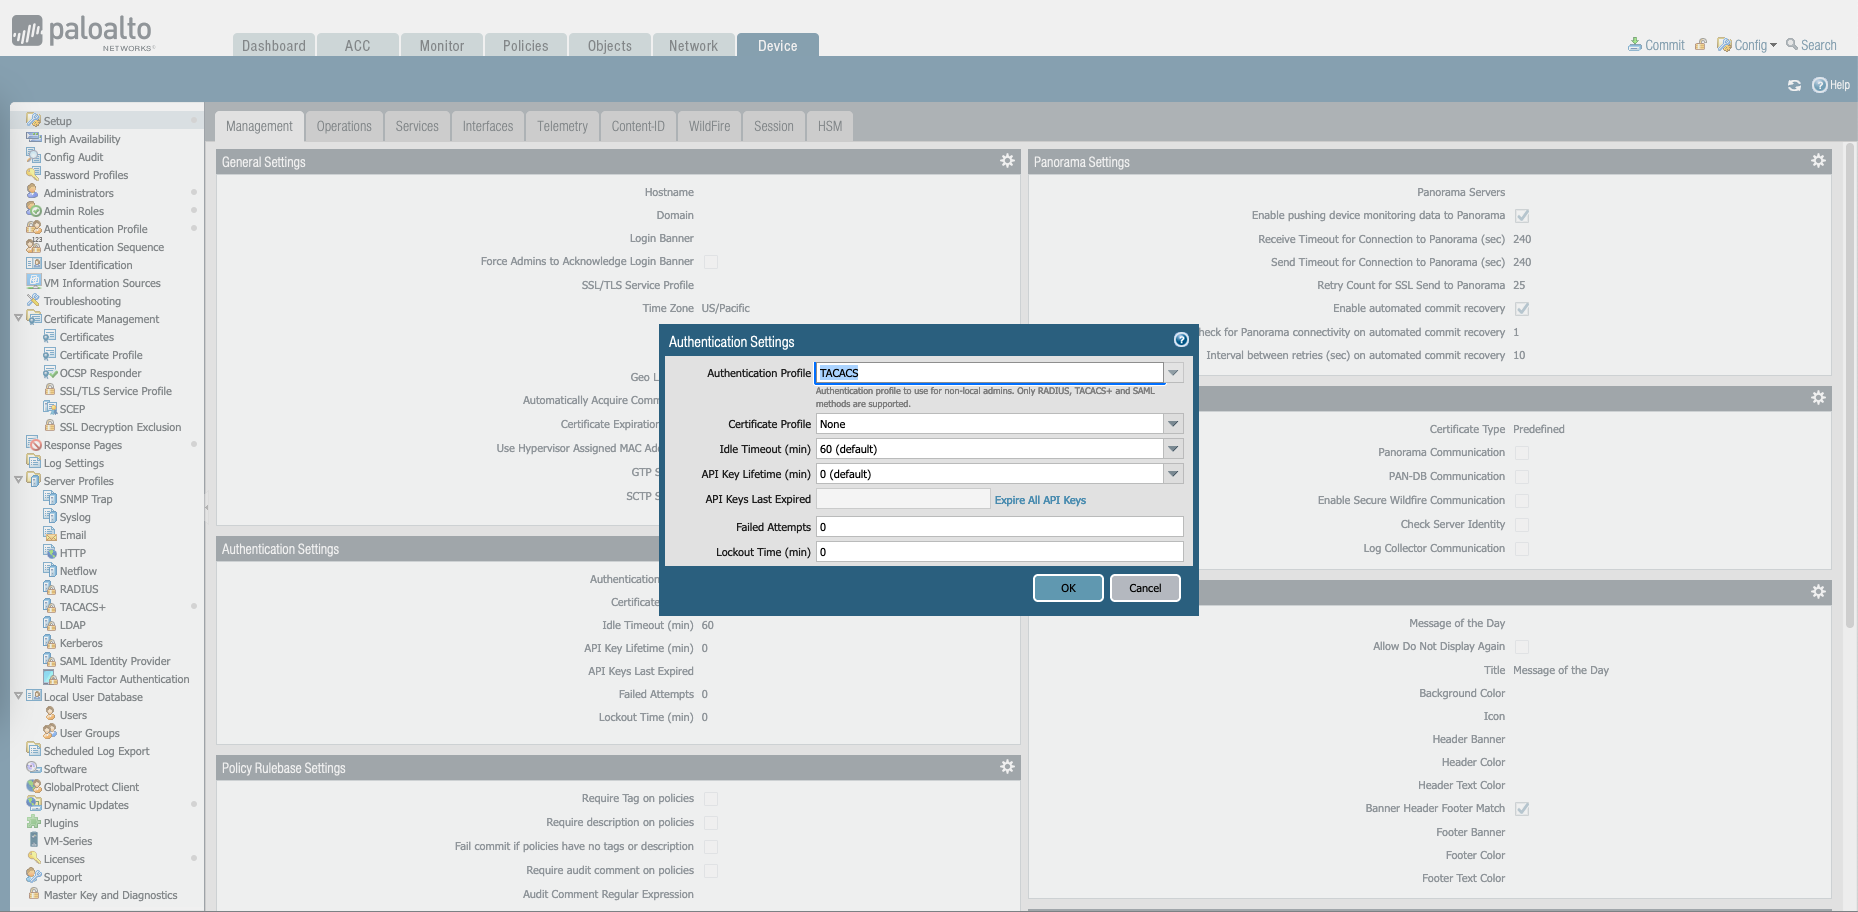
Finally on Device » Setup » Authentication Settings, select the Authentication Profile
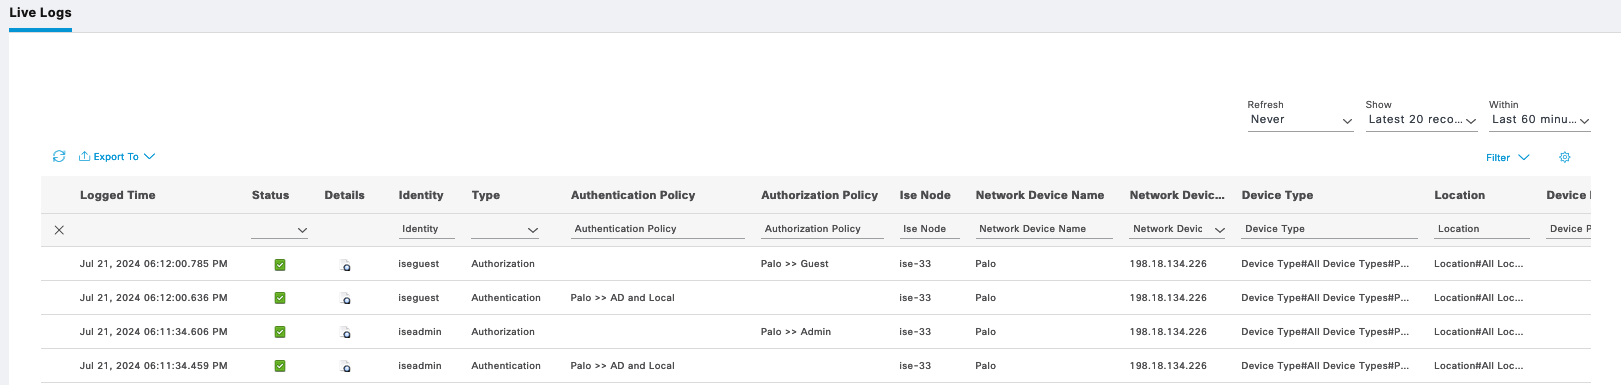
Now we can login to the Palo Device using the “iseadmin” with “Read-Write” role

And using the “iseguest” with “Read-Only” role

On ISE we can see the logs for these authenticating users